

In a previous blog post I put together a step-by-step guide on how to put together the hardware for a Raspberry Pi controlled LED strip. In this post I will focus on the software that's needed to control the lights
As I discuss in the first blog post, I am using a Raspberry Pi 3 Model B which is running Raspbian.
Getting Started
First, let's install the required libraries:
sudo pip3 install rpi_ws281x adafruit-circuitpython-neopixelOut-of-the-box examples
The rpi_ws281x repository contains a few examples of how to use the rpi_ws_281x library to control the light strip.
Try the strandtest.py script:
git checkout https://github.com/jgarff/rpi_ws281x.git
cd rpi_ws281x/python/examples/
sudo python3 strandtest.py
Interacting with the light strip requires you to run your python scripts with sudo so that the process has the correct permissions to interact with /dev/mem. If you forget to run the script with sudo you are likely to see an error like this:
Can't open /dev/mem: Permission denied
Traceback (most recent call last):
  File "strandtest.py", line 91, in <module>
    strip.begin()
  File "/usr/local/lib/python3.7/dist-packages/rpi_ws281x/rpi_ws281x.py", line 131, in begin
    raise RuntimeError('ws2811_init failed with code {0} ({1})'.format(resp, str_resp))
RuntimeError: ws2811_init failed with code -5 (mmap() failed)
Segmentation fault
sudo.At this point you should now have a working LED light strip that you can control using the out-of-the box examples.
Using a Redis queue to control the lights
I didn't want to be constrained to only controlling the lights from my Raspberry Pi. Ideally, it would be good if I could control them from my desktop, my iPad or something else.
As a result, I have implemented a simple controller on the Raspberry Pi that using PyRSMQ to listen to messages published to a Redis Queue. When the controller picks up a message it will execute a series of rpi_ws281x instructions dependant on the message payload.
For example, the lights can be set to a solid purple colour by issuing the following message to the queue:
{"type": "solid-colour","r": 128, "g": 0, "b": 128}The code for this is simple and straightforward, I have made is publicly available in my home-office-lights repository.
At present, there are two significant files in that repository:
strip_manager.py
Strip Manager interacts directly withrpi_ws281xand provides a layer of abstraction betweenrpi_ws281xand the rest of the codebase.home_office_lights.py
This is the main message loop that runs as a service on the Raspberry Pi. This script can also be using in a client mode to send messages to the Redis Queue.
Controlling lights from the iPad
I have written before about how Python code can be run on an iPad using Pythonista. I have put together a simple script (some 50 lines of code) and a GUI that will allow me to control the solid colour mode of the LED strip:
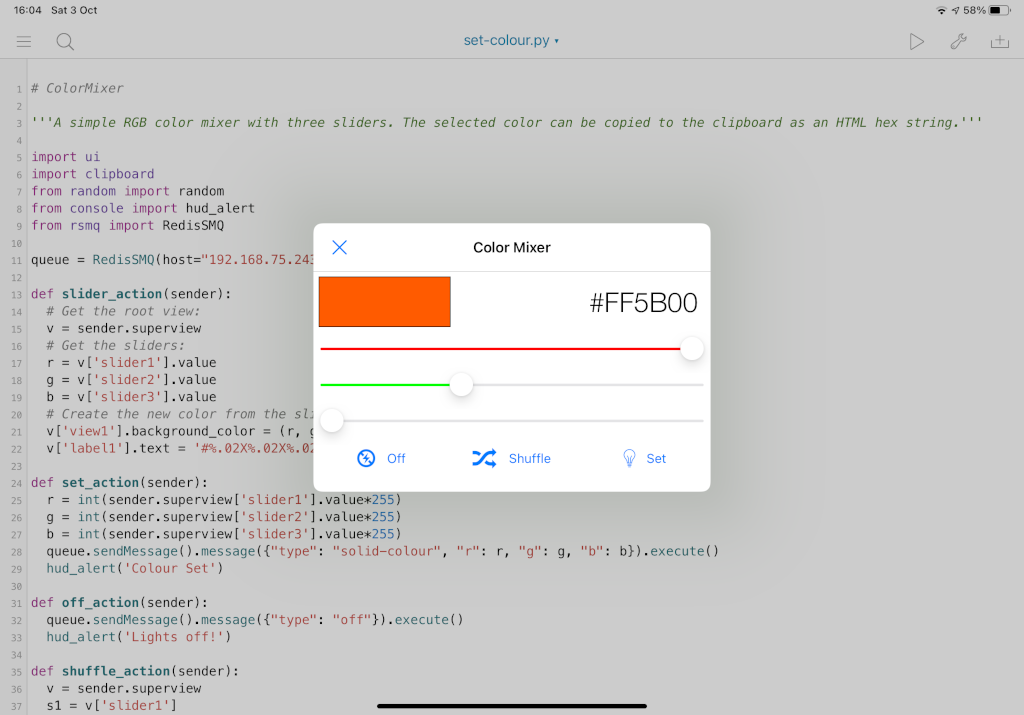
The script and GUI file for this is in the ipad folder of the repository.
Conclusion
Setting up rpi_ws281x and using it to control the lights is fairly straightforward! Within a couple of hours you can easily plan with demos, write your own controller and issue commands to it from your iPad.
Just in case this all wasn't gimmicky enough, I plan to figure out a way to control the lights using a motion sensor so that they turn on when I enter the room, and turn off automatically after a period of inactivity.
