
Home Assistant has been around for years, but I've never given it a try until now. With smart devices becoming more prevalent and affordable I wanted a better way to control all the smart devices I have as well as putting in some cost effective smart sensors.
Smart devices often suffer from vendor lock-in where devices from one vendor will work well with each other but not so well with those manufactured by someone else.This is where Home Assistant can come into its own and act as the glue to hold everything together.
Before starting this project I had a few typical smart devices:
- Amazon Echos
Various different Amazon Echo devices - evohome multi-zone thermostat
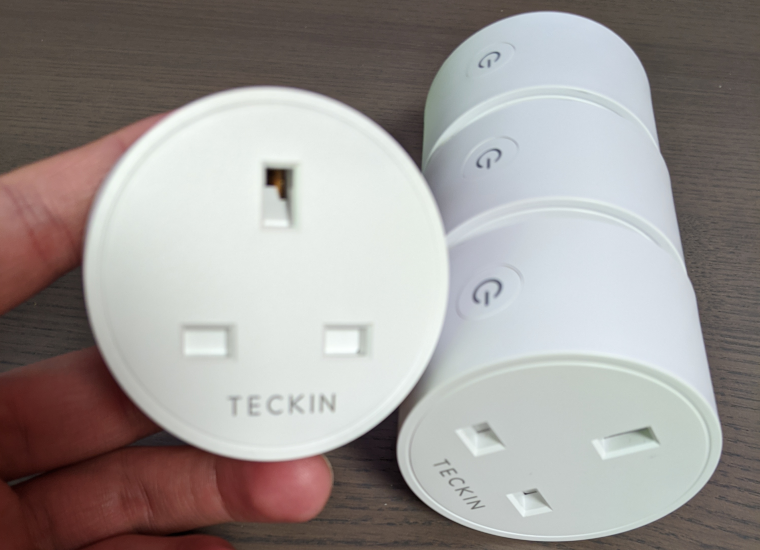
Thermostatic radiator values that allow temperature to be controlled per room - Teckin smart plugs
Used to control various lamps and other appliances
The Goal
The goals for this project are fairly simple:
- Setup Home Assistant
- Find a cost effective solution for smart sensors
- Integrate existing smart devices into a centralised system
- Use smart sensors to control smart plugs
- Build out a centralised dashboard to control any automation
The Hardware Requirements
Home Assistant can easily run on a Raspberry Pi, and with the latest Pi 4 specs the devices a Raspberry Pi is more than up to the job.
I spent some time research other people's Home Assistant setups to see if I could find a low cost door contact and motion sensors. Eventually I stumbled across Xiaomi Aqara.
Aqara typically requires a centralised hub or gateway for the sensors to talk to. Aqara is Zigbee based and there are plenty of reports of people who have managed to use Aqara sensors with Home Assistant directly. Some kind of Zigbee bridge is needed like ConBee II, which is much cheaper than the Aqara Gateway. These sensor batteries are also suppose to last for 2 years before needing to be replaced.
With my research complete, this was my shopping list:
- Raspberry Pi 4 Model B - 4GB RAM
Note: at the time of writing there are known issues with Home Assistant running on the 8GB RAM version of the Pi 4 - dresden elektronik ConBee II
- 2x Aqara Motion Sensor
- 2x Aqara Door/Window Sensor
And a few days later, the order arrives:
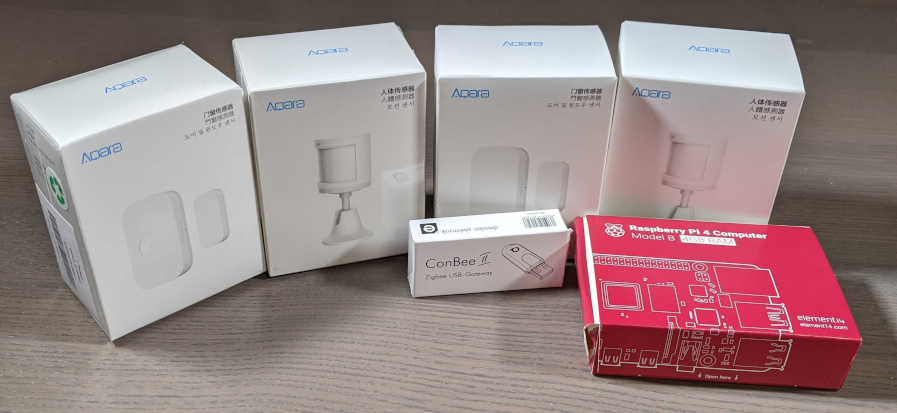
These sensors are fairly compact:

Now that we have the hardware, it's time to install Home Assistant.
Installing Home Assistant
The installation process for Home Assistant is well documented in the Install Home Assistant section of their documentation. As I'm going with a Raspberry Pi-based setup, I just need to download and flash the right image to the memory card.
During the first boot, Home Assistant will download any necessary updates that could take up to ~20 minutes.
Once Home Assistant has fully booted, you should be able to access it via your browser on port 8123.
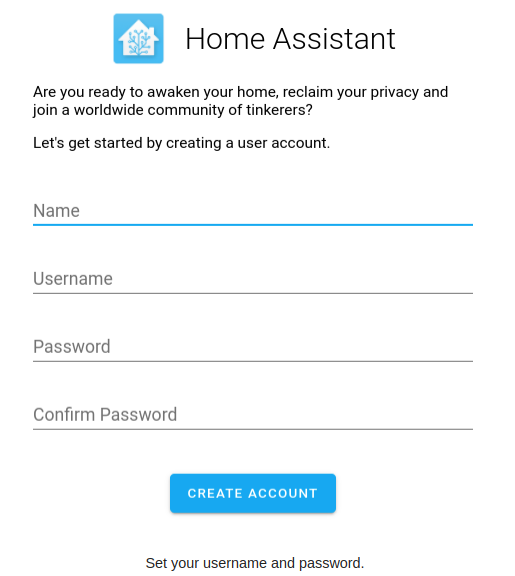
You will be guided through a series of onboarding screens, which will prompt you for a few details, including account setup information:
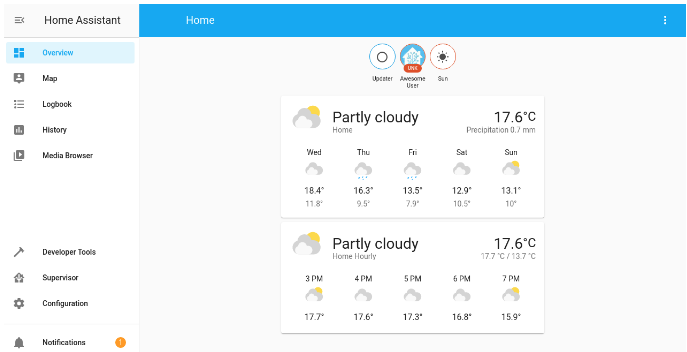
Once you've completed the setup, you'll be taken to the main dashboard:
Now we can start to tailor our Home Assistant to meet our needs!
Install deCONZ
The next thing to do is to try and get our Xiaomi Aqara sensors working with the ConBee II Zigbee bridge and Home Assistant – to do this, we will need deCONZ.
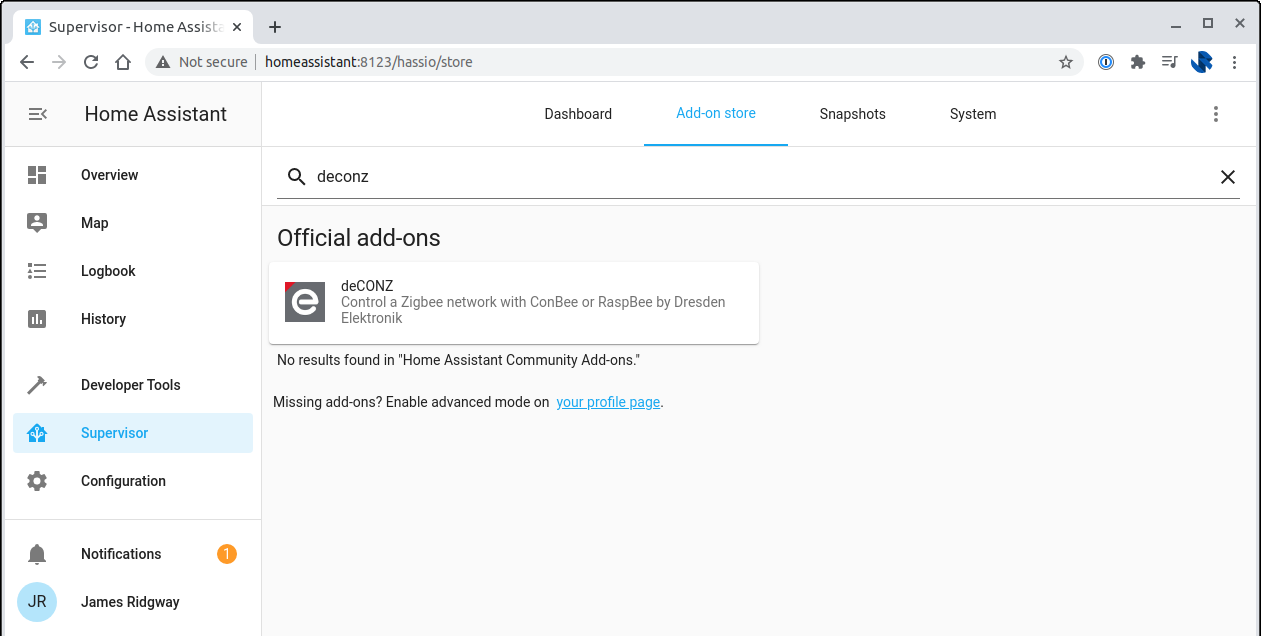
Navigate to: Supervisor > Add-on store
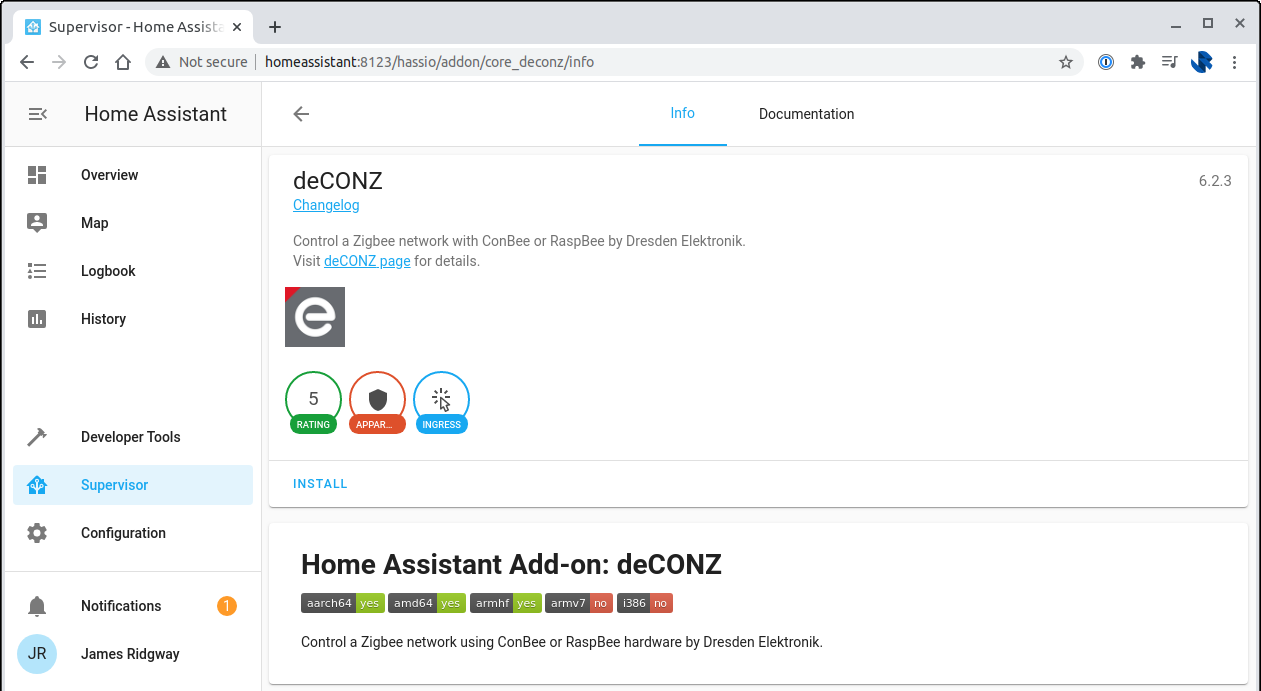
Search for deCONZ and install:
Once it has installed you should have the option to Turn on Watchdog and Show in sidebar, toggle both of these.
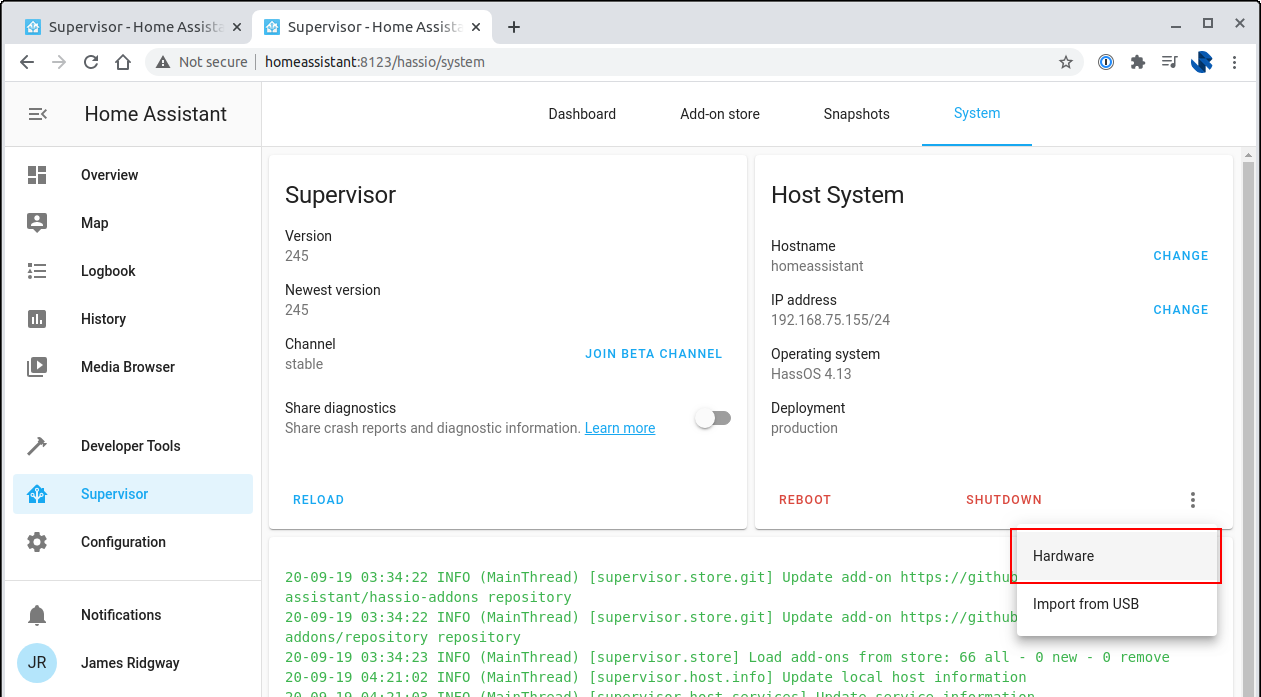
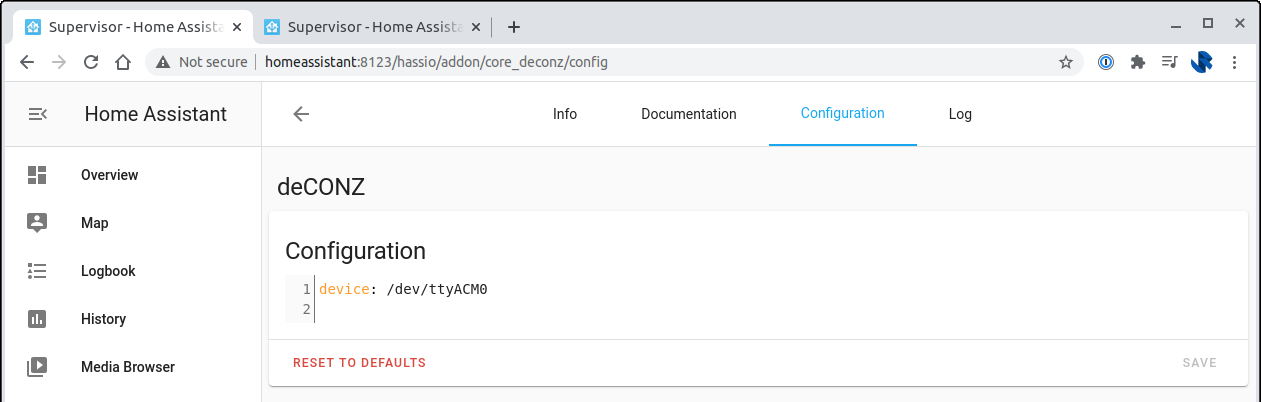
In a separate tab, go to Supervisor > System > Host system > Hardware and find serial device
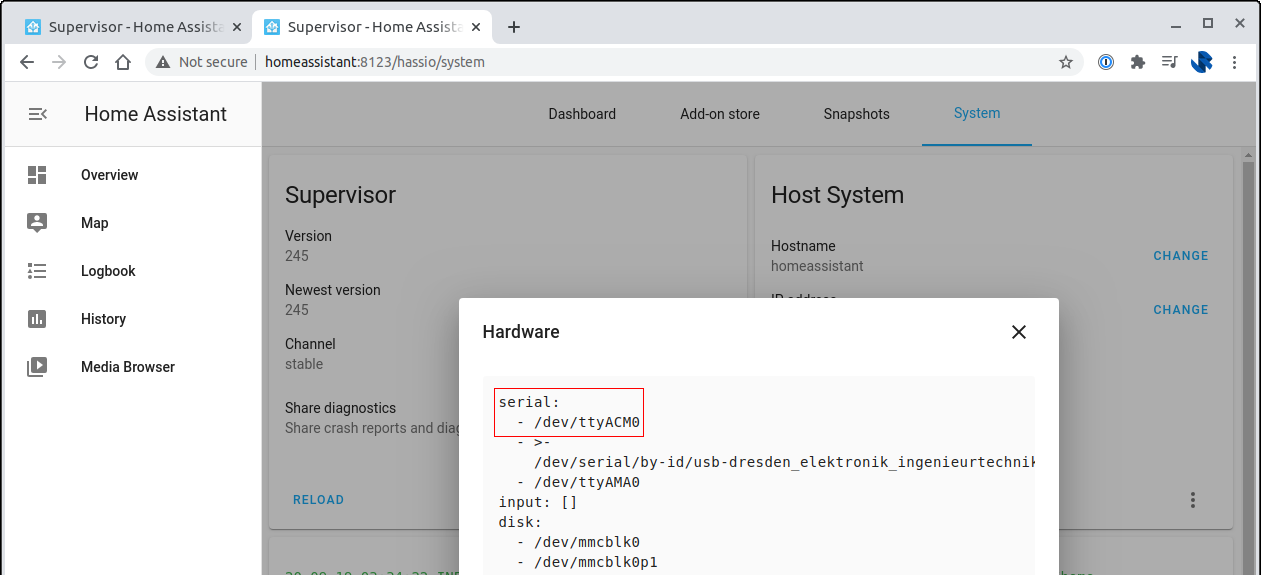
Go back to your deCONZ browser tab and fill out the device ID under the configuration tab and hit Save:
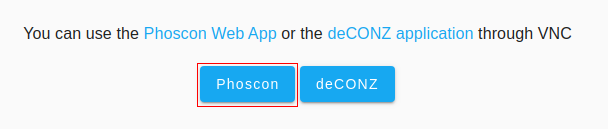
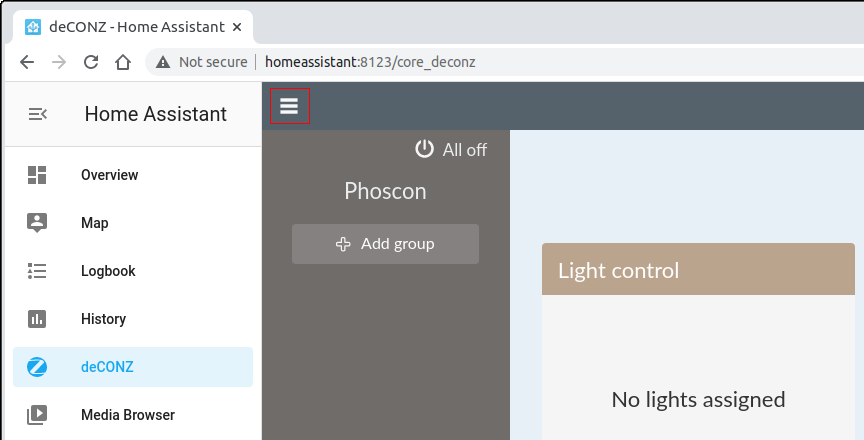
Open deCONZ from the left-hand menu and pick Phoscon:
The setup process will ask you to set a password. During the setup process, there should also be an option to Proceed without lights.
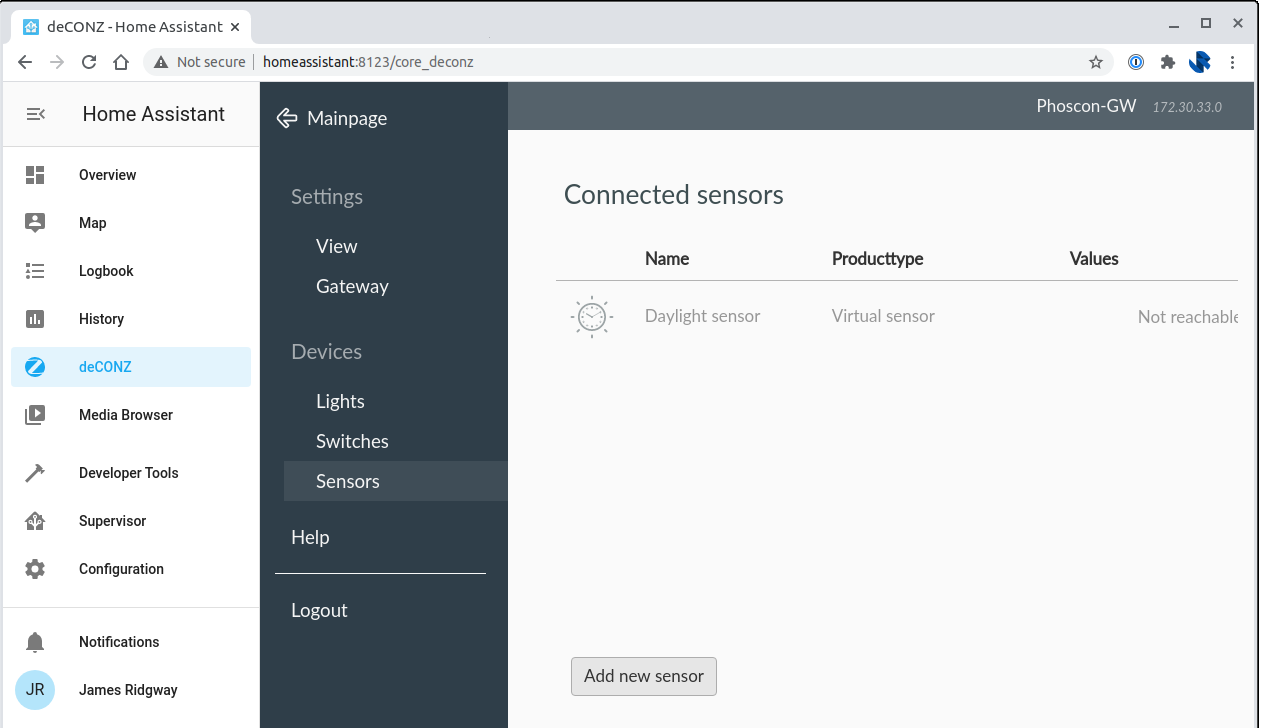
The area in Phoscon that we care about is the pop-out hamburger menu that will allow us to access and pair sensors:
Under the Sensors menu section we will be able to add and pair new Zigbee based devices.
Click on Add new sensor. When adding a Xiaomi Aqara device, we will want to select Other as the vendor:
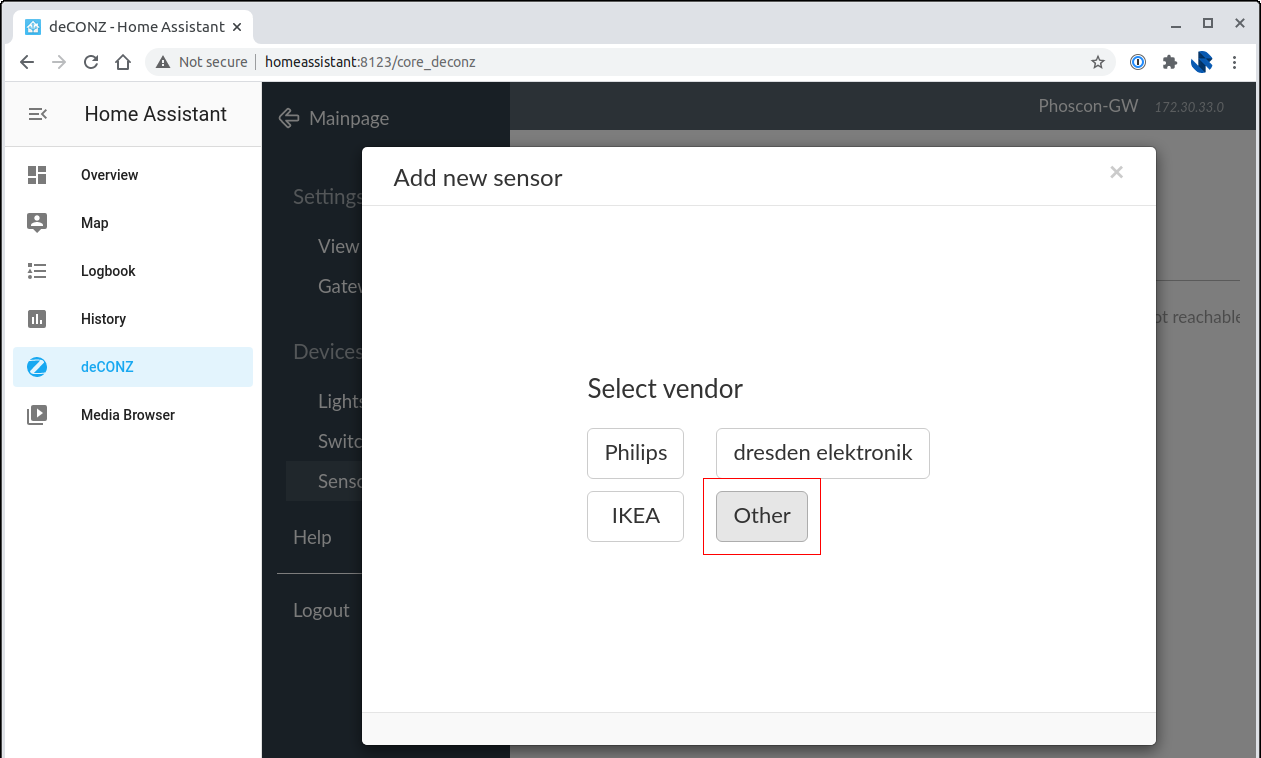
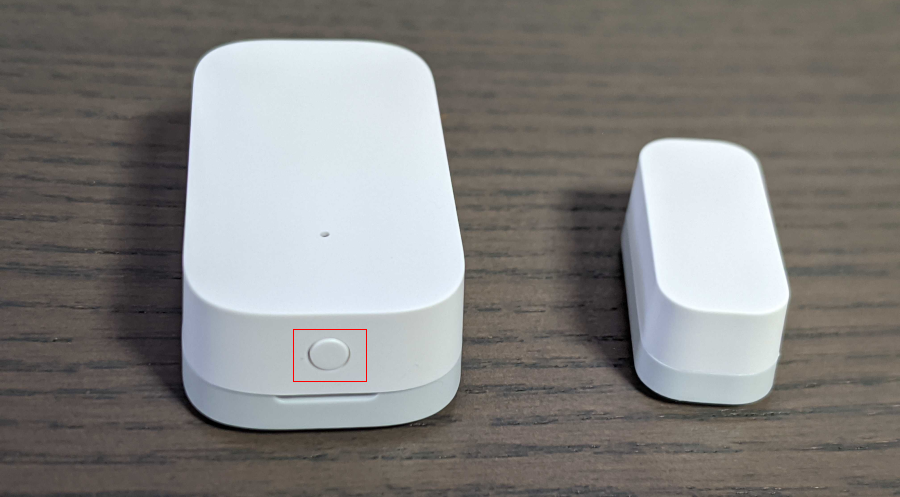
We will now need to put the sensor into pairing mode. The Xiaomi devices have a small button which you just need to press for a second or so, until a blue status light starts flashing:
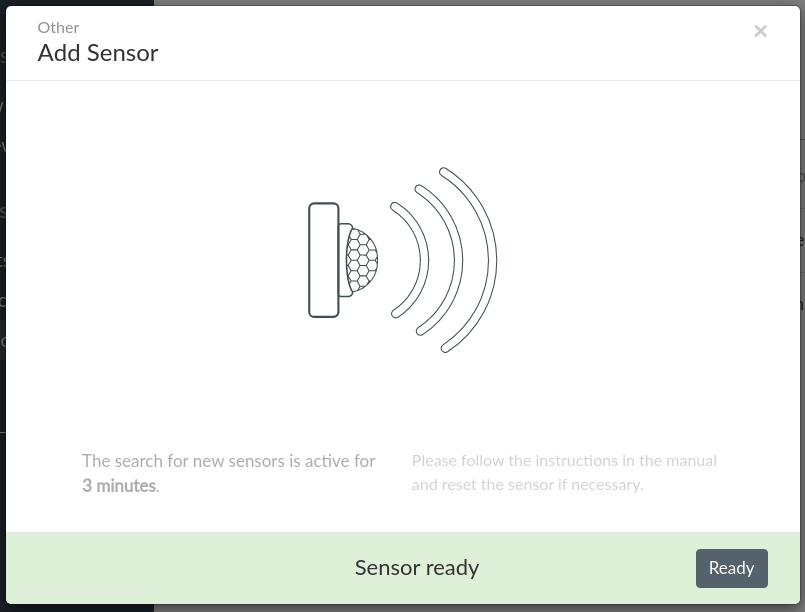
And a few seconds later, Phoscon should recognise that the sensor is ready:
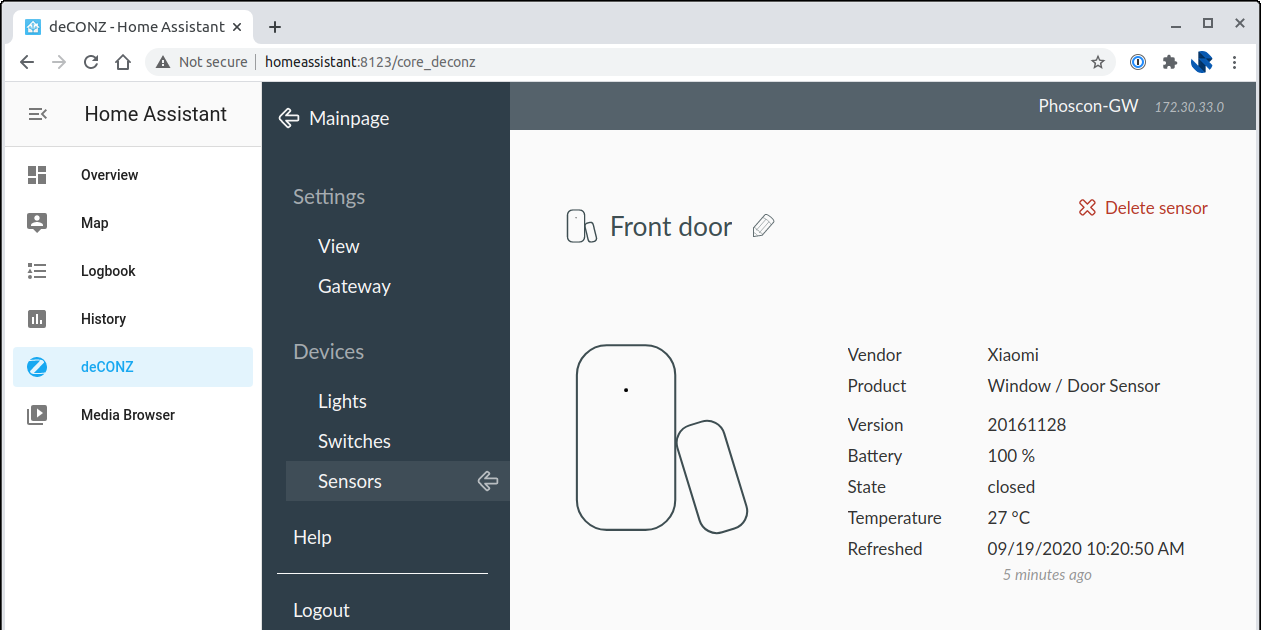
I repeated the Add new sensor wizard for each of the Xiaomi sensors and had them all added to the system very quickly. We're yet to get Home Assistant to do anything meaningful with them, but we now have the ability to write automations based on input from the Xiaomi Aqara sensors.
Let's continue with setting up Home Assistant so that we can get to a point where we can have the sensors trigger actions on some of our devices. In order to do this we'll need to setup a few more integrations and add-ons.
Easier Configuration Management
As we move forwards in customising our Home Assistant setup, having access to a terminal and to Home Assistant over SSH could be useful. Home Assistant is configured using YAML files. Various activities done through the interface will cause changes to these configuration files, In some instances certain configurations will need to be made to the YAML files directly.
Navigate to: Home Assistant > Supervisor > Add-on store
Search for and install: "Terminal & SSH8.9.1"
In the configuration tab for the add-on you will be able to specify your authorized keys for SSH and the port that SSH will run on. Authorized keys added via the config section are applied to the root user.
HACS
HACS – Home Assistant Community Store – provides a lot of custom components and integrations that you won't find in the built in Home Assistant Add-on Store. For example: HACS will allow you to integrate Home Assistant with Amazon Alexa.
Goto https://github.com/custom-components/hacs/releases/latest to find the latest link to hacs.zip. At the time I was writing this 1.5.2 was the latest version.
Using either SSH or via the terminal that has now been added to Home Assistant in the previous step, we want to make a number of changes to the file system:
# Navigate to the config directory
cd config

# Create a hacs directory
mkdir -p custom_components/hacs

# Change directory into the hacs directory
cd custom_components/hacs

# Download the latest version - make sure to use the latest hacs.zip URL which is available from https://github.com/custom-components/hacs/releases/latest
wget https://github.com/hacs/integration/releases/download/1.5.2/hacs.zip

# Unzip hacs
unzip hacs.zip

# Remove the original zip file
rm hacs.zip
Using HACS, requires access to your GitHub account - it doesn't require any specific permissions, but you will need to create a Personal Access Token.
Add the following to config/configuration.yaml:
hacs:
  token: !secret hacs_token
The !secret function allows us to store our secrets separately from the rest of our main configuration.
Let's add our GitHub Personal Access Token to config/secrets.yaml as hacs_token:
hacs_token: putyourgithubtokenhereRestart Home Assistant for the change to take effect. You can do this via the web interface – Supervisor > System > Reboot or alternatively via the Home Assistant CLI:
# Check that the config is correct before attempting to restart
ha core check

# Restart Home Assistant
ha core restart
Smart Plugs
I have a handful of Teckin Smart Sockets which have previously been controlled via the Smart Life app.
With HACS installed we can add a Tuya integration to control the sockets via Home Assistant
Navigate to Configuration> Integration and click the orange plus (+) button in the bottom right corner. Then search for Tuya.
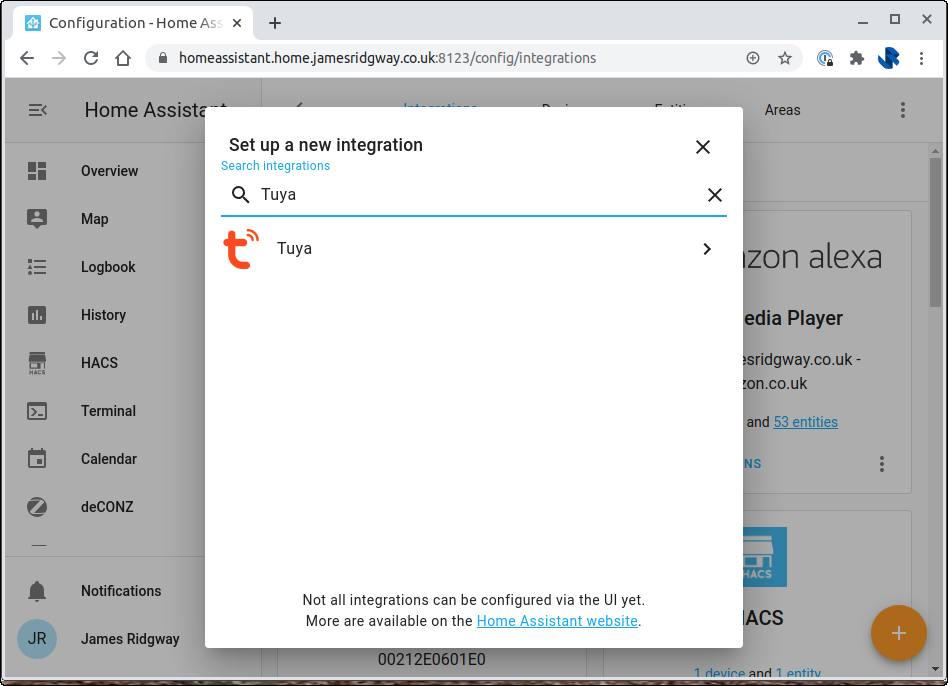
Proceed to configure the Tuya integration with your account details, now we can look to hook up the sensors to our devices.
Building Automations
Automations can be triggered by various inputs, from pressing a button in the Home Assistant interface to using timers and sensors.
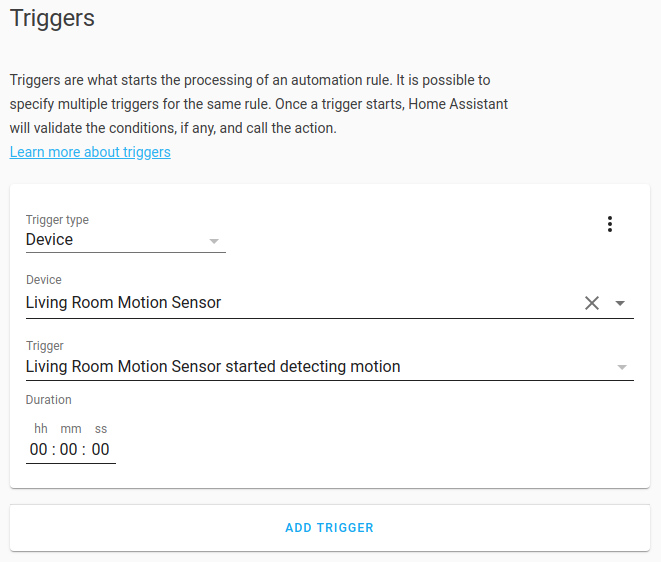
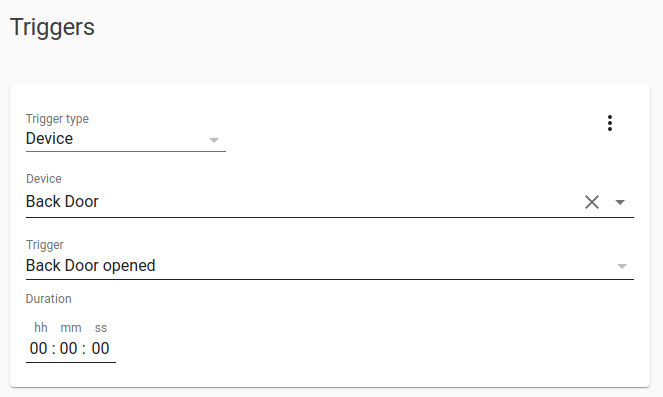
In this first example, let's use a motion sensor to turn on some lamps.
Navigate to Configuration > Automations and click the orange plus (+) button in the bottom right corner.
Give the automation a name and a description, then proceed to add a Trigger:
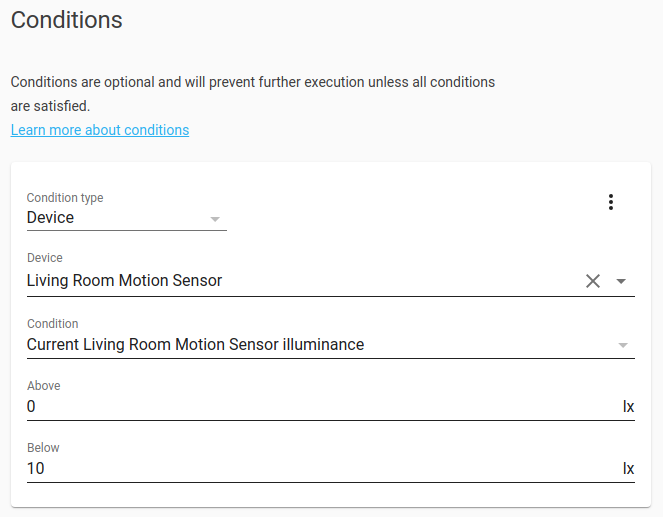
We'll combine this with a condition, so that the automation only runs if their is motion and the light level is low:
In the action section we can then define what we want the automation to do when the trigger occurs and the conditions are met:
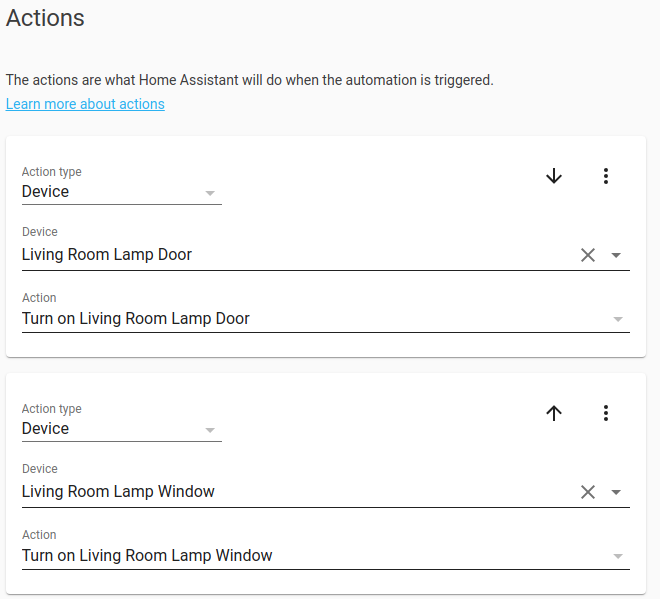
In this case I am having the automation turn on two lamps, each of which is plugged into a Teckin Smart Plug.
We now have a complete automation setup with one of our Xiaomi Aqara sensors turning on our existing smart plugs.
Securing Home Assistant with HTTPS
Up until this point I've been using Home Assistant over HTTP, but as I plan to adopt the mobile apps and add other home users to Home Assistant, it'd be prudent to setup HTTPS using Let's Encrypt.
Navigate to: Supervisor > Add-on store. Search for Let's Encrypt and install.
I have home assistant behind the firewall, so it isn't publicly accessible by the outside world. Let's Encrypt can be setup to use a DNS challenge to verify and issue the certificate.
Under the Configuration tab for Let's Encrypt we can specify the following configuration:
email: youremail+home+assistant@example.com
domains:
  - homeassistant.home.example.com
certfile: fullchain.pem
keyfile: privkey.pem
challenge: dns
dns:
  provider: dns-cloudflare
  cloudflare_email: yourcloudfrontaccount@example.com
  cloudflare_api_token: putyourtokenhere
This configuration works for me as I use Cloudflare for DNS on the domain that I am using. Let's Encrypt supports DNS challenge for numerous providers. Provided you can find your provider in this list or here I would expect that you'd be able to get Home Assistant setup with Let's Encrypt.
Mobile App
Home Assistant has apps for Android and iOS. Installing the app provides you with two main benefits, beyond using the app to control Home Assistant:
- You can have your Home Assistant automations send you push notifications
- You can build automations that are triggered by the state of your smartphone/tablet. For example, when your smartphone battery gets low, you could have Alexa to tell you to put it on charge.
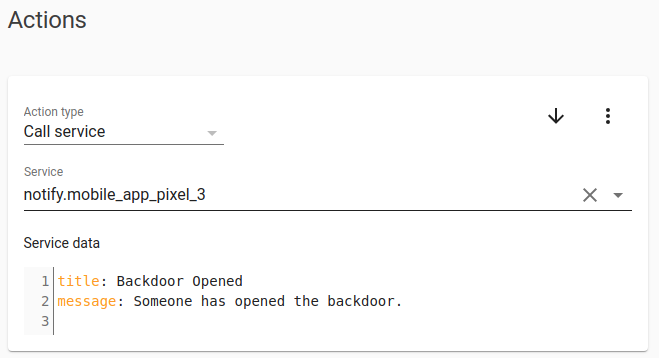
I've used the push notification feature to send me push notifications in certain scenarios, for instance, when the backdoor is opened I will receive a push on my phone:
At this point we've proved that we can use the cost effective Xiaomi Aqara sensors to build out automations that work with our existing smart devices. The next step for me was to add all of my existing devices to Home Assistant, these include:
- multiple Amazon Echo devices
- evohome multi-zone thermostat
- Uniquiti UniFi and UniFi Protect (my home network runs off of UniFi switches and access points, I also have a few UniFi Protect cameras too)
Integrating Alexa
Alexa Integration is available via the Alexa Media Player add-on. the media player will allow us to control playback on the Amazon Echo devices as well as using Home Assistant to make announcements using text-to-speech.
Navigate to Configuration > Integration and click the orange plus (+) button in the bottom right corner. Then search for Alexa Media Player.

On the next screen you will need to put in the details of your Amazon account. If you're in the UK like I am make sure to follow the instructions carefully and make sure to change amazon.com to amazon.co.uk
Once you have setup your integration we can do a quick test of the text-to-speech feature.
Navigate to Configuration > Scripts and use the orange plus (+) button in the bottom right to add a new script.
Under Sequence set the Action type to Call Service. Your echo should appear as a service starting with notify.alexa_media
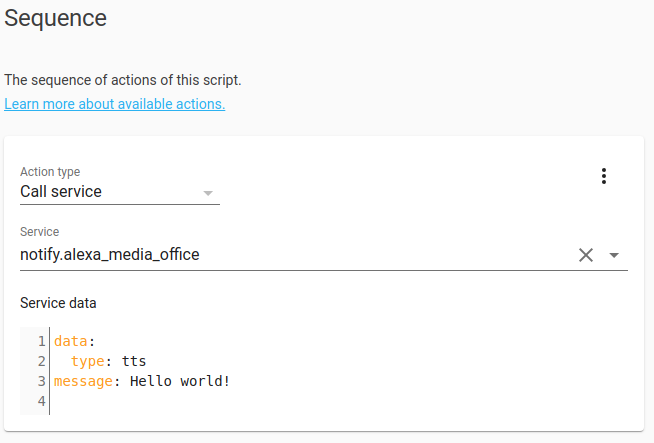
Fill out the Service data as shown above. Save the script and then use the Execute link to run the script.
Integrating evohome multi-zone thermostat
Integration for evohome is built into Home Assistant! Which means that we only need to add a few lines of configuration to get evohome integrated.
Add the following to config/configuration.yaml:
evohome:
  username: !secret evohome_username
  password: !secret evohome_password
Just like we did for HACS, let's define our secrets separately in config/secrets.yaml:
evohome_username: putyourevohomeusernamehere
evohome_password: putyourevohomepasswordhere
Restart Home Assistant
Integrating UniFi and UniFi Protect
As you've probably guessed by now, if the integration isn't built in, or available via the official Home Assistant add-on store, you'll likely find an integration in HACS.
For UniFi and UniFi Protect you can an a HACS integration using exactly the same process that was used for Tuya and Alexa Media Player.
Setting up a theme
In getting everything setup, I'd gotten a bit bored of the default Home Assistant theme. There are a lot of themes out there, but I ended up settling on the slate theme.
There are different ways to add themes to Home Assistant by making changes to the configuration.yaml. I didn't make any theme related changes to configuration.yaml and opted to put the theme in the default location.
Inside the config folder I created a themes/slate folder and placed the theme yaml file at ./config/themes/slate/slate.yml
Building out a Dashboard
Now that we've added all our devices, built a few basic integrations and picked a theme we should populate the dashboard with something meaningful!
My starting point for building a dashboard was to do a Google Image search for other home assistant dashboards and to get ideas from others.
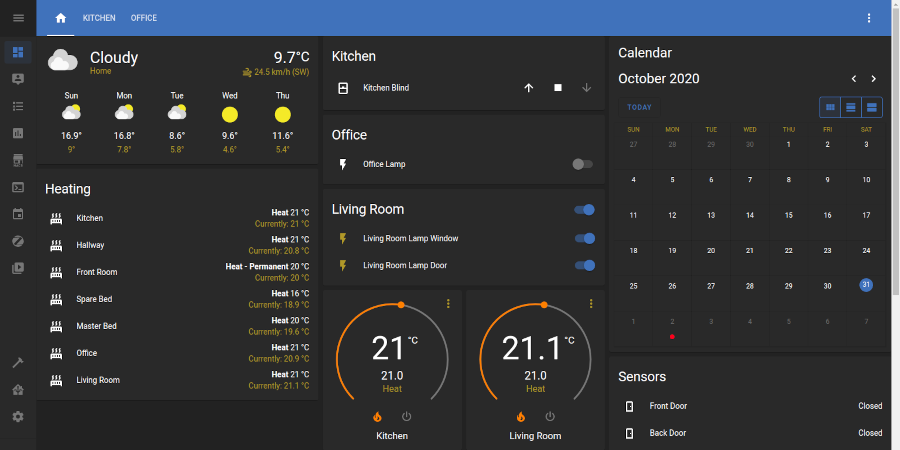
What I finally settled on was a design that looks like this:
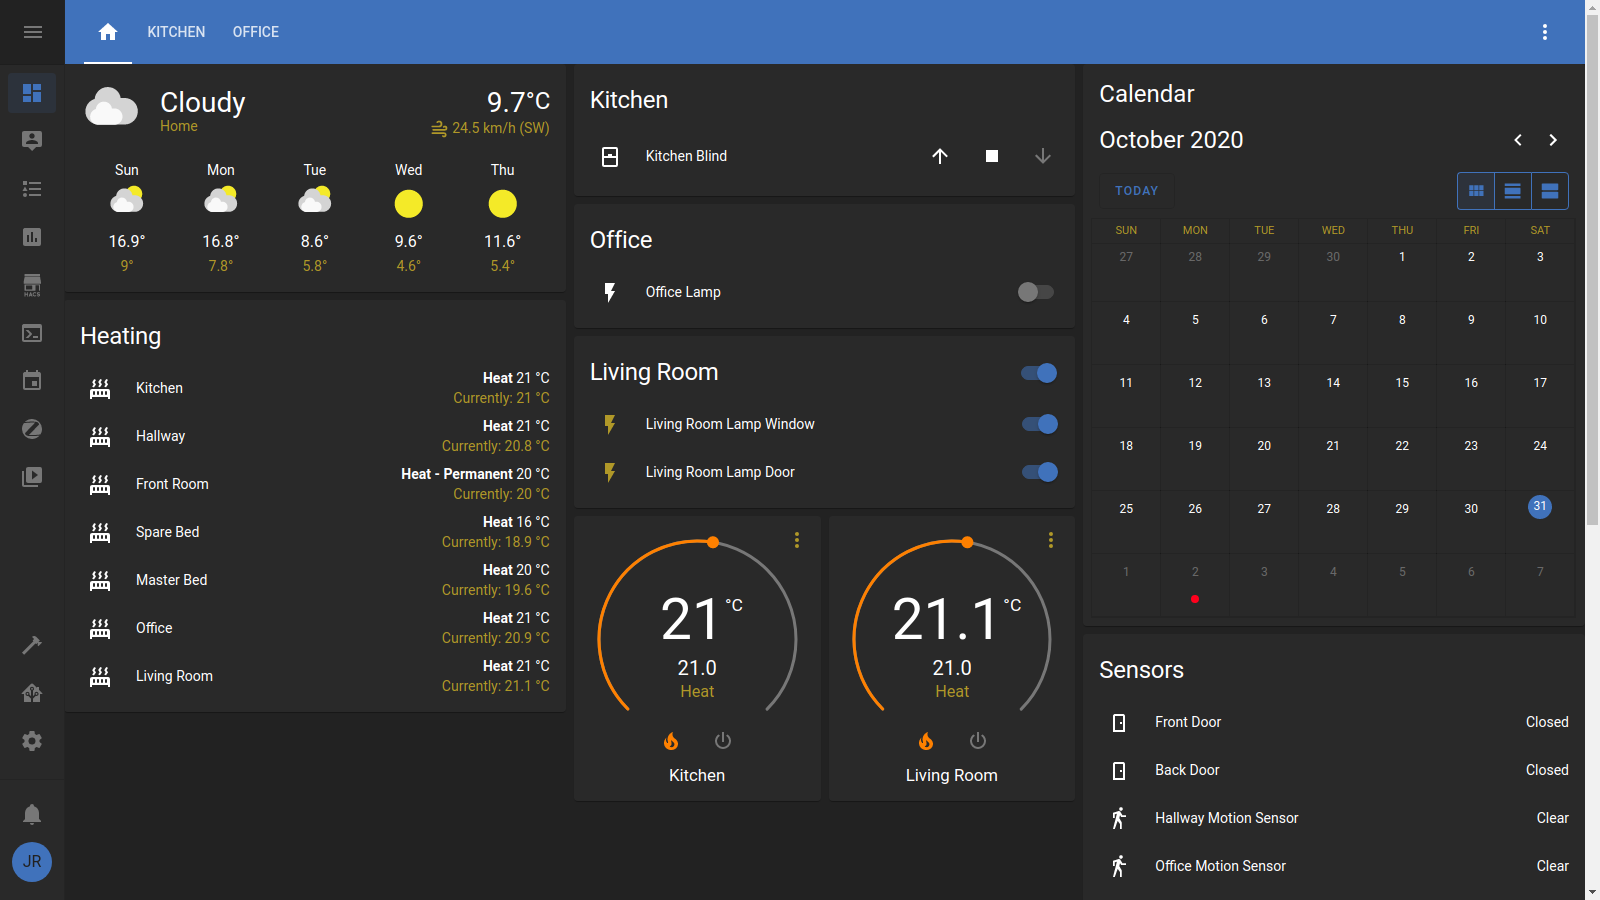
I found that most people appeared to build a dashboard using vertical stacks. I have 3 stacks in the above image, one representing the left column, centre column and right-most column.
Continue to Automate!
I've now got a solid foundation for Home Assistant, my goal from here is to continue to build out automations to make life at home a little more slick and automated.
I already have some plans for follow on projects:
- Integrating my desk lights with Home Assistant
- Replace the light switches with smart light switches
Expect to here more about my home automation projects over the coming months!
