
A few months ago, I got a Sonoff NSPanel, and I've been waiting for some downtime to have a proper play with it and figure out how I want to use it in the house.
New IoT toy! Now what should I use it for 🤔 pic.twitter.com/keH4rRYEk3
— James Ridgway (@james_ridgway) September 7, 2022
The Sonoff NSPanel comes in an EU and US form factor and will fit to a single gang light switch. The NSPanel is primarily a touchscreen device with two hard buttons, a thermometer, a microphone and a speaker.
Although nearly all the light switches in the house have been made smart using Shelly devices, a few rooms could benefit from having a smart light switch with a touchscreen.
One of those contenders is our master bedroom; being able to control lighting and the heating for the room from a touch screen light switch within the room would certainly be a nice touch!
Native Firmware vs ESPHome vs Tasmota
Although I've only just gotten around to using the NSPanel, over the last couple of months, I've been contemplating what I want to run on the device. For example, do I use the native Sonoff firmware that comes with it? Or should I flash the device with ESPHome or Tasmota to give me more control over how the device can be used?
As part of this process, I've been researching what others have done with their NSPanel. Using Tasmota or ESPHome will give me the most flexibility in controlling what the panel displays and allowing it to control other devices.
I already use Home Assistant extensively to control all of the smart home tech in the house. In an ideal world, I'd use the NSPanel as an extension of Home Assistant and control any device in Home Assistant from the panel.
With a bit more googling and research, I've found exactly what I'm after – NSPanel Lovelace UI.
Someone (joBr99) has written a custom firmware (deployable via Tasmota) that will allow you to use the NSPanel with a Lovelace UI, the default UI that Home Assistant ships with.
Flashing the Sonoff NSPanel
This is going to require flashing the NSPanel and overwriting the original firmware.
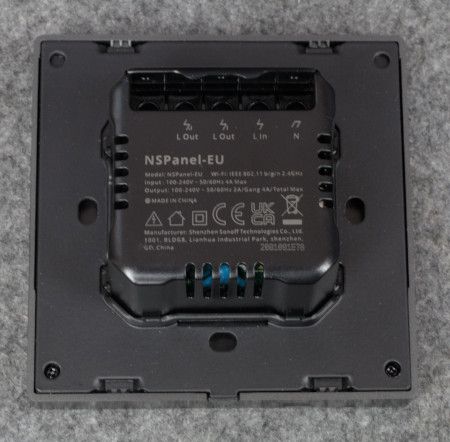
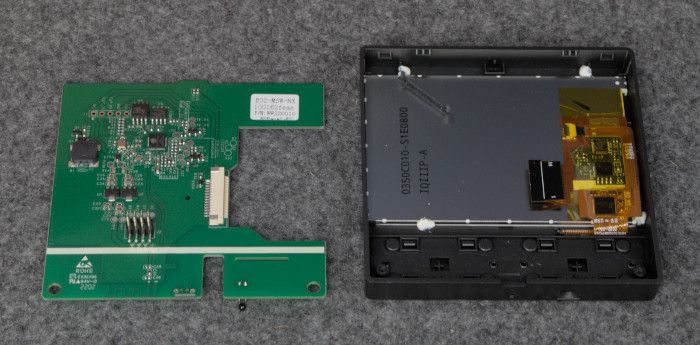
Removing the circuit board
Step 1 - Remove the rear module, which unclips
Step 2 - With the rear module removed, unscrew the back plate of the screen using the two screws at the bottom.
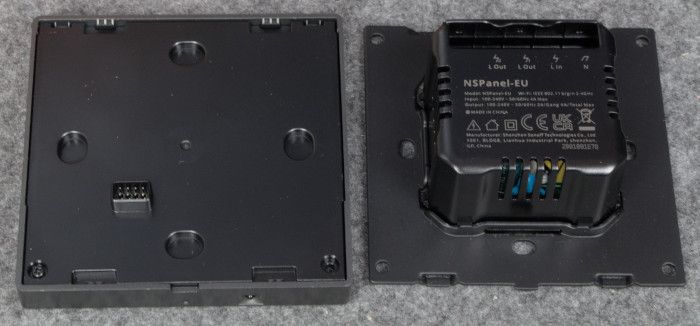
Step 3 - Carefully detach the ribbon wire connecting the screen so the circuit board can be removed. The ribbon wire is held in place with a grey clip which can be removed before disconnecting the ribbon wire.
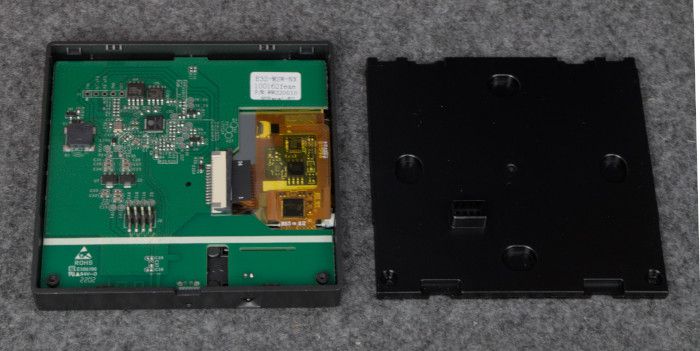
Step 4 - You should now be able to remove the circuit board from the back plate.
We're now ready to use a serial adapter to flash the device.
The Flashing Process
The circuit board has a row of 5 through holes which are used for flashing the device. You'd use a soldered connection for maximum reliability in an ideal world. Instead, I took a slightly riskier approach by using dupont wires connected to a spare pin header that I threaded through the other side of the board. This approach can work, but you must be careful not to disturb the wiring during the flashing process, as a dodgy connection will likely brick the device.
To flash the circuit board, you'll need a serial adapter (I used a DSD TECH USB to TTL Serial adapter with FTDI FT232RL Chip) to perform the flashing process.
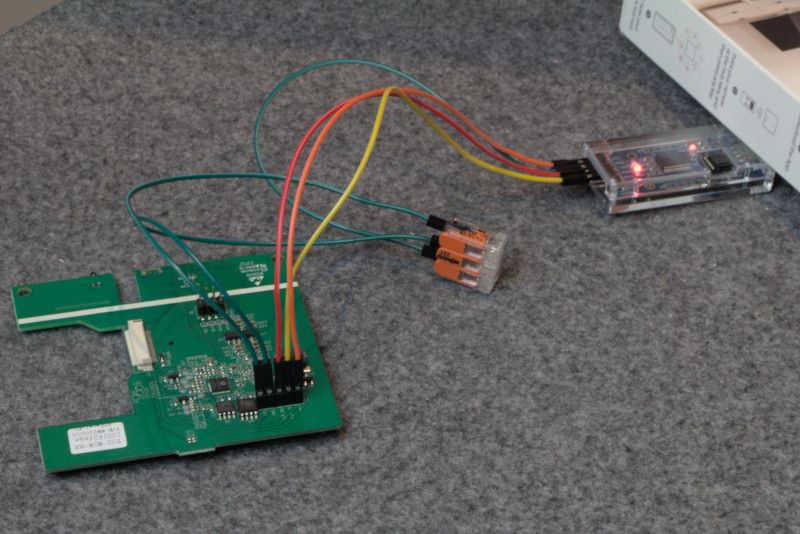
The pins need to be connected as follows. First, ensure that the serial adapter is disconnected from your computer when you wire up the board.
NSPanel IO0 - Serial Adapter GND
NSPanel GND - Serial Adapter GND
NSPanel RX  - Serial Adapter TX
NSPanel TX  - Serial Adapter RX
NSPanel 3V  - Serial Adapter VCC
As you can see from the above most of the connections are straightforward. However GND and IO0 on the NSPanel both need to be wired to GND on the serial adapter. I used a Wago connector to make this easier.
Most serial adapters can operate in 3V and 5V modes; set the adapter to work in 3V for the purpose of flashing.
Only once everything was wired up, and I'd triple-checked that the wiring was correct, did I connect the serial adapter to the computer.
We can now start backing up the original firmware and flashing the device, which will use esptool.py and ESPHome-Flasher. I already have both of these installed from when I set up a load of ESP32 to provide room-by-room presence detection using ESPresense.
Step 1 - Test the connection using esptool.py – sudo esptool.py flash_id
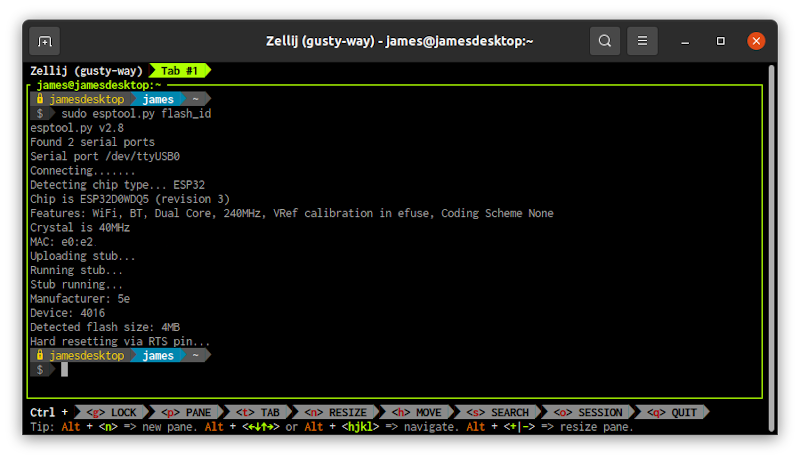
If the connection is successful, you should see a full output similar to the above and confirmation of a 4MB flash size on the second from last line – Detected flash size: 4MB
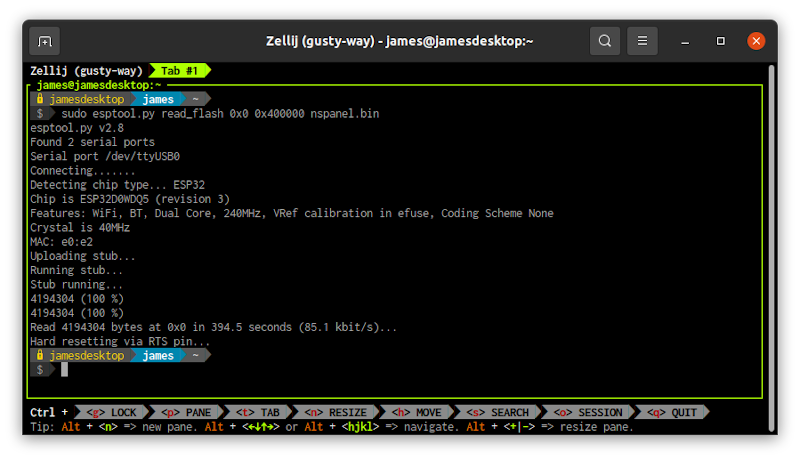
Step 2 - Backup the original firmware – sudo esptool.py read_flash 0x0 0x400000 nspanel.bin
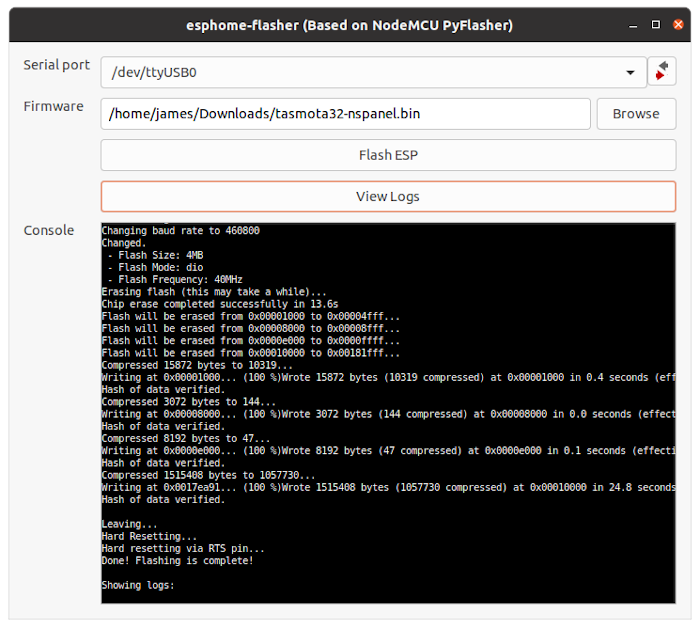
Step 3 - Flash tasmota32-nspanel.bin from Tasmota ESP32 Binaries using ESPHome-Flasher
Once the flashing is complete, we can partially reassemble the device and perform some configuration before getting the device ready to install in the wall.
- Disconnect the serial adapter from the computer
- Disconnect the dupont wires from the circuit board
- Reconnect the circuit board to the screen using the ribbon cable
At this point, we can use the serial adapter to power up the device to test that it works and perform some initial configuration.
Change the serial adapter from 3v mode to 5V – there is probably a jumper on the adapter that needs changing for this.
With the board oriented in the following orientation:
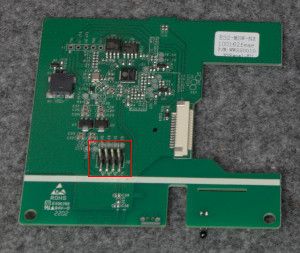
There are a group of 8 pins organised in 2 rows of 4 pins:
| 1 | 2 | 3 | 4 |              (top row)
|---------------|
| 5 | 6 | 7 | 8 |              (bottom row)
Pin 6 should be connected to GND on the serial adapter, and Pin 7 to VCC on the serial adapter.
Connect the serial adapter to the computer. The adapter will now use the 5V power from the computer to power up the NSPanel.
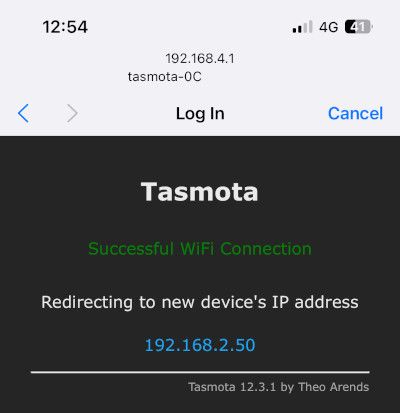
To begin with, you will not see anything on the screen – this is normal at this stage. The device will power up and will provide a WiFi hotspot that you can connect to to perform the initial setup.
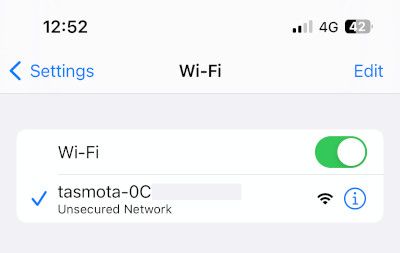
When you connect, browse to 192.168.4.1 and you will be prompted to select your WiFi network and provide your WiFi password. Once you have supplied this, your NSPanel will join your main network properly, and you can continue the configuration process from the new IP that your router has provided:
Browse to the new device IP and under Configuration > Configuration Other, set the Tasmota template to the following and ensure the Activate checkbox is ticked:
{"NAME":"NSPanel","GPIO":[0,0,0,0,3872,0,0,0,0,0,32,0,0,0,0,225,0,480,224,1,0,0,0,33,0,0,0,0,0,0,0,0,0,0,4736,0],"FLAG":0,"BASE":1}Reboot the device, and the screen will now load up with the default firmware:
It’s alive! pic.twitter.com/yDjnRcHWHh
— James Ridgway (@james_ridgway) December 31, 2022
Installing NSPanel Lovelace UI
Now that we have our Sonoff NSPanel running Tasmota, we can go through the NSPanel LoveLace UI instructions to get the panel running NSPanel LoveLace UI.
Under Consoles > Console run:
Backlog UrlFetch https://raw.githubusercontent.com/joBr99/nspanel-lovelace-ui/main/tasmota/autoexec.be; Restart 1This will cause the device to restart. Once the device has restarted, we will need to run another command in the same console to flash the Nextion screen firmware (note that this is the EU version – there is a different tft file for the US version of the device):
FlashNextion http://nspanel.pky.eu/lui-release.tft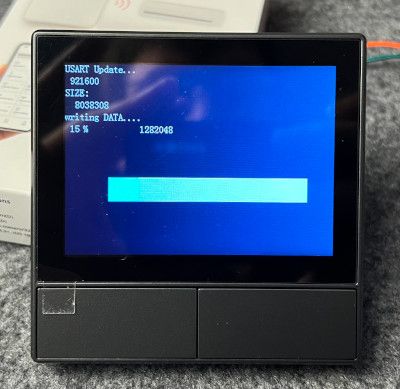
This process could take up to ~5 minutes; once completed, the device will restart.
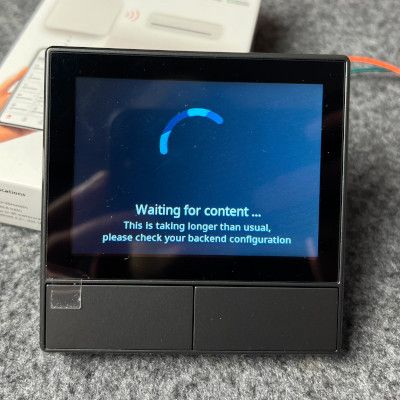
Our NSPanel is now fully setup, and you'll see the following screen until we have Home Assistant fully set up:
At this point, we can power off the NS Panel, replace the backplate and install the device in a light switch back box.
Configuring Home Assistant
By this point, all the hard work is done, and we need to get MQTT and the Lovelace AppDaemon Backend running on Home Assistant.
Install and Configure AppDaemon
AppDaemon is available via the Add-on Store in Home Assistant. If you don't already have this installed, I cover the installation steps in this post.
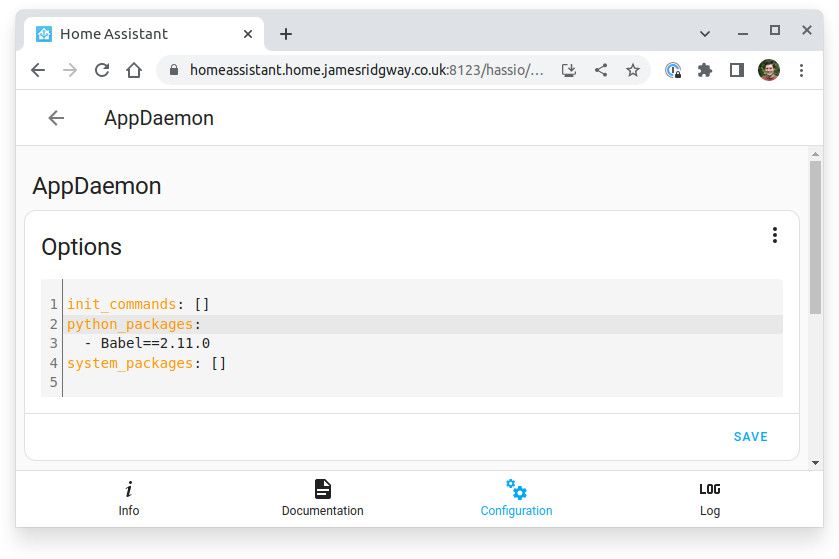
Once AppDaemon is installed, adjust the configuration to include Babel as one of the installed python packages. I had a few challenges trying to do this via the UI editor, so I used the triple-dot menu option to change to YAML mode and adjusted my config accordingly:
Save the configuration and restart AppDaemon.
Install HACS
If you don't already have HACS, you will need to install HACS for the next step.
Follow the instructions on the HACS website to install HACS.
Install the Lovelace AppDaemon Backend Application
Firstly, we need to make sure that HACS is configured correctly:
Under Configuration > Devices & Services > Integrations, find the HACS integration and click on Configure. Ensure that Enable AppDaemon apps discovery & tracking is checked.
We're now ready to install the AppDaemon application.
Under HACS > Automations, click on Explore & Download Repositories in the bottom right corner. Next, search for and download NSPanel Lovelace UI Backend.
Configure NSPanel for MQTT
Browse to your NSPanel IP address in your browser and open up Configuration > Configure MQTT.
Provide the details of an MQTT broker that the panel can use. Fo example, I use the Mosquitto Broker Add-on for Home Assistant.

AppDaemon will also need to be configured with the same broker settings; to do this edit config/appdaemon/appdeamon.yaml to include a appdaemon.plugins.MQTT block and restart AppDaemon:
---
secrets: /config/secrets.yaml
appdaemon:
  time_zone: Europe/London
  plugins:
    HASS:
      type: hass
    MQTT:
      type: mqtt
      namespace: mqtt
      client_id: "appdaemon"
      client_host: 192.168.1.5
      client_port: 1883
      client_user: "mqttint"
      client_password: "**********"
      client_topics: NONE
  api_port: 5000
http:
  url: http://127.0.0.1:5050
admin:
api:
hadashboard:
The final thing for us to do is to configure our NSPanel UI!
If we edit our config/appdaemon/apps/apps.yaml to add the following:
nspanel-1:
  module: nspanel-lovelace-ui
  class: NsPanelLovelaceUIManager
  config:
    panelRecvTopic: "tele/tasmota_your_mqtt_topic/RESULT"
    panelSendTopic: "cmnd/tasmota_your_mqtt_topic/CustomSend"
    model: eu
Our NSPanel will now load the default "Setup successful" screen.
We can now customise the apps.yaml until we have the UI screen we want on our NSPanel. Any changes to the yaml file will be automatically applied to the device when the file is saved.
The official NSPanel Lovelace UI documentation provides a comprehensive overview of all the supported cards, entities and settings.
The End Result
Flashing a device like this with custom firmware can always be a bit nerve-racking, but the process has been straightforward (albeit there have been several steps to follow), and the NSPanel Lovelace UI has worked flawlessly and without issue.
I love that I now have a small touchscreen in our master bedroom that I can use to control pretty much anything in Home Assistant. It's just like having a mini-version of the Home Assistant dashboard that we have in the kitchen.

I expect to continue refining and tweaking the screens we use on the NSPanel over the next few days. So far, I have the NSPanel configured so that we can easily:
- Adjust the thermostat in the bedroom
- Adjust the smart lights in the ensuite and associated scenes
- Trigger various scenes within Home Assistant.
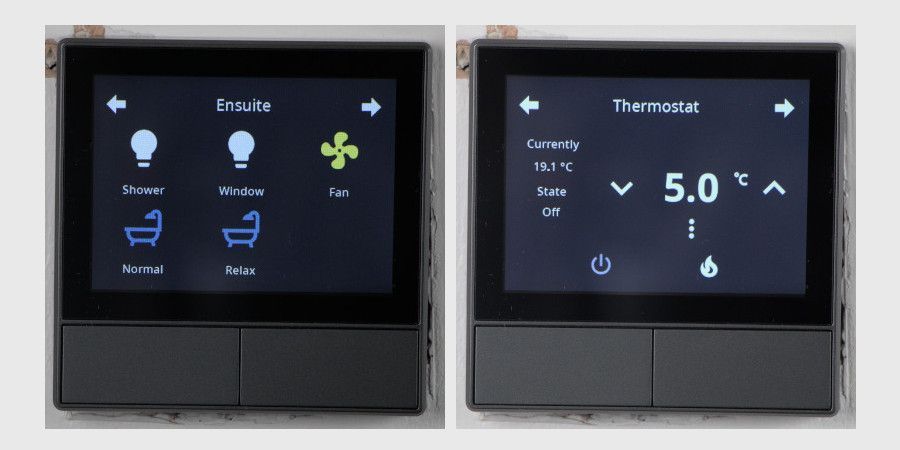
Ensuite Controls
From the Ensuite screen i can control the individual lights and the extract fan. I also have two buttons "Normal" and "Relax" that will trigger a predefined scene within Home Assistant.
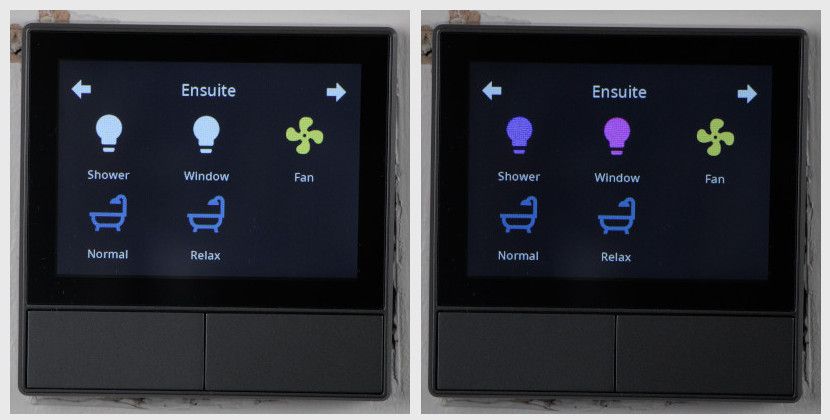
With an RGB light, if you press and hold on the light bulb you'll be taken to another screen that lets you adjust colour and brightness.
Thermostat
The thermostat control is rather self explanatory, but very useful. From here I can adjust the desired temperature, turn the heating on or off, etc...

Scenes
I expect to add to this over time, but it useful when going to bed to ensure that all lights are off:

"Turn off all lights" will run a script in home assistant to turn of all lights in an "all_lights" lighting group when pressed. I have also setup the colour of the bulb to reflect the state of the lighting group, so if any lights are left on the icon will be yellow.
Conclusion
I'm really pleased with the end result. The process of flashing the device was a little bit daunting as these things usually has an element of risk associated with them. However, the process was straightforward and worked without issue.
NSPanel Lovelace UI has also been reliable throughout and appears to be a solidly built project.
I could definitely be tempted to get more Sonoff NSPanels 🤔
