
One of the first things I did when I started with Home Assistant was to get to grips with using motion sensors to trigger automations.
Motion sensors work well for identifying when someone goes into a room, but if you want to try and figure out when someone is no longer in a room, a motion sensor may not be the best approach.
In the past, I've used automations in the living room and my home office to turn off lights if no motion is detected after some time. The issue with this approach is that you sit very still when you're sitting watching TV in the living room or focused on some work in the office. Still enough that a motion sensor won't pick up that you're still in the room, and before you know it, you're sat in the dark.
Presence Detection and ESPresense
A motion sensor will only detect changes in passive infrared, but what if you could detect presence more reliably? What if you could detect specifically who was in a given room?
There are several different options for tracking room occupancy. However, most solutions gravitate around tracking people using BLE, as most people these days carry a smartphone or some other wearable device with them that acts as a BLE beacon.
I originally stumbled across Room Assistant, which uses a Raspberry Pi Zero W to track the signature of bluetooth devices from room to room. Room Assistant will require a Raspberry Pi Zero W to be present in every room that you'd like to track devices in,
The system works by determining your presence in a room based on which Pi Zero your beacon is closest to. The only downside is that Room Assistant runs on a Pi Zero W, Pi 3 or Pi 4. Supply chain issues and an increase in demand mean that getting hold of Raspberry Pis is difficult at the moment.
However, after attending a recent home automation meetup hosted by dotnetsheff, I learned that ESPresense is an alternative to Room Assistant, but is designed to work on an ESP32. ESP32's are cheaper than Pi Zero's and more available.
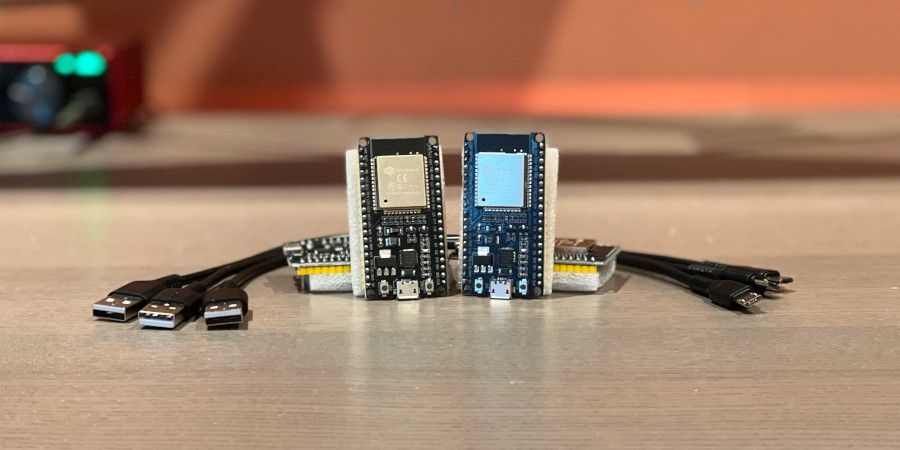
I've picked up two 3-packs of ESP-WROOM-32 for £20.99, which will be enough to give me coverage in most of the rooms in the house.
ESP32
An ESP32 is a low-cost, low-power microcontroller that supports WiFi and Bluetooth.
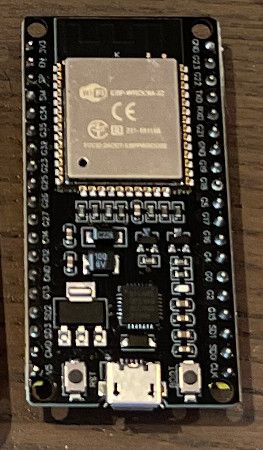
"ESP32" refers explicitly to the microcontroller chip. Pictured above is an ESP-WROOM-32 which is the specific name of this ESP32 module.
A 5V micro-USB power supply can power the ESP-WROOM-32. Being a microcontroller, the CPU, memory and I/O, etc. are all integrated into the same chip, giving the board a small form factor of 72mm x 32.6mm.
How Does It Work?
ESPresense monitors for the signature of nearby bluetooth devices and publishes the results to various topics on MQTT.
Home Assistant can then use the MQTT Room Presence integration to track specific bluetooth signatures.
ESPresense works by broadcasting tracking information to per-room and per-device topics on MQTT.
Preparing Home Assistant
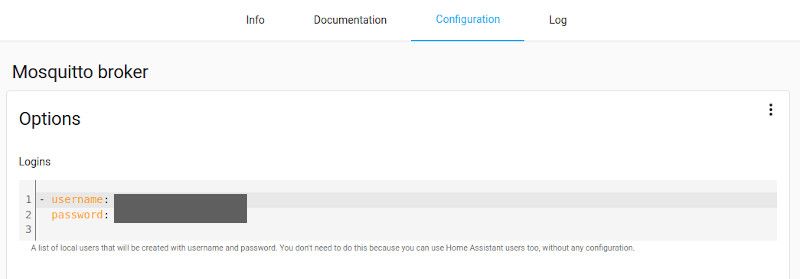
The only requirement other than Home Assistant is an MQTT broker that Home Assistant can use. Last year when I automated my ensuite to help perfect my morning routine I set up a Mosquitto MQTT Broker, which I already use for numerous existing automations.
If you've not used MQTT before, one of the quickest ways to get started with MQTT can be to install the Mosquitto Broker via the Add-ons Store.
Goto Settings > Add-ons and click Add-on Store in the bottom right corner. Search for and select Mosquitto Broker.
Once the broker is intsalled, make sure that "Start on boot" is enabled.

A set of credentials will also be required to that Home Assistant and the ESP devices can communicate with the broker, this is configured on the Configuration tab:
With this in place we now have an MQTT message broker, but Home Assistant isn't using it yet.
Under Settings, Devices & Services add a new integration for MQTT.
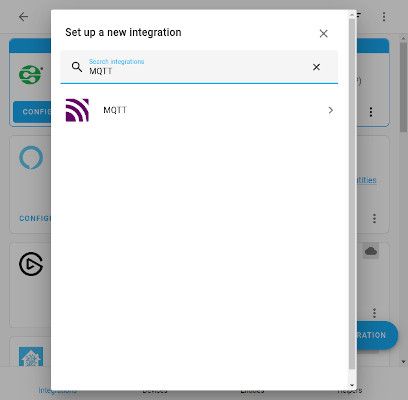
The integration will need to be configured with the details of your Mosquitto Broker (hostname, username, password, etc).
Installing ESPresense
Installing and configuring ESPresense on an ESP only takes a couple of minutes per device.
The process is as follows:
- Flash the device with ESPresense
- ESPresense will provide a Wireless SSID that you can connect to.
- Provide the details of your wireless network, MQTT broker and the name of the room that the device will be placed in
- Reboot the device
There are several ways you can install the ESPresense firmware, which are detailed on the firmware page of the ESPresense website.
I'm using Ubuntu on my desktop and chose to flash the devices using ESPHome-Flasher.
First, install ESPHome-Flasher:
sudo pip3 install esphomeflasherDownload the firmware that you want to run. There are different versions of the firmware that support more verbose logging or things like attaching additional sensors. I'm keeping things simple and just going with the standard firmware – esp32.bin which is available from the ESPresense release page.
Run esphome flasher:
sudo esphomeflasherSelect the correct serial port for your device and firmware that you want to flash the device with:
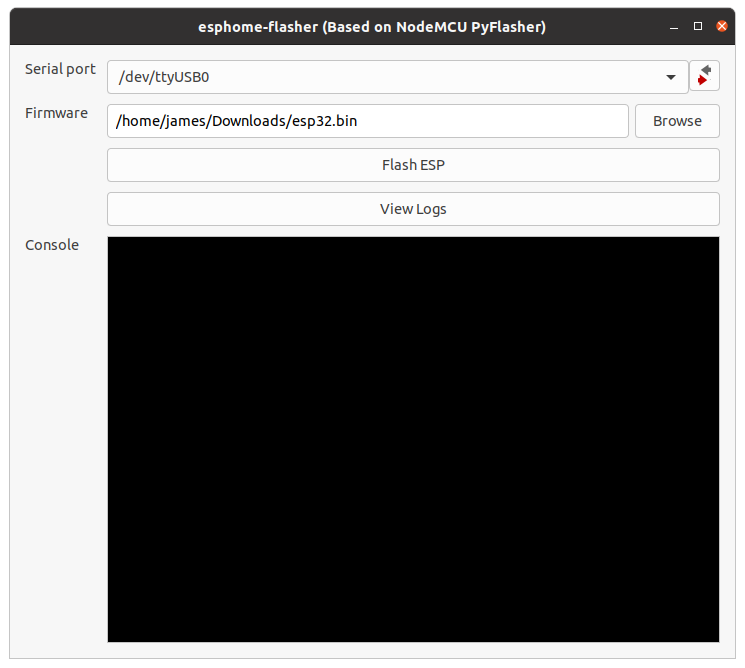
The next step is to flash the device by clicking "Flash ESP":
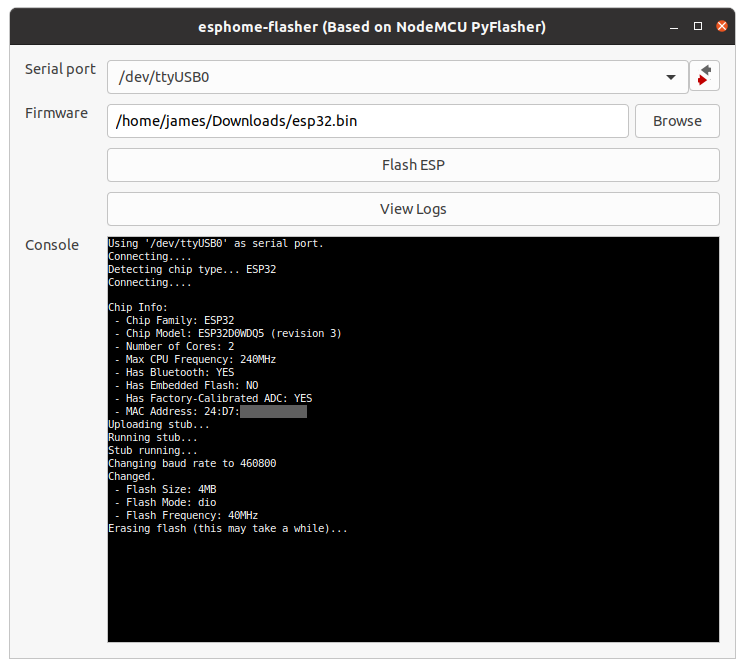
Once the flashing is complete, ESPresense will log out the SSID which the device is now broadcasting and the IP of the device:
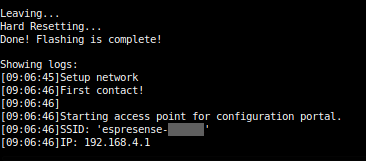
Connect to the SSID, and your device should launch the captive portal. If it doesn't, in your browser navigate to the IP address shown in the logs.
You will need to provide the details of your WiFi network, Room Name and MQTT Broker:
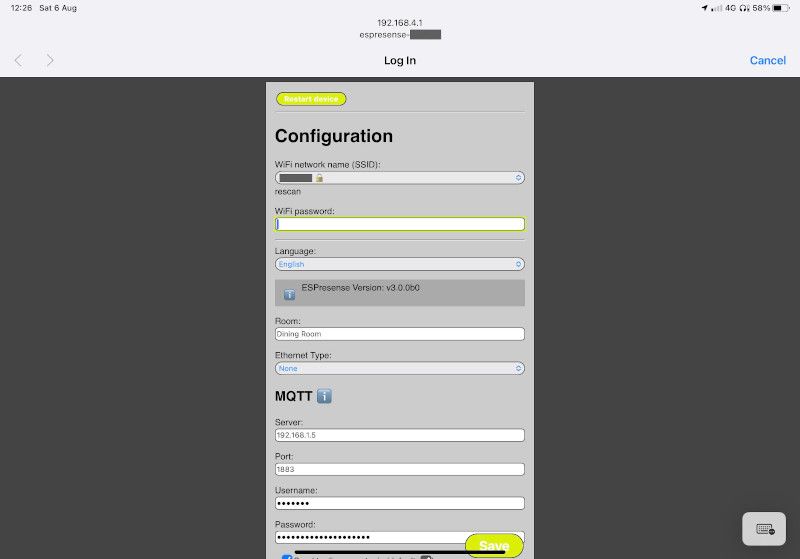
Once you have provided these details, click "Save" to save the settings. Clicking Save will only save the changes. Click "Restart Device" at the top of the form to reboot the devise.
When the ESP32 reboots, it will connect to the network you provided and start reporting bluetooth signatures over MQTT. If your ESP32 is still connected to ESPHome-Flasher at the point where it has been configured and rebooted, ESPHome-Flasher will show the logs from the device booting up and the MAC address and Device IDs of any nearby BLE beacons:
If you need to adjust the settings, navigate the browser to the IP address the ESP32 has obtained from your network to access the configuration page.
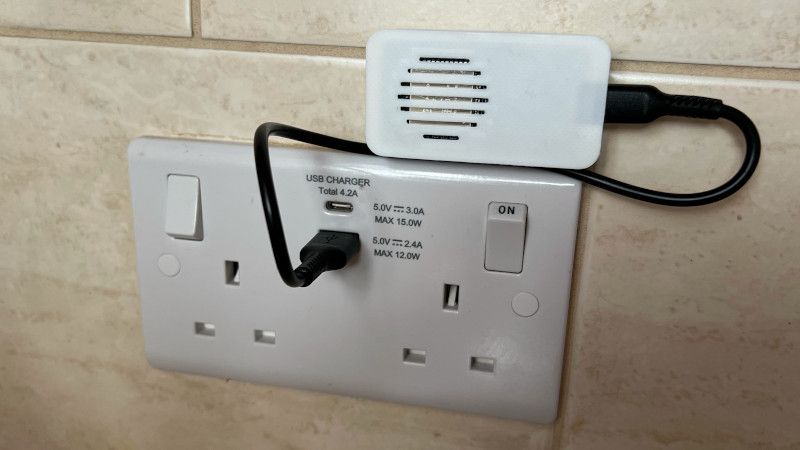
With the ESP32 flashed and configured, it can now be placed in your chosen room. Unfortunately, cases for ESP32s are a bit harder to come by, but there are several 3D print designs for cases. I don't have a 3D printer, but from eBay, I was able to get hold of some 3D printed cases for the ESP32-WROOM.
Tracking Devices in Home Assistant
Now that we have the ESP32s installed as "base stations" throughout the house, we need to set up Home Assistant to track the devices (beacons) we're interested in tracking.
The Beacons page of ESPresense documents which devices are known to work with ESPresense. Additionally, Beacon Apps can aslo be used on Android/iOS devices.
I currently have an iPhone and an iPad, both of which can be problematic from a tracking perspective as the operating system randomises the MAC address to protect privacy.
ESPresense works by broadcasting tracking information to per-room and per-device topics.
It is possible to track the presence of an iPad or iPhone without a Beacon App, but you could run into issues if you try to distinguish between individuals with the same make/model device. This is because the devices will identify as follows:
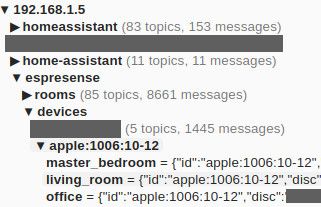
Fingerprints for Apple devices often follow the format apple:100?:*-* as a result apple:1006:10-12 isn't a particularly unique ID. If there are other Apple devices present, there is the opportunity for fingerprints to collide.
Therefore, I have opted to install the Room Assistant app, which will provide a much more unique ID in the format:
roomAssistant:xxxxxxxx-xxxx-xxxx-xxxx-xxxxxxxxxxxxIn my configuration.yaml file I have the following line, which means sensors are taken from a separate configuration file:
...
sensor: !include sensor.yaml
...
I have added the following to my sensor.yaml file so that the MQTT Room Presence integration for Home Assistant will know which devices to track:
- platform: mqtt_room
  name: "James iPad BLE"
  device_id: "roomAssistant:xxxx-xxxx-xxxx"
  state_topic: "espresense/rooms"
  timeout: 5
  away_timeout: 120
- platform: mqtt_room
  name: "James iPhone BLE"
  device_id: "roomAssistant:xxxx-xxxx-xxxx"
  state_topic: "espresense/rooms"
  timeout: 5
  away_timeout: 120
I used MQTT Explorer to determine the topics and Device IDs – although the Room Assistant app will tell you what the Device ID is.
Home Assistant will need to be restarted to pick up the sensor changes, but once restarted you should be able to track the devices and see their states:

I can now walk around the house with the iPad and see the state change as I move from room to room! I've noticed that it can typically take 10-20 seconds for Home Assistant to determine that you have entered a different room or area of the house.
Since writing this blog post, ESPresense v3 has been released. V3 includes a new enroll flow which provides much more reliable tracking of Apple devices. I cover how you can migrate to this approach in my blog post: Reliable iOS Presence Detection with ESPresense v3 Enroll Flow and IRK.
Better Automations
When I first started playing with Home Assistant, some of the first automations I put in place were ones to turn lights on and off based on motion sensors. This works well for turning lights on. However, motion sensors are less effective for determining that someone is still in a room for activities such as working at the computer or watching TV where minimal movement is required.
Unsurprisingly it didn't take long before the automations to turn lights off after a lack of motion were disabled.
However, I can now use ESPresense to have more reliable automations for triggering actions when a room is no longer occupied:
alias: Office Off - Unoccupied
description: "Turn the lights off if James isn't in the office for more than 10 minutes"
mode: single
trigger:
  - platform: state
    entity_id:
      - sensor.james_iphone_ble
    from: office
    for: 00:10:00
action:
  - service: light.turn_off
    data: {}
    target:
      entity_id:
        - light.office_lights
  - service: switch.turn_off
    data: {}
    target:
      entity_id: switch.office_lights
Or at the end of the day, if it looks like I'm getting ready for bed and I've left the lights on, I can have Home Assistant turn them all off, and Alexa can let me know that I left them on:
alias: Master Bedroom - Night - Office Off
description: "Turn off the office lights at night if they are on"
mode: single
trigger:
  - platform: state
    entity_id:
      - sensor.james_iphone_ble
    to: "master_bedroom"
condition:
  condition: and
  conditions:
    - condition: time
      after: "21:00:00"
      before: "23:59:59"
    - condition: or
      conditions:
        - condition: state
          entity_id: light.office_lights
          state: "on"
        - condition: state
          entity_id: switch.office_lights
          state: "on"
action:
  - service: light.turn_off
    data: {}
    target:
      entity_id:
        - light.office_lights
  - service: switch.turn_off
    data: {}
    target:
      entity_id: switch.office_lights
  - service: notify.alexa_media
    data:
      message: The office lights have been turned off
      target:
        - media_player.master_bedroom_2
      data:
        type: announce
        method: all
These are just a few examples of how I plan to use ESPresense to put in place more reliable automations.
Conclusion
This was my first time working with ESP32s but the whole process was fairly straight forward and pain free. I was able to get all of the devices flashed, connected to the network and placed in situ throughout the house comfortably within half an hour.
In a few cases I did have to make a few tweaks to the ESPresense settings to ensure that I'm being picked up in the correct room as there are a few points in the house where I get a strong overlapping signals and my location ends up being misreported:

For some of the ESPs I have a Maximum distance to report which I have set to a custom value to avoid the location being misreported.
With a small amount of tweaking, this has been a success! I will still keep most presence-based automations using motion sensors to determine if someone entered the room. But for more specific actions or determining when a room isn't being used, ESPresense is working out nicely!
