
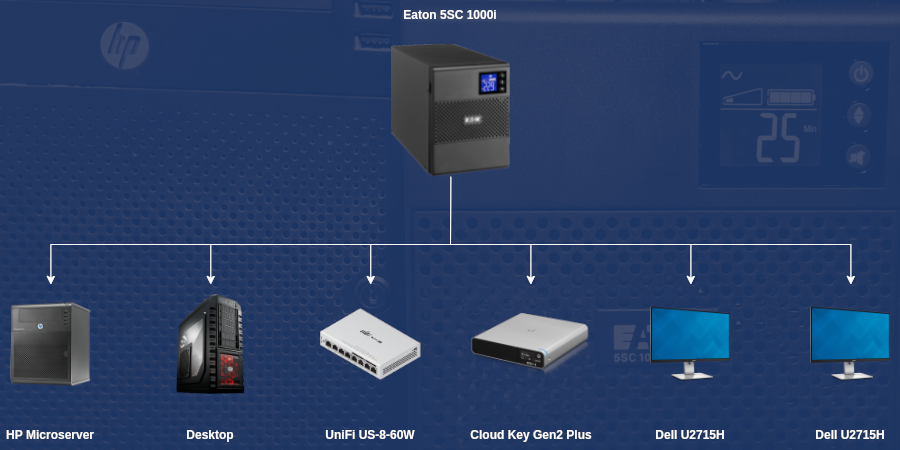
Last year I bought an Eaton 5SC 1000i UPS to provide my home office with backup power in the event of a short term power cut. The UPS will provide power to my desktop, HP ProLiant G7 MicroServer and a number of networking devices.
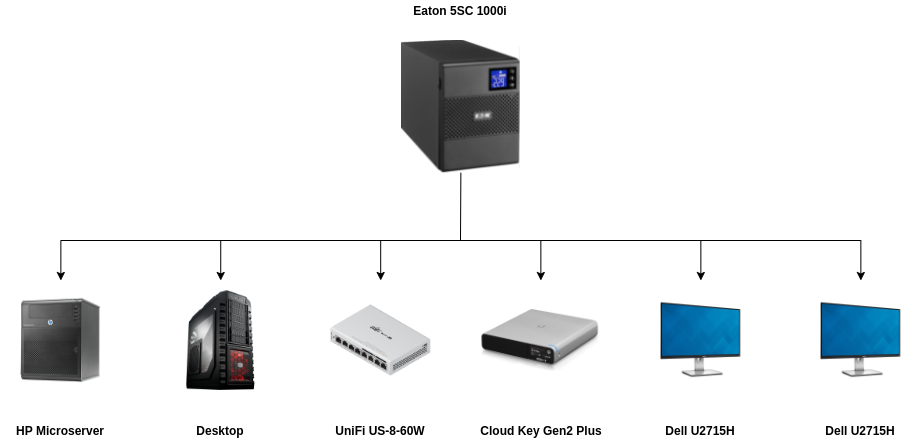
From the beginning I've wanted to ensure that the UPS would be responsible for safely shutting down both my desktop and microserver. Shutting down one computer with a UPS is farily simple, but how does this work if I want to shutdown my desktop and then the microserver?
This is the first time I've worked directly with a UPS, what follows in the rest of this blog post is an explanation of a number of different methods I looked at for getting information out of a UPS, and how you can even pull data from your UPS into your home assistant setup!
Official Software
Eaton, like most other mainstream UPS manufactuers provide their own management software for their UPS. The official software for an Eaton UPS is Intelligent Power Protector (IPP).
Intelligent Power Protector provides a web interface for configuring the software and viewing any events:
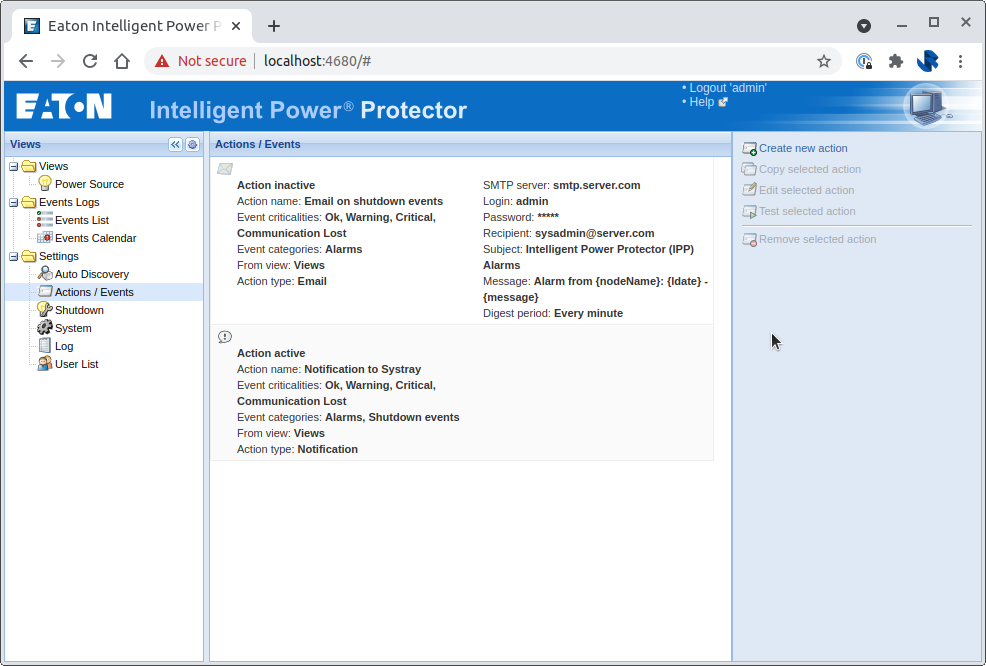
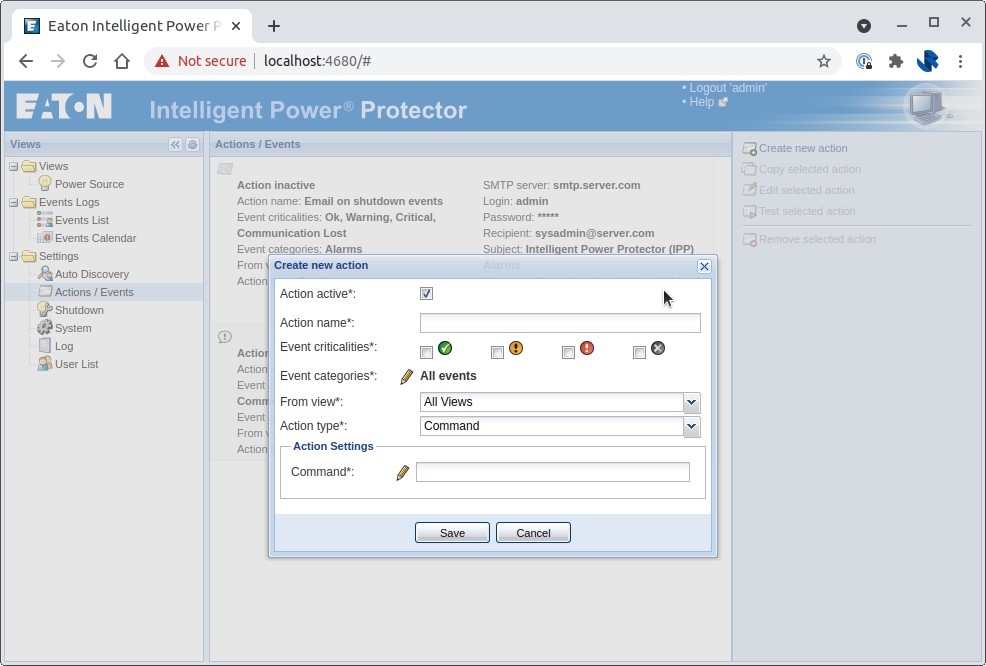
Within the web interface it is possible to setup Actions that are triggered based on Events. An action can be used to either send an email or execute a command (program or script) of your choosing.
The shutdown behaviour can also be configured in a seperate section of the tool. Once the time remaining on battery crosses a threshold the management software can either: Shutdown, Hibernate, Power Off or run a script:
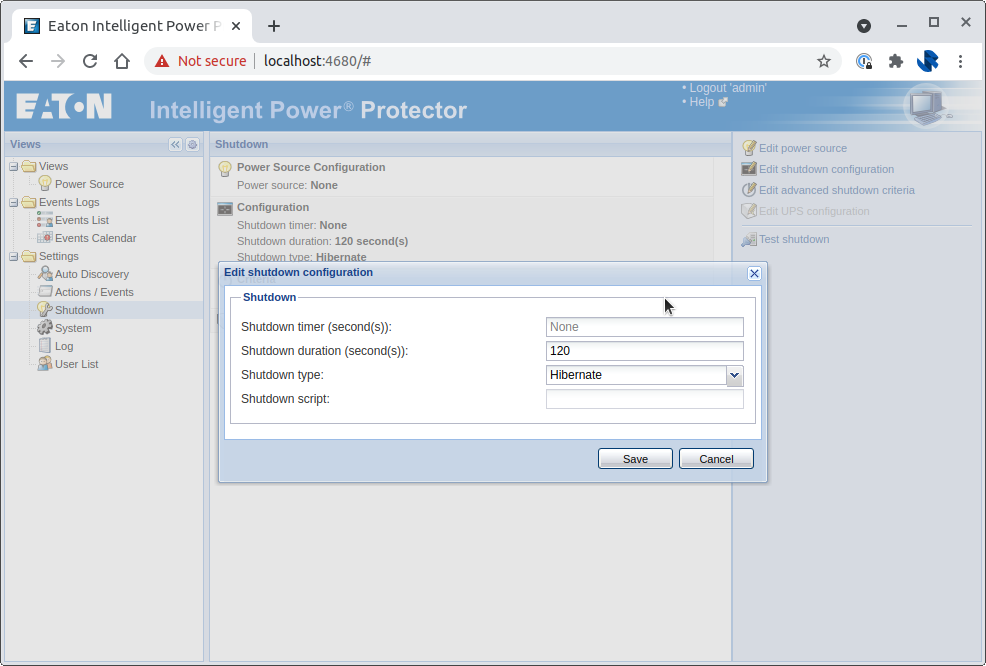
In the shutdown configuration, the script is expected to be a javscript file that implements a specific interface and is able to use the UserFunctions API provided by IPP.
The challenge with this scripting approach is that there isn't really any documentation around the interface or APIs beyond the sample scripts, and there are only two sample scripts – netapp_shutdown.js and sample_user_script.js. These will likely be located in /usr/local/Eaton/IntelligentPowerProtector/configs/scripts or C:\Program Files\Eaton\IntelligentPowerManager\configs\scripts depending on if you're using Linux or Windows.
Whilst trying to look for better documentation and examples on the internet of how to use and build javascript scripts for IPP, I came across quite a few references and mentions of Network UPS Tools (NUT). It was at this point I decided to abandon the official software and see what I could achieve with Network UPS Tools.
Network UPS Tools
Network UPS Tools (NUT) is an open source software package that is aimed at providing a common protocol and set of tools to monitor and manage power devices (Uninterruptible Power Supplies, Power Distribution Unit, etc)
NUT works by running a number of services on a machine connected to the UPS.
- Driver - The driver is responsible for talking directly to the UPS
- Server - Serves data from the driver to the network
- Client - A client for talking to and getting data from the Server
- Monitor - This is a type of client that will act (e.g. perform shutdown) based on status information received from the Server component.
Monitor will allow us to poll the UPS and react based on events such as loss of power or low battery. Should we want to pull any data ad-hoc from the UPS we should be able to do this using the upsc command line client, or any other NUT-compatible client.
Desired Setup
In my desired setup I have the UPS connected via USB to the mircoserver. When the UPS enters a low battery state and needs to trigger a shutdown I would like both my microserver and my desktop to shutdown. My desktop isn't connected to the UPS. The setup required will be as follows:
- My microserver will run the driver, server and monitor. The monitor will be responsible for shutting down the microserver
- My desktop will run the monitor, which will connect to the server on the microserver and will be responsible for shutting down the desktop
Install NUT on the Microserver
Below are the steps that I have taken for installing and setting up NUT on the microserver (running Ubuntu Server 20.04).
Install NUT:
sudo apt install nutAll configuration files will be created in /etc/nut. Ensure that NUT is running in standalone mode.
MODE=standalone/etc/nut/nut.confNext, we need to setup the UPS devices that the driver will need to interact with. The Network UPS Tools website provides a Hardware Compatibility List that you can check to see if your UPS is supported.
I have checked the hardware compatibility list and can see that the 5SC supports using the USB driver, so I can add the followign to /etc/nut/ups.conf:
[eaton5sc]
driver=usbhid-ups
port=auto
desc = "Eaton 5SC 1000i"
/etc/nut/ups.confThe next step is to create a set of users for the microserver and desktop monitor to use:
[microserver]
password=Eptdral1
upsmon master

[desktop]
password=Judsis0
upsmon slave/etc/nut/upsd.usersThe user for my desktop only needs to be setup as a slave, where as the microserver can be the master.
Next, let's configure the UPS monitor on the microserver to monitor our UPS, add the following entry to /etc/nut/upsmon.conf:
MONITOR eaton5sc@localhost 1 microserver Eptdral1 master/etc/nut/upsmon.confRestart the server, monitor and driver to ensure that all of the configuration changes are reloaded:
sudo systemctl restart nut-driver.service
sudo systemctl restart nut-server.service
sudo systemctl restart nut-monitor.service
You should now be able to use the NUT client (upsc) to get information from the UPS:
$ upsc eaton5sc@localhost

battery.capacity: 9.00
battery.charge: 31
battery.charge.low: 20
battery.charge.restart: 0
battery.charger.status: charging
battery.energysave: no
....
Individual attributes can be requested as follows, this shows that the low battery level is set to 20%:
$ upsc eaton5sc@localhost battery.charge.low
20
NUT is now successfully setup and monitoring our UPS. If the UPS battery level drops below 20%, NUT will shutdown the microserver.
Installing NUT on the desktop
The desktop (running Ubuntu 20.04) will not be talking to the UPS directly, therefore we only require the NUT monitor service to be running, as the desktop will talk the UPS via the NUT server running on the microserver.
Install NUT:
sudo apt install nutAll configuration files will be created in /etc/nut. Ensure that NUT is running in netclient mode:
MODE=netclient/etc/nut/nut.confNext, the monitor config needs to be updated to monitor the UPS on the microserver. Add the following to /etc/nut/upsmon.conf:
MONITOR eaton5sc@192.168.1.3 1 desktop Judsis0 slave/etc/nut/upsmon.conf192.168.1.3 is the IP address of my microserver.
Restart the monitor to ensure that all of the configuration changes are reloaded:
sudo systemctl restart nut-monitor.serviceThe microserver and desktop are now both monitoring the UPS power status, and will shutdown if the UPS enters a low battery state!
Notification Script for Netowrk UPS Tools
The monitor service can be configured to trigger a script based on events.
On the microserver, I want the monitor service will email me with some key information when an event happens.
To do this, I can update the /etc/nut/upsmon.conf config file to add the following entries:
NOTIFYFLAG ONBATT SYSLOG+WALL+EXEC
NOTIFYFLAG ONLINE SYSLOG+WALL+EXEC
NOTIFYFLAG LOWBATT SYSLOG+WALL+EXEC
NOTIFYFLAG COMMOK SYSLOG+WALL+EXEC
NOTIFYFLAG COMMBAD SYSLOG+WALL+EXEC
NOTIFYFLAG REPLBATT SYSLOG+WALL+EXEC
NOTIFYFLAG NOCOMM SYSLOG+WALL+EXEC
NOTIFYCMD "/etc/nut/notifycmd"/etc/nut/upsmon.confNOTIFYFLAG directives tell the monitor how to handle a given event type. The different flags are SYSLOG, WALL and EXEC.
SYSLOG- Writes the message to the syslogWALL- Write the message to all users via/bin/wallEXEC- ExecuteNOTIFYCMDwith the message and environment variablesNOTIFYTYPEandUPSNAME.
The different event types are as follows:
ONLINE      UPS is back online
ONBATT      UPS is on battery
LOWBATT     UPS is on battery and has a low battery (is critical)
FSD         UPS is being shutdown by the master (FSD = "Forced Shutdown")
COMMOK      Communications established with the UPS
COMMBAD     Communications lost to the UPS
SHUTDOWN    The system is being shutdown
REPLBATT    The UPS battery is bad and needs to be replaced
NOCOMM      A UPS is unavailable (can’t be contacted for monitoring)
In the scenario I configured above, I have most events triggering the script, writing to wall and syslog.
I have put together the following bash script that uses upsc to query additional information about the UPS state and send an email using Mailgun:
#!/bin/bash
#
# Emails a given email address with information when an event happens.
#
# This script can be tested without sending an email by running as follows:
#     SKIP_SEND=1 UPSNAME="eaton5sc@localhost" ./notifycmd
#
set -e

# Configuration
MAILGUN_API_KEY="YOURAPIKEYGOESHERE"
MAILGUN_DOMAIN="email.jamesridgway.co.uk"
SEND_TO="james@jamesridgway.co.uk"


# UPS Info
BATT=$(upsc "${UPSNAME}" battery.charge)
BATT_LOW=$(upsc "${UPSNAME}" battery.charge.low)
BATT_RUNTIME=$(upsc "${UPSNAME}" battery.runtime)
MODEL=$(upsc "${UPSNAME}" ups.model)
SERIAL=$(upsc "${UPSNAME}" ups.serial)
LOAD=$(upsc "${UPSNAME}" ups.load)
STATUS=$(upsc "${UPSNAME}" ups.status)

# Prepare email subject and body
SUBJECT="$*"
BODY=$(cat <<EOF
UPS: ${UPSNAME}
Model: ${MODEL}
Serial: ${SERIAL}

Status: ${STATUS}
Load: ${LOAD}%
Battery Charge: ${BATT}%
Battery Charge Low Threshold: ${BATT_LOW}%
Battery Runtime: $(date -d@"${BATT_RUNTIME}" -u "+%M mins %S seconds") (${BATT_RUNTIME})
EOF
)

echo "Prepairing to notify with the following message:"
echo "${BODY}"
echo -e "\n"

if [ -n "${SKIP_SEND}" ]; then
    echo "Skipping email send"
else
    curl --user "api:${MAILGUN_API_KEY}" \
        "https://api.eu.mailgun.net/v3/${MAILGUN_DOMAIN}/messages" \
        -F from="Eaton 5SC 1000i <eaton5sc@${MAILGUN_DOMAIN}>" \
        -F to="${SEND_TO}" \
        -F subject="UPS Status Changed: ${SUBJECT}" \
        -F text="${BODY}"
fi

echo "Done!"
/etc/nut/notifycmdDon't forget to ensure that the script has execute permissions
sudo chmod +x /etc/nut/notifycmdThe notification script is triggered by the monitor service when an event of interest happens. The script then polls the NUT server to get additional information abotu the UPS using the upscclient that comes with the NUT package. Another alternative implementation could have been written in python using the python-nut2 library.
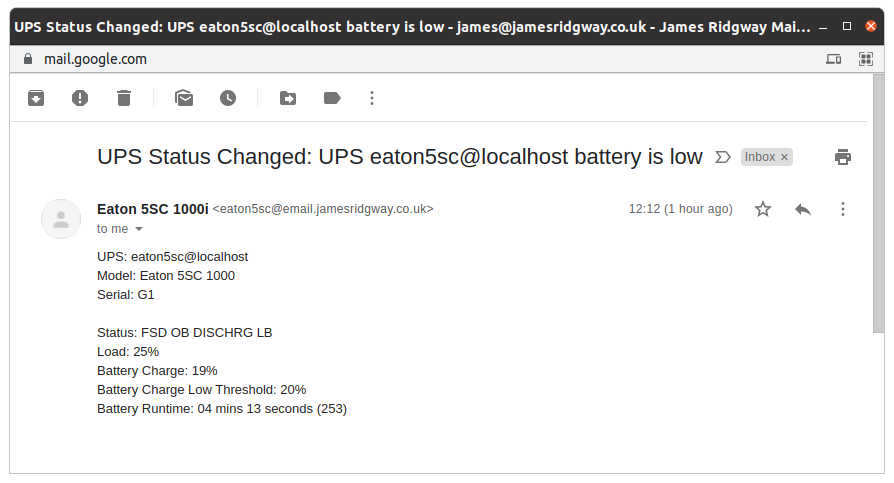
Whenever a UPS event is triggered I'll receive an email like this:
Integrating UPS data with Home Assistant
Recently, I've been getting more power usage data into my home assistant setup. I bought a TP-Link Kasa Smart Plug last week to monitor the power consumption for all of the various accessories on my office desk:
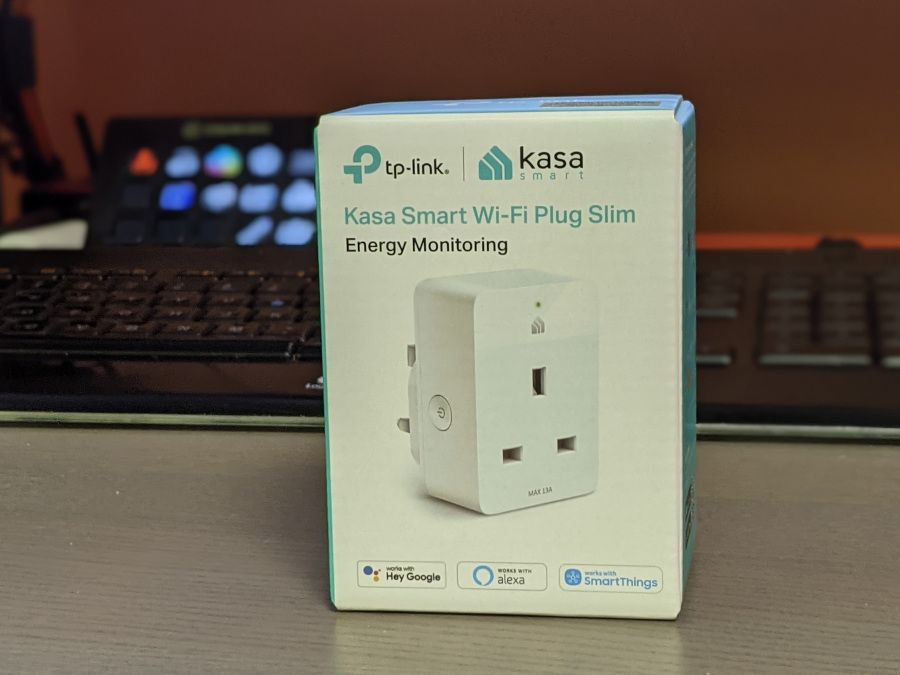
This now feeds into my Home Assistant dashboard using TP-Link Kasa Smart Home integration that is built into home assistant:
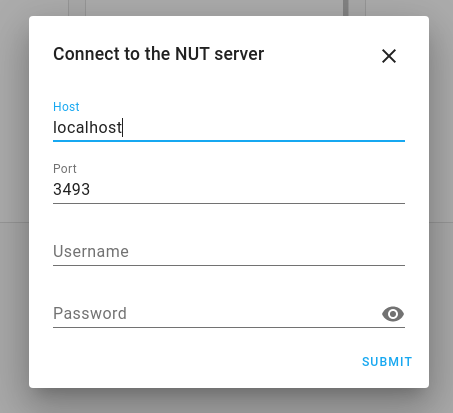
Given that NUT is widely used for monitoring UPS, I shouldn't be too suprised that Home Assistant has an out of the box integration for working with NUT:

All I need to do is plug in the details of my NUT server, and I'm ready to start placing widgets onto my dashboard!
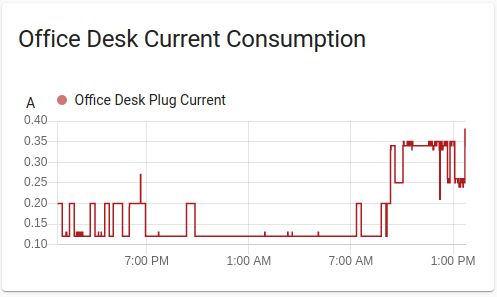
My dashboard now features a set of graphs showing the battery, load and output voltage for my UPS:
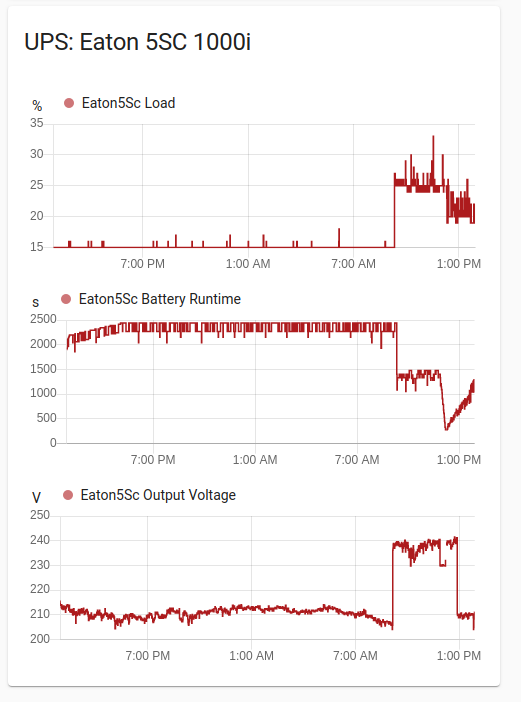
As you can see from the graphs I did a power-cut test at around 12:00 to ensure my script and setup worked as expected. I received an email when the power was cut, and when the UPS entered low battery mode.
Once the battery dropped below 20%, the microserver and desktop automatically started a safe shutdown! 😎
