

Legacy systems can be scary; they’re often vast and sprawling with incomplete documentation. And as with all legacy systems, they’re business-critical.
It can be a real challenge re-writing a legacy application, especially if the tech stack is so old that doing a phased migration is out of the question.
A few years ago, I worked on a project which was a significant re-write of several different systems. It took multiple teams nine months to implement the changes and 14 people to deploy the application over an 8-hour deployment window one Friday night. The release was a success, but it took much longer than it should have because there were many missing dependencies and configurations, which wasn’t helped by incomplete release notes.
I recently worked on migrating a project from a legacy Microsoft tech stack to a slightly less legacy tech stack. Unfortunately, the technology was so old that we knew it would have to be a “big bang” migration when the new system was ready.
Keen to avoid all of the headaches of past experiences, we built an immutable development server that we used to test the application throughout the development. This process of building an immutable deployment server ensured that we had a well understood and tested example of how to install the new system on a server from scratch. If you're interested in the benefits of immutable servers, I've written about these previously on my blog.
The plan is to use Packer (a provisioning tool) to provision our server with everything we need. Then, when it comes to deploy day, our Packer setup and associated scripts will provide all the documentation we need to install the application.
The Tech Stacks
In this specific example we were working with the following technology stacks.
Legacy application:
- Microsoft Access
- Windows Server 2012
- Microsoft SQL Server 2012
New Application:
- .Net Core 3.1
- Windows Server 2012
- Microsoft SQL Server 2012
This is a bit of hybrid migration, we're sticking with 2012, but ditching Microsoft Access for something a bit more modern — .Net Core 3.1.
Introducing: Packer
Packer is a tool produced by HashiCorp that automates the creation of machine images:
It embraces modern configuration management by encouraging you to use automated scripts to install and configure the software within your Packer-made images. Packer brings machine images into the modern age, unlocking untapped potential and opening new opportunities.
Out of the box, Packer can produce machine images for:
- Microsoft Azure
- AWS
- vmware
- Google Cloud Platform
- Docker
- Digital Ocean
- ...and many more
When Packer builds a machine image, the process will take an existing machine image and run through a series of provisioning steps to produce your new image. A provisioning step can be anything from a Bash script or a PowerShell script all the way through to applying configuration from SaltStack/Chef/Puppet/Ansible/etc.
As we're looking to produce a custom Windows Server 2012 image, we'll start with a plain Windows Server 2012 image and apply a series of provisioning steps to produce the setup required.
Note: In this blog post, I will be building the image as an AMI for use in AWS. Packer supports many Builders including, Azure, GCP, etc. For this example, I picked AWS.
One of the main benefits of Packer is that you build a server image for the given environment in which you're working, and that image is used to create the server. So, for example, Packer can create an AMI for AWS, and AWS can create EC2 instances directly from the AMI. For this project, we knew that we would be deploying to a bare metal server, and in the environment in which we were working, we wouldn't be able to leverage a Packer image directly. However, we used Packer as part of the development process to ensure that we had a documented and repeatable process for setting up a Windows Server 2012 server from scratch to run our application.
The Provisioning Process
We will be looking to take a Windows Server 2012 image and:
- Install OpenSSH and configure it to allow us to connect (by providing a public key)
- Install IIS
- Install .Net Core 3.1 Hosting Bundle
- Install SQL Server Express 2012
- Set the Administrator password for the server
At its simplest packer takes a JSON configuration file which provides it with all of the instructions needed to perform a build.
For example:
packer builder win-server.jsonTwo of our steps involve setting up credentials. OpenSSH will need to know our public key. We will also need to set a password for the Windows Administrator account.
For ease, we will setup a wrapper script that will allow us to generate a password for our administrator account and a key pair to use for SSH:
#!/bin/bash
set -e

# Generate an admin password
ADMIN_PASSWORD=$(</dev/urandom tr -dc '1234567890abcdefhijklmnopqrstuvwxyzABCDEFGHIJKLMNOPQRSTUVWXYZ' | head -c18)
export ADMIN_PASSWORD

# Generate a public/private key pair for ssh
rm -f ssh-key ssh-key.pub
ssh-keygen -f ssh-key -q -N ""

packer build win-server.json

# Output administrator password
echo "Administrator password was set to: ${ADMIN_PASSWORD}"
In the above build script a password is generated and assigned to the environment variable ADMIN_PASSWORD. ssh-keygen is used to generate an SSH key pair. Finally, we invoke packer and print out the Administrator password (assuming Packer runs successfully).
To run the above script we will also need an initial win-server.json:
{
    "variables": {
        "admin_password": "{{env `ADMIN_PASSWORD`}}"
    },
    "builders": [
        {
            "type": "amazon-ebs",
            "region": "eu-west-2",
            "instance_type": "t3a.xlarge",
            "source_ami_filter": {
                "filters": {
                    "virtualization-type": "hvm",
                    "name": "*Windows_Server-2012-R2*English-64Bit-Base*",
                    "root-device-type": "ebs"
                },
                "most_recent": true,
                "owners": "amazon"
            },
            "launch_block_device_mappings": [
                {
                    "device_name": "/dev/sda1",
                    "delete_on_termination": true,
                    "volume_size": 60,
                    "volume_type": "gp2"
                }
            ],
            "ami_name": "legacy-win2012-sql2012-netcore31 {{timestamp}}",
            "user_data_file": "./bootstrap.txt",
            "communicator": "winrm",
            "winrm_username": "Administrator",
            "winrm_port": 5986,
            "winrm_insecure": true,
            "winrm_use_ssl": true,
            "tags": {
                "Name": "Legacy: Windows Server 2012, SQL Server Express 2012, .Net Core 3.1"
            }
        }
    ],
    "provisioners": [
    ]
}Our win-server.json file tells packer that we want to build a server image on top of a Windows Server 2012 image provided by Amazon (see source_ami_filter). We also tell Packer that we want the server to have a 60GB hard disk - see launch_block_device_mappings.
Packer needs to be able to talk to the server during the build process so that it can provide instructions for what needs provisioning. If you use Packer to provision Linux machines, you'll typically configure it to communicate with the VM over SSH. With Windows, on the other hand you will need to communicate via Windows Remote Management (winrm). Hence the values for winrm_username, winrm_port, winrm_insecure and winrm_use_ssl.
Most Windows images do not have Windows Remote Management setup out of the box. As a result we need to configure this. In AWS a server can run certain commands based on "user data" when it boots. In our example here we're telling Packer to provide AWS with some user data from a text file ("user_data_file": "./bootstrap.txt"):
<powershell>

write-output "Running User Data Script"
write-host "(host) Running User Data Script"

Set-ExecutionPolicy Unrestricted -Scope LocalMachine -Force -ErrorAction Ignore

# Don't set this before Set-ExecutionPolicy as it throws an error
$ErrorActionPreference = "stop"

# Remove HTTP listener
Remove-Item -Path WSMan:\Localhost\listener\listener* -Recurse

$Cert = New-SelfSignedCertificate -CertstoreLocation Cert:\LocalMachine\My -DnsName "packer"
New-Item -Path WSMan:\LocalHost\Listener -Transport HTTPS -Address * -CertificateThumbPrint $Cert.Thumbprint -Force

# WinRM
write-output "Setting up WinRM"
write-host "(host) setting up WinRM"

cmd.exe /c winrm quickconfig -q
cmd.exe /c winrm set "winrm/config" '@{MaxTimeoutms="1800000"}'
cmd.exe /c winrm set "winrm/config/winrs" '@{MaxMemoryPerShellMB="1024"}'
cmd.exe /c winrm set "winrm/config/service" '@{AllowUnencrypted="true"}'
cmd.exe /c winrm set "winrm/config/client" '@{AllowUnencrypted="true"}'
cmd.exe /c winrm set "winrm/config/service/auth" '@{Basic="true"}'
cmd.exe /c winrm set "winrm/config/client/auth" '@{Basic="true"}'
cmd.exe /c winrm set "winrm/config/service/auth" '@{CredSSP="true"}'
cmd.exe /c winrm set "winrm/config/listener?Address=*+Transport=HTTPS" "@{Port=`"5986`";Hostname=`"packer`";CertificateThumbprint=`"$($Cert.Thumbprint)`"}"
cmd.exe /c netsh advfirewall firewall set rule group="remote administration" new enable=yes
cmd.exe /c netsh firewall add portopening TCP 5986 "Port 5986"
cmd.exe /c net stop winrm
cmd.exe /c sc config winrm start= auto
cmd.exe /c net start winrm

</powershell>
If we run our ./build.sh now this will take the Amazon Windows Server 2012 image, spin up a server and configure Windows Remote Management. Packer would then go on to use Windows Remote Management to run any provisioners but we're yet to define these.
The Provisioning Steps
Most of us are use to downloading Microsoft SQL Server (picking ENU\x64\SQLEXPRADV_x64_ENU.exe) and running through a graphical installed to configure and install what we need.
The challenge with provisioning a machine image with Packer is that we need to be able to describe everything via the command line. There are no provisions for interacting with a GUI or doing point-and-click operations.
Fortunately, the Microsoft SQL Server installer was designed to be executed on the CLI. Microsoft provides comprehensive documentation on the command prompt parameters that can be used with the SQL Server installer.
We can provide the installed with a configuration file:

The syntax and configuration options for the configuration file are quite complicated, and I originally started trying to craft one from scratch by this proved (as you'd expect) to be error prone and tedious.
After a bit more research I discovered that the install could be run in a way that will generate a configuration file for you.
Run:
.\SQLEXPRADV_x64_ENU /ACTION=INSTALL /UIMODE=NormalThis will launch the installation wizard:
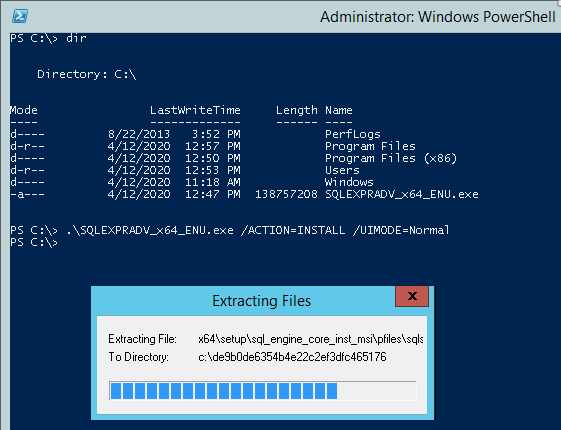
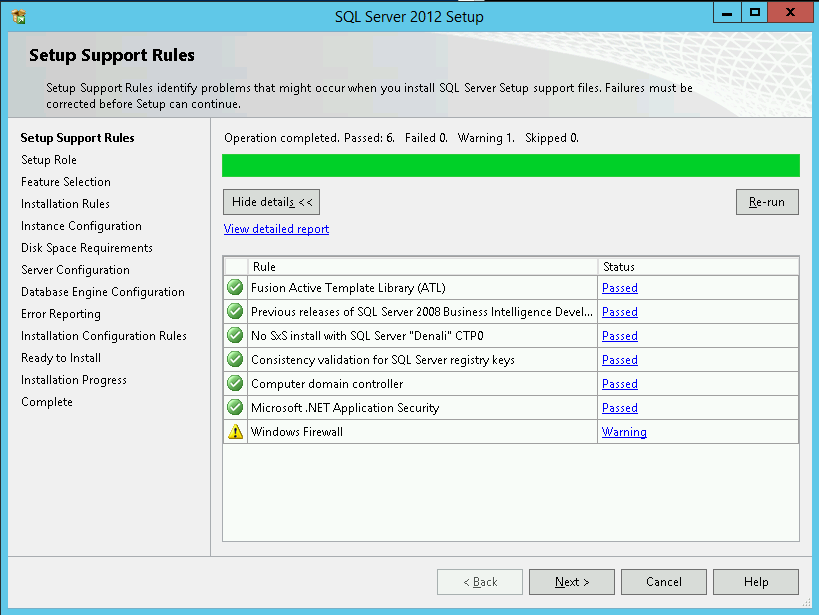
Click through the screens as you normally would configuring the installation with your desired settings, you will eventually get to a screen that looks like this:
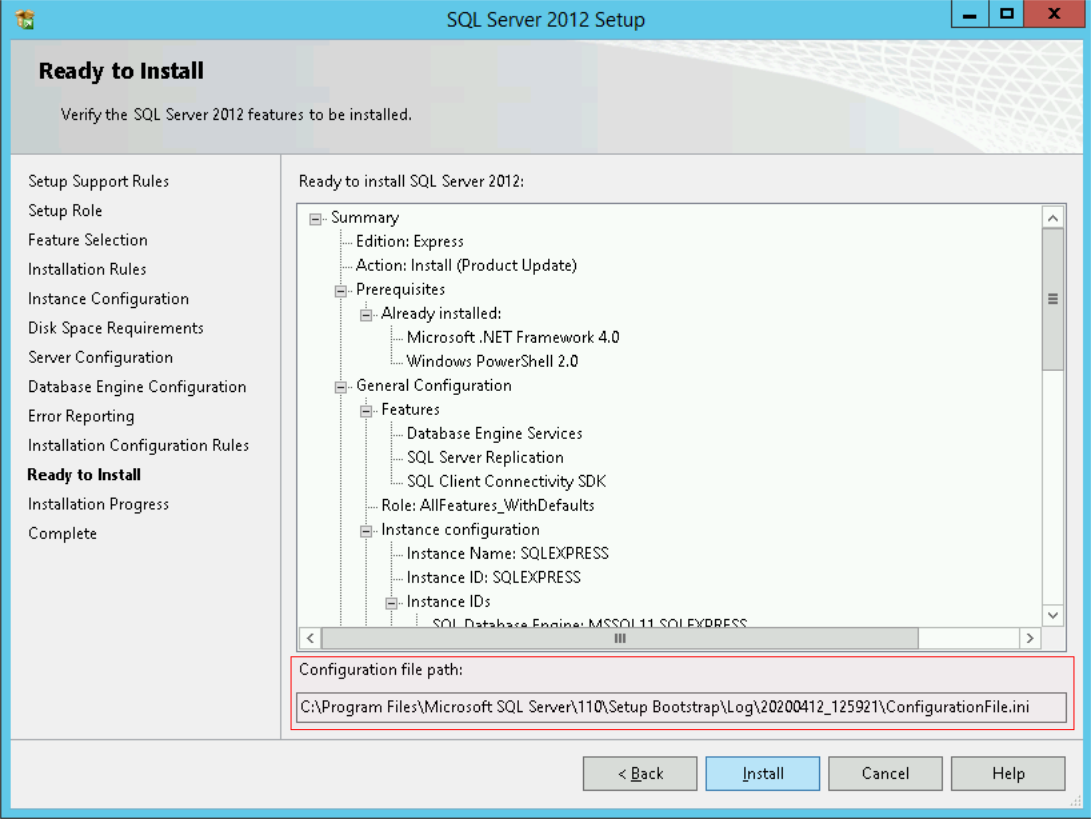
Note the "Configuration file path" displayed at the bottom of this wizard screen. This is the path to the configuration file you've just generated. Take a copy of the configuration file and save it as SqlConfigurationFile.ini alongside your win-server.json file.
We're now at a point where we can build out our provisioning steps as follows:
    ...
    "provisioners": [
        {
            "type": "file",
            "source": "ssh-key.pub",
            "destination": "C:\\Users\\Administrator\\.ssh\\authorized_keys"
        },
        {
            "type": "file",
            "source": "SqlConfigurationFile.ini",
            "destination": "C:\\SqlConfigurationFile.ini"
        },
        {
            "type": "file",
            "source": "sshd_config",
            "destination": "C:\\Users\\Administrator\\sshd_config"
        },
        {
            "type": "powershell",
            "environment_vars": [
                "ADMIN_PASSWORD={{ user `admin_password` }}"
            ],
            "elevated_user": "Administrator",
            "elevated_password": "{{.WinRMPassword}}",
            "script": "init.ps1"
        }
    ]
    ...
Other than a PowerShell provisioner, we're using a series of file provisioners.
ssh-key.pubis a generated by ourbuild.shSqlConfigurationFile.iniis the configuration file that we generated from running the installation process manuallysshd_configis a basic sshd configuration file that can be found here.
Our PowerShell provisioner will run an init.ps1 script with administrator privileges.
Let's start to flesh out our init.ps1 script.
Ensure that the script stops on an error, hides progress status reporting and supports HTTPS connections:
$ErrorActionPreference = "stop"
$ProgressPreference = 'SilentlyContinue'
[Net.ServicePointManager]::SecurityProtocol = [Net.SecurityProtocolType]::Tls12
Next we will define a function for unzipping zip files:
Add-Type -AssemblyName System.IO.Compression.FileSystem
function Unzip
{
    param([string]$zipfile, [string]$outpath)

    [System.IO.Compression.ZipFile]::ExtractToDirectory($zipfile, $outpath)
}Create a WebClient for downloading files.
Side note: Invoke-WebRequest is a built-in cmdlet for performing web requests, but as the request is buffered into memory before being flushed to disk it can be (a) very slow for large files, (b) cause memory issues. Hence the choice of WebClient.
$WebClient = New-Object System.Net.WebClientDownload and install OpenSSH:
# Install OpenSSH
Write-Host "SSH: Installing..."
Invoke-WebRequest -Uri "https://github.com/PowerShell/Win32-OpenSSH/releases/download/v8.1.0.0p1-Beta/OpenSSH-Win64.zip" -OutFile "C:\OpenSSH-Win64.zip"
Unzip "C:\OpenSSH-Win64.zip" "C:\OpenSSH-Win64\OpenSSH"
Move-Item -Path "C:\OpenSSH-Win64\OpenSSH\*" -Destination "C:\Program Files\OpenSSH"
Set-Location -Path "C:\Program Files\OpenSSH"
powershell -File .\install-sshd.ps1
.\ssh-keygen.exe -A
New-NetFirewallRule -Protocol TCP -LocalPort 22 -Direction Inbound -Action Allow -DisplayName SSH
Start-Service sshd
Set-Service -Name sshd -StartupType 'Automatic'
Move-Item -Path "C:\\Users\\Administrator\\sshd_config" -Destination "C:\\ProgramData\\ssh\\sshd_config" -Force
Write-Host "SSH: Installed"Install IIS and the .Net Core 3.1 hosting bundle. This will also setup a new website in IIS.
# Install IIS
Write-Host "IIS: Installing..."
Install-WindowsFeature -Name Web-Server, Web-Mgmt-Tools
Write-Host "IIS: Installed."

# Install .Net 3.1
Write-Host "Hosting Bundle: Installing..."
$WebClient.DownloadFile("https://download.visualstudio.microsoft.com/download/pr/fa3f472e-f47f-4ef5-8242-d3438dd59b42/9b2d9d4eecb33fe98060fd2a2cb01dcd/dotnet-hosting-3.1.0-win.exe","C:\dotnet-hosting-3.1.0-win.exe")
$args = New-Object -TypeName System.Collections.Generic.List[System.String]
$args.Add("/quiet")
$args.Add("/norestart")
Start-Process -FilePath "C:\dotnet-hosting-3.1.0-win.exe" -ArgumentList $args -NoNewWindow -Wait -PassThru
New-WebSite -Name "Default Web Site" -Port 80 -HostHeader mywebsite.com -PhysicalPath "C:\inetpub\wwwroot\" -Force
Write-Host "Hosting Bundle: Installed"Now for SQL Server 2012. Download and install SQL Server 2012 using the configuration file that we generated:
# Install SQL Server Express 2012
Write-Host "SQL Server Express 2012: Installing"
$WebClient.DownloadFile("https://download.microsoft.com/download/8/D/D/8DD7BDBA-CEF7-4D8E-8C16-D9F69527F909/ENU/x64/SQLEXPRADV_x64_ENU.exe", "C:\SQLEXPRADV_x64_ENU.exe")
(Get-Content "C:\SqlConfigurationFile.ini").replace('WIN-HOSTNAME', [System.Net.Dns]::GetHostName()) | Set-Content "C:\SqlConfigurationFile.ini"
$args = New-Object -TypeName System.Collections.Generic.List[System.String]
$args.Add("/ConfigurationFile=""C:\SqlConfigurationFile.ini""")
Start-Process -FilePath "C:\SQLEXPRADV_x64_ENU.exe" -ArgumentList $args -NoNewWindow -Wait -PassThru
Write-Host "SQL Server Express 2012: Installed"Finally, we can set the Windows Administrator password:
# Set admin password
Write-Host "Admin password: setting"
net user Administrator $Env:ADMIN_PASSWORD
Write-Host "init.ps1 completed!"There we go, it's time to run ./build.sh
Automation Is the Best Documentation
Figuring out how to reproduce each installation step in Packer can be time-consuming to get it to the point where everything works. However, the end result is a build process that can be run from scratch to produce a fully configured server image.
Building a server image through automation is a highly repeatable process. Throughout the development of a project, the server can be regularly re-built to ensure that there is no configuration drift or additional software dependency that have been installed on the server manually without being captured in the automated provision process.
And when the time comes to throw the project over to production, the Packer provisioning steps provide the perfect documentation for everything needed for the project to run.
All of the code in this blog post is available as a ready-to-run project on GitHub: legacy-win-server-image
