

Explore how to use Application Load Balancers and Target Groups to build core infrastructure for deploying immutable web applications.
This post is the next installment in the series on Immutable Servers. In the previous post we looked at building immutable server images with Packer and SaltStack. In this post we will look at the infrastructure we need to launch an immutable Rails web application which we build in the next post - coming soon.
Architecture
Throughout this series I have been using a Rails application as an example of how an existing service can be adopted to follow an Immutable Servers pattern which will better allow the application to run on a Spot Instance.
The architecture we're about to design will allow you to launch an immutable web application on Spot Instances.
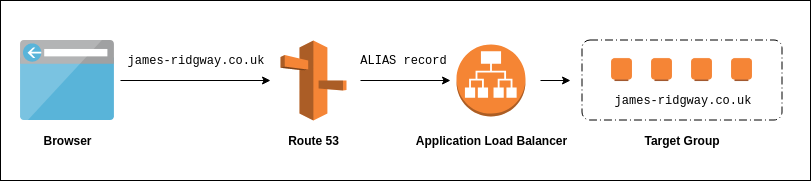
As you can see from the above diagram the proposed architecture will utilise a couple of AWS services.
- Route 53
Route 53 will manage DNS and will allow us to point our domain at a CloudFront distribution using anAalias record. - Application Load Balancer
An application can load balance traffic to a Target Group based on the Host header or the Path of the request.
Our infrastructure code that we place in Terraform will describe everything apart from the instances that should be added to the Target Group.
Launching the specific server image that contains our application should be the responsibility of the CI/CD pipeline that will build our application. When following an immutable servers pattern the server image is regarded as your build artifact, as a result your server image you deploy is likely to iterate a different (and potentially faster) rate than your infrastructure.
In a future post we will look at the build and deployment process for our application that will rely on the infrastructure we build in this post.
Application Load Balancers and Target Groups
An Application Load Balancer (ALB) is a type of load balancer that AWS provides through their Elastic Load Balancing service.
An ALB can support listeners which listen for connections on a configured protocol and port. For example, you may have one listener configured for HTTP (80) and another configured for HTTPS (443).
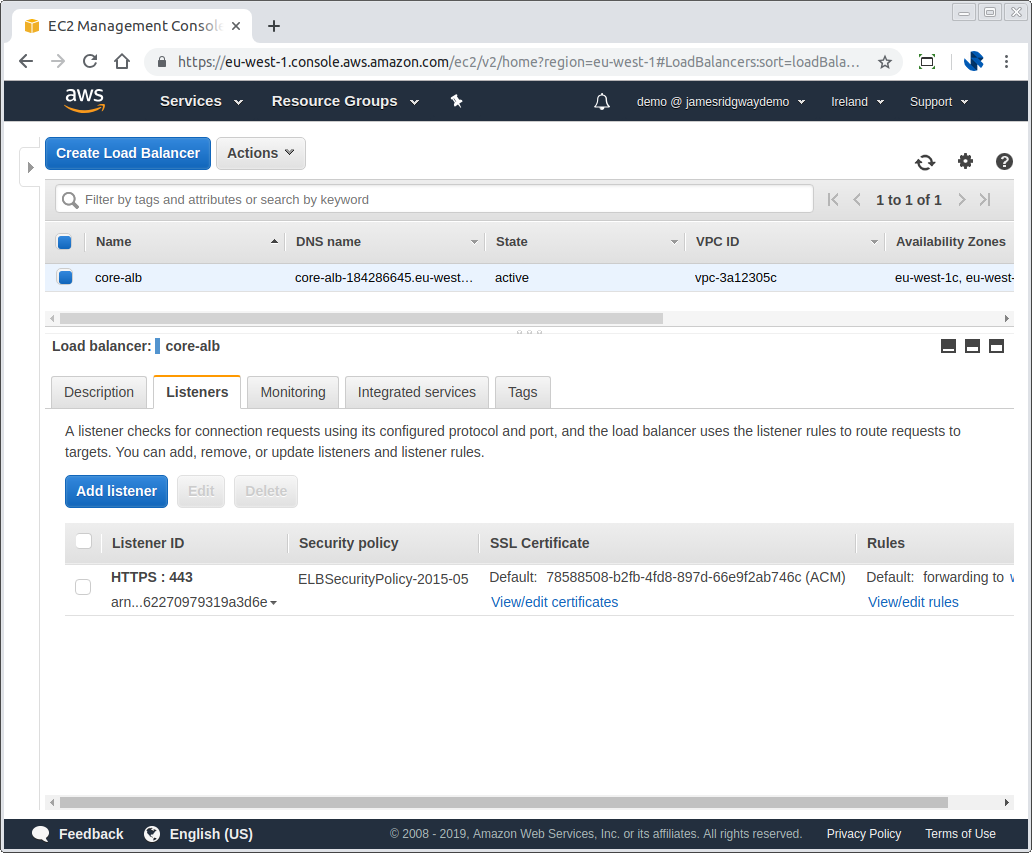
Each listener can then have a set of rules that will direct traffic to a target group based on either the Host Header or the Request Path.
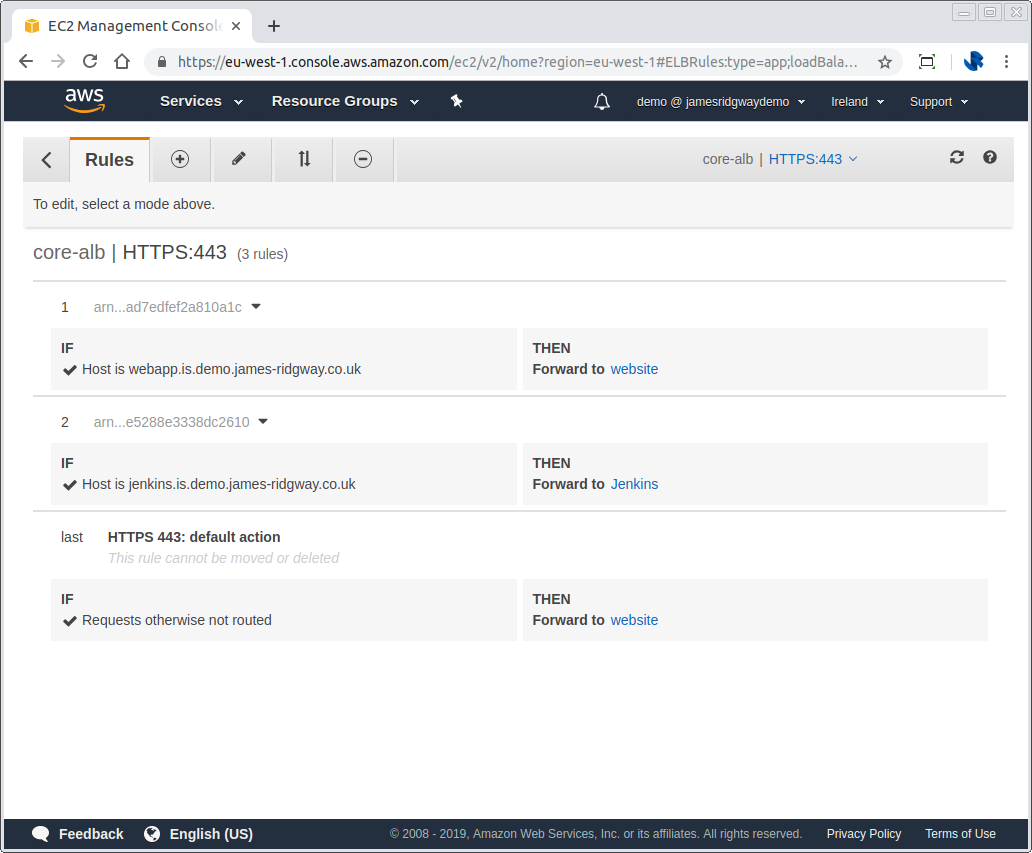
If the above example, all of these rules are looking at the Host Header to then determine if the request should be routed to the website or jenkins target group.
EC2 instances can be registered to a target group. When the ALB sends traffic to a target group it will load balance the traffic between all instances that have been registered in the target group.
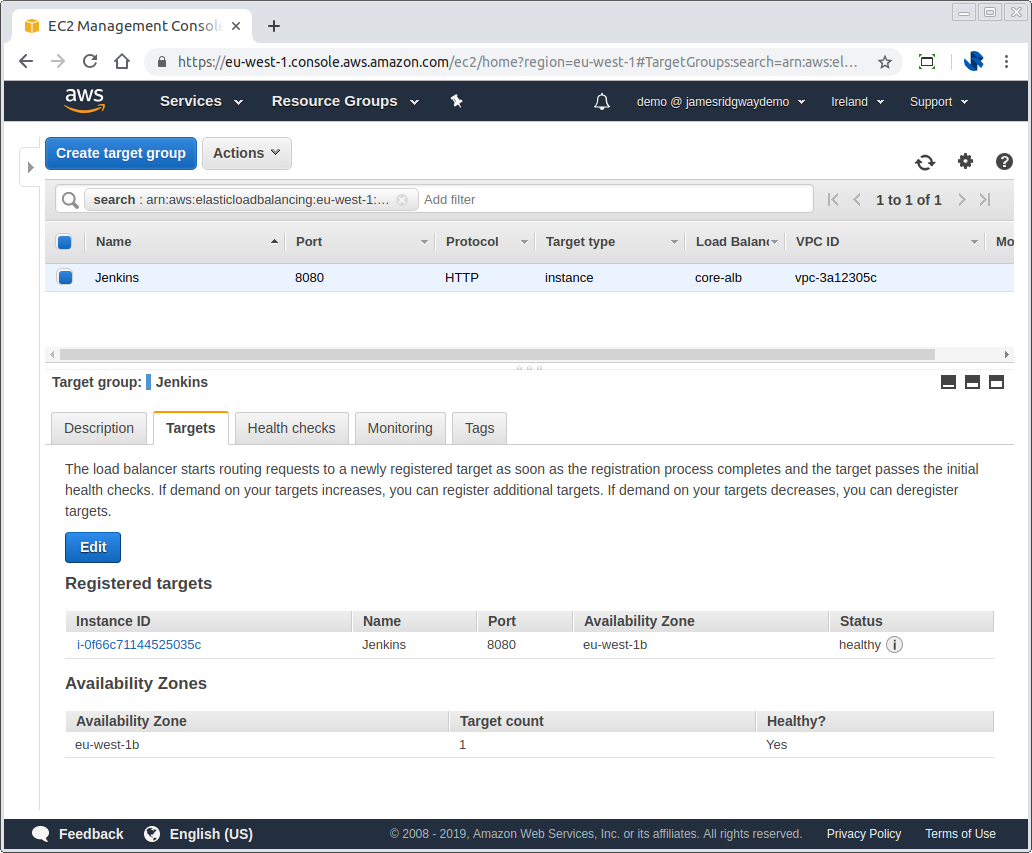
A target group will only allow traffic to be served up to an instance if the instance is healthy. On a per target group basis you can define a health check end point that can be checked to ensure that a given EC2 instance is healthy and able to receive traffic.
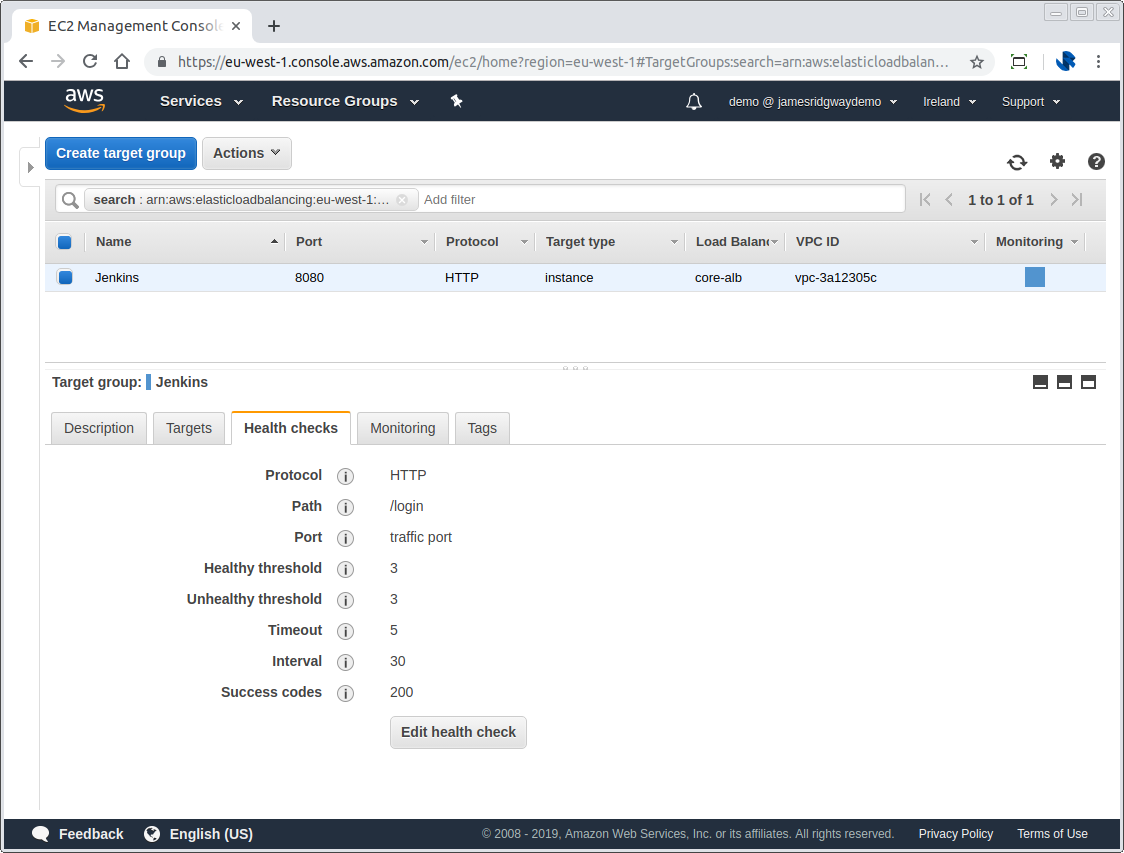
In this example, we will only consider the instance to be healthy if we get a 200 response on /8080:login. The unhealthy threshold tells us that we require 3 consecutive checks to fail at an interval of 30 seconds before we consider the host unhealthy. The same is also true of the healthy threshold.
Target Groups as a deployment destination
In the terraform setup that we're about to look at, we will treat a target group as the destination for our code to be deployed to.
When you follow an immutable servers pattern, the premise is that the entire VM image with the application baked into the image is the build artifact and the code that gets shipped to production. As a result our core infrastructure will describe everything for a target group to function, but not the specific instances that should be registered within it.
As part of our build process for our web application we will look to follow a continuous deployment principle where every successful build is deployed as spot instances to the target group, and we retire any instances associated with an older build.
Building the Infrastucture
Let's build our core infrastructure, if you don't already have a domain setup in Route 53, we'll need to start there.
Manual Setup
The first and only manual step is to make sure that the domain you are using is setup in Route 53.
In Route 53 click on the Create Hosted Zone button. This will allow you to specify your domain. After creating your hosted zone in Route 53 you will be able to see the nameservers for your domain (as per the screenshot below).
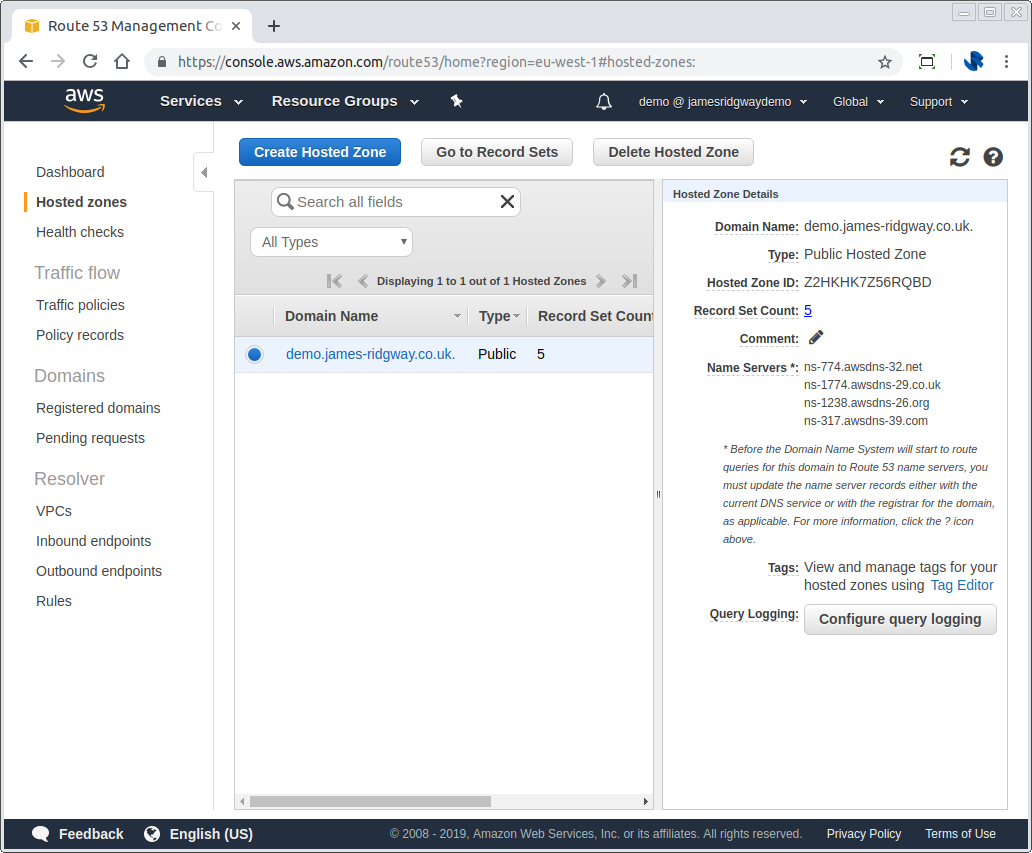
You will need to update your domain registrar to use the nameservers Route 53 provides you with. This step will vary based on who you registered your domain with.
Once you've done this we will be able to manage the DNS records for your hosted zone via Terraform.
Terraform
I'll assume that you have Terraform installed, and that you're familiar with the basic concepts. If Terraform is new to you I'd recommend checking out their getting started guides first.
Variables
When I write infrastructure code I like to keep any details which are specific to the particular deployment as variables and outside of the main Terraform code. This helps me write reusable Terraform code that I can easily share with others.
variable "region" {
  default = "eu-west-1"
  description = "The AWS reegion to use for the Short URL project."
}
variable "domain" {
  description = "The domain to use to host the project. This should already exist as a hosted zone in Route 53."
}
I can now create a terraform.tfvars file so that I don't need to specify the domain variable every single time I want to apply my Terraform state:
domain = "demo.james-ridgway.co.uk"
It can also be good practice to ignore your *.tfvars files from version control as these variables may be specific to only you.
Provider
When you work with Terraform you need to define which provider you're going to use. In this example we're going to show how to setup a secure web application that accepts traffic over HTTPS.
If you've not used Certificate Manager in AWS before, you should know that certificates have to exist in the us-east-1 region for them to be usable by services such as Elastic Load Balacing and CloudFront. With this in mind we will be registering two AWS providers so that I can have everything apart from my certificates in the region of my choosing.
provider "aws" {
  region = "${var.region}"
}
provider "aws" {
  region = "us-east-1"
  alias  = "cloudfront_acm"
}

# An aws_caller_identity allows us to get details about the user which is running terraform - such as their AWS account number.
data "aws_caller_identity" "current" {}
Data Sources
Data sources in Terraform allow for a Terraform configuration to build on resources that are defined outside of Terraform. For example, all AWS accounts will have default VPCs defined.
We should define data sources for Route53, our default VPC and subnets as we'll need these references for configuring our load balancer.
data "aws_route53_zone" "domain" {
  name         = "${var.domain}."
}
data "aws_vpc" "main" {
}

data "aws_subnet" "eu-west-1a" {
  availability_zone = "eu-west-1a"
}

data "aws_subnet" "eu-west-1b" {
  availability_zone = "eu-west-1b"
}

data "aws_subnet" "eu-west-1c" {
  availability_zone = "eu-west-1c"
}

data "aws_security_group" "default" {
  vpc_id   = "${data.aws_vpc.main.id}"
  name = "default"
}
Certificates
We will create a certificate in AWS Certificate Manager that will allow us to setup our load balancer to accept connections over HTTPS. As with all other certificate providers AWS requires that you validate that the domain for the certificate is yours.
AWS provides two methods for doing this: email validation and DNS validation. DNS validation will allow us to have Terraform use Route 53 to automate the validation process when it creates the certificate:
resource "aws_acm_certificate" "wildcard-certificate-euwest1" {
  domain_name               = "is.${var.domain}"
  subject_alternative_names = ["*.is.${var.domain}"]
  validation_method         = "DNS"
  tags {
    Name = "${var.domain}"
    Project = "Core"
  }
}
resource "aws_route53_record" "wildcard-certificate-euwest1-validation" {
  name    = "${aws_acm_certificate.wildcard-certificate-euwest1.domain_validation_options.0.resource_record_name}"
  type    = "${aws_acm_certificate.wildcard-certificate-euwest1.domain_validation_options.0.resource_record_type}"
  zone_id = "${data.aws_route53_zone.domain.id}"
  records = ["${aws_acm_certificate.wildcard-certificate-euwest1.domain_validation_options.0.resource_record_value}"]
  ttl     = 60
}
resource "aws_acm_certificate_validation" "wildcard-certificate-euwest1" {
  certificate_arn         = "${aws_acm_certificate.wildcard-certificate-euwest1.arn}"
  validation_record_fqdns = ["${aws_route53_record.wildcard-certificate-euwest1-validation.fqdn}"]
}
In this use case we're creating a wildcard certificate for is.${var.domain} and *.is.${var.domain}. The aws_route53_record will create a DNS record in Route 53 with a value that will allow Certificate Manager to verify that we have control of the domain.
The aws_acm_certificate_validation resource will cause Terraform to wait for Certificate Manager to verify that we own the domain and for the certificate to be provisioned. This will ensure that the certificate is ready before Terraform continues to evaluate any states that may require the certificate resource to exist.
Load Balancer
Before we create our load balancer we'll need to make sure we have a security group that will allow us to accept HTTPS traffic over 443.
We can then create our Application Load Balancer. We will specify all of the subnets for our VPC to ensure that the load balancer is available in each subnet where we have one subnet representing each availability zone in our region.
Once the load balancer is created an alias can be created in Route 53 so that any traffic for *.is.${var.domain} is sent to the load balancer.
A listener will listen on 443 for any HTTPS traffic, and based on the listener rules we can direct traffic to the correct security group.
resource "aws_security_group" "HTTPS" {
  name        = "HTTPS"
  description = "Allow HTTPS traffic"

  ingress {
    from_port   = 443
    to_port     = 443
    protocol    = "tcp"
    cidr_blocks = ["0.0.0.0/0"]
  }

  tags {
    Name = "HTTPS"
    Project = "Core"
  }
}

resource "aws_lb" "core-alb" {
  name               = "core-alb"
  internal           = false
  load_balancer_type = "application"
  subnets            = ["${data.aws_subnet.eu-west-1a.id}", "${data.aws_subnet.eu-west-1b.id}", "${data.aws_subnet.eu-west-1c.id}"]
  security_groups    = ["${data.aws_security_group.default.id}", "${aws_security_group.HTTPS.id}"]

  tags {
    Name = "Core ALB"
    Project = "Core"
  }
}

resource "aws_route53_record" "alb" {
  zone_id = "${data.aws_route53_zone.domain.zone_id}"
  name    = "*.is.${var.domain}"
  type    = "A"
  alias {
    name                   = "${aws_lb.core-alb.dns_name}"
    zone_id                = "${aws_lb.core-alb.zone_id}"
    evaluate_target_health = false
  }
}

resource "aws_lb_target_group" "website" {
  name     = "website"
  port     = 3000
  protocol = "HTTP"
  vpc_id   = "${data.aws_vpc.main.id}"

  health_check {
    path = "/api/v1/version"
  }

  tags {
    Name = "website"
    Project = "website"
  }
}

resource "aws_lb_listener" "https" {
  load_balancer_arn = "${aws_lb.core-alb.arn}"
  port              = "443"
  protocol          = "HTTPS"
  ssl_policy        = "ELBSecurityPolicy-2015-05"
  certificate_arn   = "${aws_acm_certificate.wildcard-certificate-euwest1.arn}"

  default_action {
    target_group_arn = "${aws_lb_target_group.website.arn}"
    type             = "forward"
  }
}

resource "aws_lb_listener_rule" "website" {
  listener_arn = "${aws_lb_listener.https.arn}"
  priority     = 1

  action {
    type             = "forward"
    target_group_arn = "${aws_lb_target_group.website.arn}"
  }

  condition {
    field  = "host-header"
    values = ["webapp.is.${var.domain}"]
  }
}
Any traffic with a Host Header of webapp.is.${var.domain} will be redirected to the website target group which we will be able to attach our immutable servers to.
Complete Example
This architecture that we have setup is a subset of the example that you can see in my demo-is-infrastructure repository.
Deploying Immutable Servers to Production
In the final two blog posts of this series (coming soon) we will look at how we deploy our web application to the target group that we've created and how we can use this same approach to build a cheap, fully automated and fully reproducible deployment pipeline with Jenkins.
