Building and configuring an immutable server image from the ground up using SaltStack and Packer.
I recently set myself a challenge to migrate all of my projects to deploy using an Immutable Servers pattern to AWS EC2 Spot Instances. This blog post is part of a broader series on how I've migrated my projects to run on Spot Instances.
In this post, I will show you how I have taken my existing traditional SaltStack configuration management setup a step further to build fully configured server images automatically. This post will focus on how to apply SaltStack and Packer to an Immutable Server concept, for a detailed introduction to these tools I will defer you to their respective documentation.
Configuration Management
Most people use configuration management at work. It doesn't matter if you use Ansible, Chef, Puppet, SaltStack or something else, a good configuration management tool is essential for managing multiple servers.
Just under a year ago I decided to over-engineer my projects and put my server setups into SaltStack. I like experimenting with technology, which sometimes involves migrating VMs from one provider to another.
It reached a point back in May 2017 where I decided that this process shouldn't be the manual slog that it was, and with that decision made I put my personal projects into SaltStack. Since doing this, I've managed to leverage the following benefits:
- I don't get a lot of time for projects, so I can often forget what I've done or how I've done it. Config management solves this problem — the code acts as documentation and a reminder.
- I like to try out new things and move my projects around. I can easily apply my Salt state to any new server/environment.
- Version control and server configuration also provide a safeguard for experimenting and making changes.
- I enjoy sharing ideas, and public repositories are a great way to do that
If you don't already have a standard server setup defined in a config management tool, this should be your starting point.
My SaltStack configuration covers the following areas at a minimum:
- Common packages
- Shell environment setup (aliases, prompt customisation, etc)
- My user and SSH access
- Security enhancements (secure by default, firewall rules, etc)
I'll let you pick the configuration tool that best suites your needs. I would recommend a tool that allows you to apply configuration locally without needing to connect to a master. This will be important when we use Packer to build machine images.
Automated Machine Images using Packer
Packer allows you to fully automate the build process for a machine image by taking a base image (such as Ubuntu 18.04 server) and then building any custom setup on top of that.
For each VM image that you want to build you will need to define a template file, which is just a JSON file. In this file, you can specify how you want to build the image (EC2, VMware, etc), the base image to use, and the provisioners that you want to use to build on top of the image. For example, a provisioner could be a file copying provisioner or a shell provisioner that will execute a script.
Immutable Servers and containers are both technologies that are designed for ephemeral environments. If you're familiar with a container technology like Docker, you're probably used to the concept of layering container images. With Immutable Servers, the same layering technique can be applied. Layered VM images will allow you to maximise on re-use and utility.
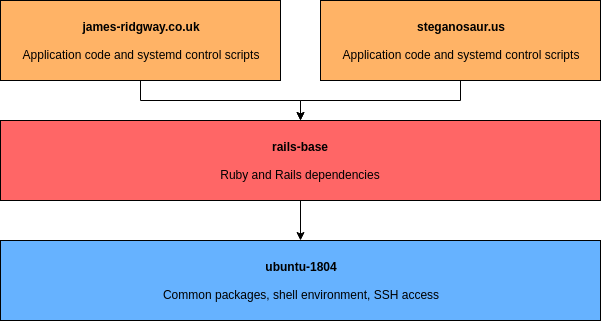
If we sketch this out visually, my VM images can be split into the following layers. Note that the below diagram also shows how the VM images of the actual applications fit in (the specifics of which will follow in another blog post).

With this in mind I structured my VM images as follows (remember that in my context most of my projects are Rails applications):
- Ubuntu 18.04 base image
Uses my Salt states to bootstrap the VM with my standard setup. This includes setting up my user, SSH access, etc. - Rails Base
This image is built on top of my own Ubuntu 18.04 base image. I install dependencies required for rails on top. This means that a Rails app can be built on top of the image without having to wait for any common dependencies to be installed each time the Rails app is re-built.
I have a vm-images repository that contains all of my core VM images that can be built with packer. Each VM image is designed for a specific purpose.
The vm-image repository is structured as follows:
vm-images
├── build.sh				# Build script
├── rails-base/				# Base image for Rails apps (built on top of ubuntu-1804)
├── salt/					# Salt states (as git submodule)
└── ubuntu-1804/			# Base image for Ubuntu 18.04
rails-base and ubuntu-1804 directories both house a packer JSON template file which contains the steps for the builders and provisioners.
The salt folder is a git submodule of my pre-existing SaltStack repository.
I also have a single build.sh build script which is designed to build all of the VM images in the repository.
One of the nice benefits of layering VM images is that if I want to experiment with building a rails app quickly, or I want to spin up a new VM, I can do so using my preferred rails setup (rails-base) or my preferred Ubuntu setup (ubuntu-1804).
Salt Provisioning with Packer Template Files
My ubuntu-1804 image is my base image for everything else, with this I use a file provisioner to ensure that the salt directory is copied to ~/salt on the VM image:
{
  "builders": [
    {
      "type": "amazon-ebs",
      ...
    }
  ],
  "provisioners": [
    {
      "type": "file",
      "source": "../salt/salt",
      "destination": "~/salt"
    },
    {
      "type": "shell",
      "execute_command": "echo 'vagrant' | {{.Vars}} sudo -S -E bash '{{.Path}}'",
      "scripts": [
        "init.sh"
      ]
    }
  ],
  ...
}
After the file provisioner I use a shell provisioner to run an init.sh which is used to install and bootstrap salt:
set -e

echo "The user is: $SUDO_USER"

# System Updates
apt-get update
DEBIAN_FRONTEND=noninteractive apt-get dist-upgrade -yq

apt-get update
DEBIAN_FRONTEND=noninteractive apt-get upgrade -yq
apt-get install -y curl htop language-pack-en
apt-get autoremove -y

# Configure salt
curl -o bootstrap-salt.sh -L https://bootstrap.saltstack.com
sh bootstrap-salt.sh
# Set file_client property in minion config
sed -i -e 's/#file_client:.*/file_client: local/g' /etc/salt/minion
# Symlink salt directory to default salt and pillar locations
ln -sf "/home/$SUDO_USER/salt" "/srv/salt"
ln -sf "/home/$SUDO_USER/pillar" "/srv/pillar"

# Run masterless salt
systemctl restart salt-minion
salt-call --local state.apply

# Clean up salt by removing state files and symlinks
rm -rf "/home/$SUDO_USER/salt" /srv/salt "/home/$SUDO_USER/pillar" /srv/pillar
# Remove file_client property
sed -i -e '/^file_client:/ d' /etc/salt/minion
That's the entire process for building my ubuntu-1804 base image. From here I could run the following to build the image:
packer build ubuntu.json
However, before I do this I want to ensure that I can tell exactly what code has contributed to which version of a VM image.
Versioning AMI Images
I often find a way to bake version control information (e.g. the git commit hash) into the software that I build. This gives an unambiguous view of precisely what code goes into each build.
Most of my images are designed to run in AWS only and therefore only have an AWS provisioner. You can track the commit hash of your image through an AWS tag.
Let's assume your packer file looks like this:
{
  "builders": [
    {
      "type": "amazon-ebs",
      "access_key": "{{user `aws_access_key`}}",
      "secret_key": "{{user `aws_secret_key`}}",
      "region": "eu-west-1",
      "instance_type": "t2.nano",
      "ssh_username": "ubuntu",
      "source_ami_filter": {
        "filters": {
          "name": "ubuntu/images/hvm-ssd/ubuntu-bionic-18.04-amd64-server-*"
        },
        "most_recent": true,
        "owners": ["099720109477"]
      },
      "ami_name": "ubuntu-1804 {{timestamp}}",
      "associate_public_ip_address": true,
      "tags": {
        "Name": "Ubuntu 18.04",
        "Project": "Core",
        "Commit": "unknown"
      }
    }
  ],
  ...
}
I've added the Commit tag with a value of unknown
Using a build script written in bash I have jq replace the unknown value with commit hash before building the images:
#!/bin/bash
set -e
cd "$(dirname "$0")"

(
        cd ubuntu-1804
        jq '.builders[0].tags.Commit = "'"$(git rev-parse HEAD)"'"' ubuntu.json > packer-versioned.json
        packer build packer-versioned.json
        rm packer-versioned.json
)
(
        cd rails-base
        jq '.builders[0].tags.Commit = "'"$(git rev-parse HEAD)"'"' rails-base.json > packer-versioned.json
        packer build packer-versioned.json
        rm packer-versioned.json
)
Note: packer-versioned.json is ignored in my .gitignore file.
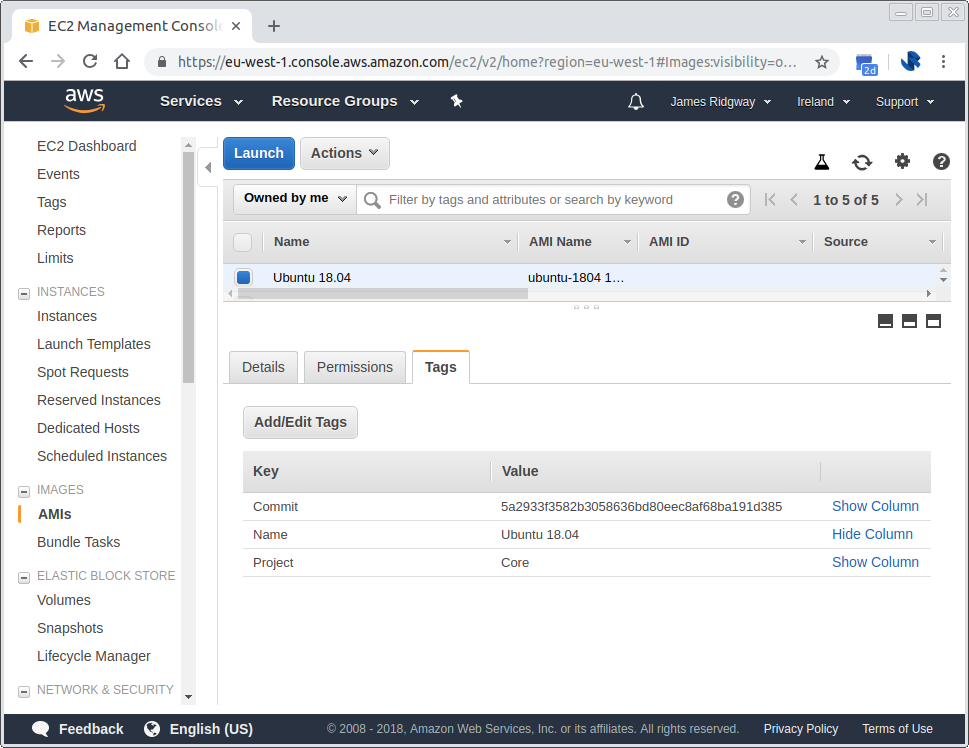
When I look in the AWS console, I can easily see which AMI was built with which code by looking at the AMI tags.

There are numerous ways that you can specify variables for Packer. In my case, I decided to use jq to modify the template file. Other solutions include:
- Setting user variables from environment variables
- Using a variables JSON file
- Specifying a variable on the command line
Getting the Latest Source AMI
My packer build process always automatically pulls in the latest source AMI using a most_recent filter. Using this filter allows you to easily propagate changes without having to version-bump the source AMI referenced in your packer build files:
{
  "builders": [
    {
      "type": "amazon-ebs",
      ...
      "source_ami_filter": {
        "filters": {
          "name": "ubuntu-1804*"
        },
        "owners": ["12345678"],
        "most_recent": true			// Takes the most recent AMI that matches the owner and the filter
      },
      ...
    }
  ],
  ...
}
Building Images on top of Your Base Image
Building my ubuntu-1804 base image is a simple process of applying Salt state. The process of building my rails-base image, or any other image is fairly simple. For any image, I typically rely on SaltStack for the configuration.
For my rails-base image, I use my ubuntu-1804 as the base image. I use the same style packer template file too, the init.sh script is subtly different. In this version, I make sure to set the hostname and the minion ID.
set -e

echo "The user is: $SUDO_USER"

# System Updates
apt-get update
DEBIAN_FRONTEND=noninteractive apt-get dist-upgrade -yq

# Hostname
echo -n "rails-base-01" > /etc/hostname
hostname -F /etc/hostname

# Configure salt
curl -o bootstrap-salt.sh -L https://bootstrap.saltstack.com
sh bootstrap-salt.sh
sed -i -e 's/#file_client:.*/file_client: local/g' /etc/salt/minion
ln -sf "/home/$SUDO_USER/salt" "/srv/salt"
ln -sf "/home/$SUDO_USER/pillar" "/srv/pillar"

# Run masterless salt
echo -n "rails-base-01" > /etc/salt/minion_id # Set the hostname for minion ID matching
systemctl restart salt-minion
salt-call --local state.apply

# Clean up salt
rm -rf "/home/$SUDO_USER/salt" /srv/salt "/home/$SUDO_USER/pillar" /srv/pillar
sed -i -e '/^file_client:/ d' /etc/salt/minion

# Create webapp system user
useradd webapp
In this extract:
# Run masterless salt
echo -n "rails-base-01" > /etc/salt/minion_id # Set the hostname for minion ID matching
systemctl restart salt-minion
salt-call --local state.apply
I set the minion ID before locally applying the salt state to ensure that salt state for minions matching rails-base-* is applied. This will install all the dependencies and requirements that are needed to run a rails application based on what I have defined in my Salt configuration.
Automated Server Images
This approach of using Packer to automate the building of my AMI images has allowed me to re-use my existing SaltStack configuration and wrap a packer build process around this that can build all of my core server images from the ground up in a fully repeatable and version controlled process.
For a talk that I did at Sheffield DevOps, I prepared a set of example projects that illustrate the concepts I have discussed in this article:
- Demo Salt
An example SaltStack repository that includes the necessary configuration for an Ubuntu and Rails base image. - Immutable servers demo repository of VM images
An example of using Packer to wrap an existing SaltsStack configuration into an automated AMI build process.


