In an effort to go paperless at work I recently bought an iPad with the intention of using it to replace handwritten paper based notes. Not long after getting the iPad I started looking into whether I could use the iPad for programming or SSH. At the time I was looking into this from a position of "is it possible", rather than having a particular need that I was solving for.
One thing that I started wondering recently was: can I use the Voice Memos app on the iPad to record meetings or notes, and then use AWS Transcribe to "write up" the audio file into text based notes that can be much more easily skim read or searched in the future.
AWS Transcribe is a service that can perform automatic speech recognition on audio files. You provide it with the audio file hosted on S3, and AWS Transcribe will transcribe the file and provide the output (as a JSON file) back onto S3.
The goal was to do this in a way that required to technical effort. I just wanted to take a voice memo, have it transcribed and that's it. From what I understand of programming on the iPad, I can use Pythonista to write a custom Share Extension Shortcut.
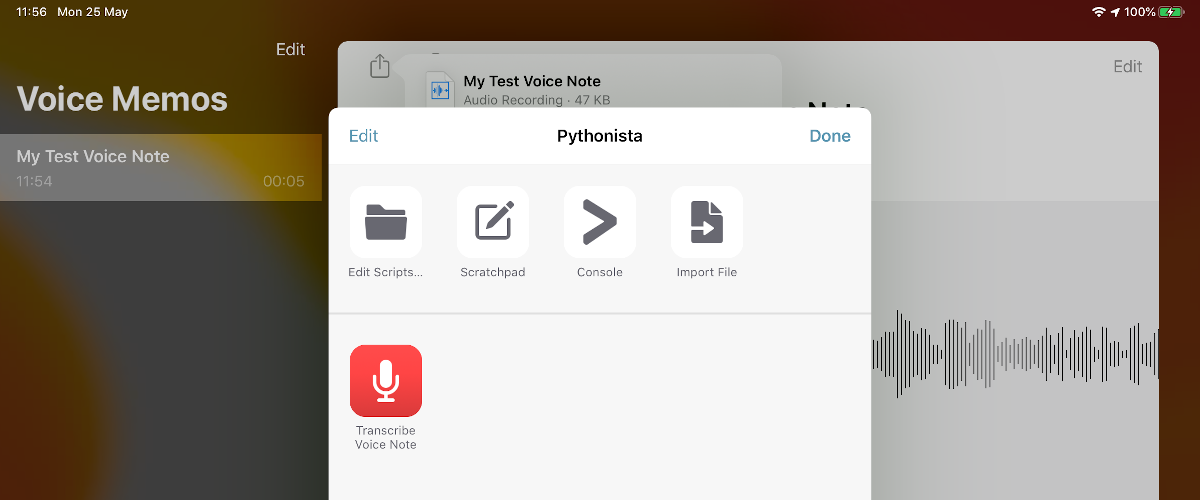
So that when I opt to share via "Run Pythonista Script":
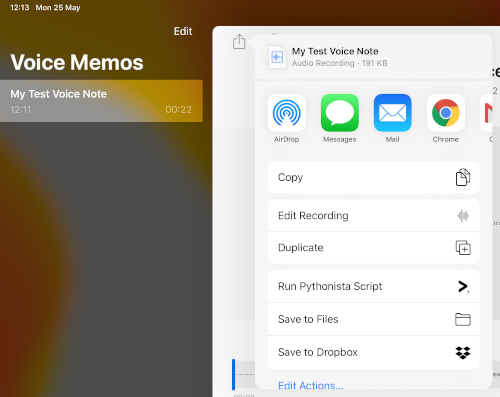
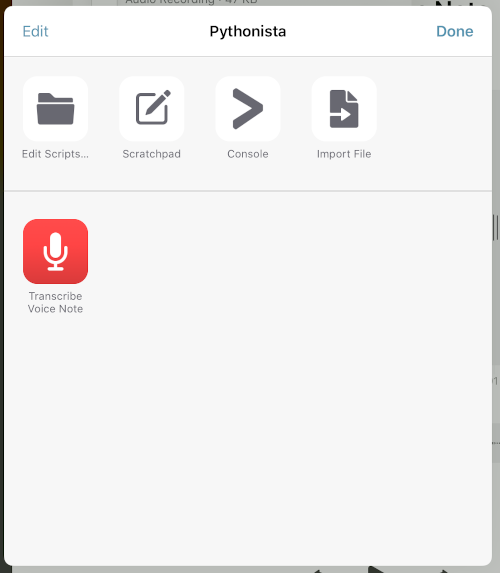
I can then just tap on "Transcribe Voice Note":
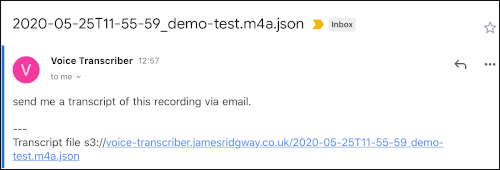
And a minute or two later I'll get an email with my voice note, fully transcribed:
Building a Serverless Voice Transcribing Service
I can't imagine myself using this service all the time, or being able to justify paying on-going service costs for something like this, and ultimately this has pushed me down a route of building this in a serverless fashion where I can leverage a pay-as-go style model, where I'm only charged for time transcribing and per Lambda invocation for a service that otherwise has a 24x7 availability model.
Approach
The diagram below shows a rough sketch of how I'm going to build this voice note transcribing process.
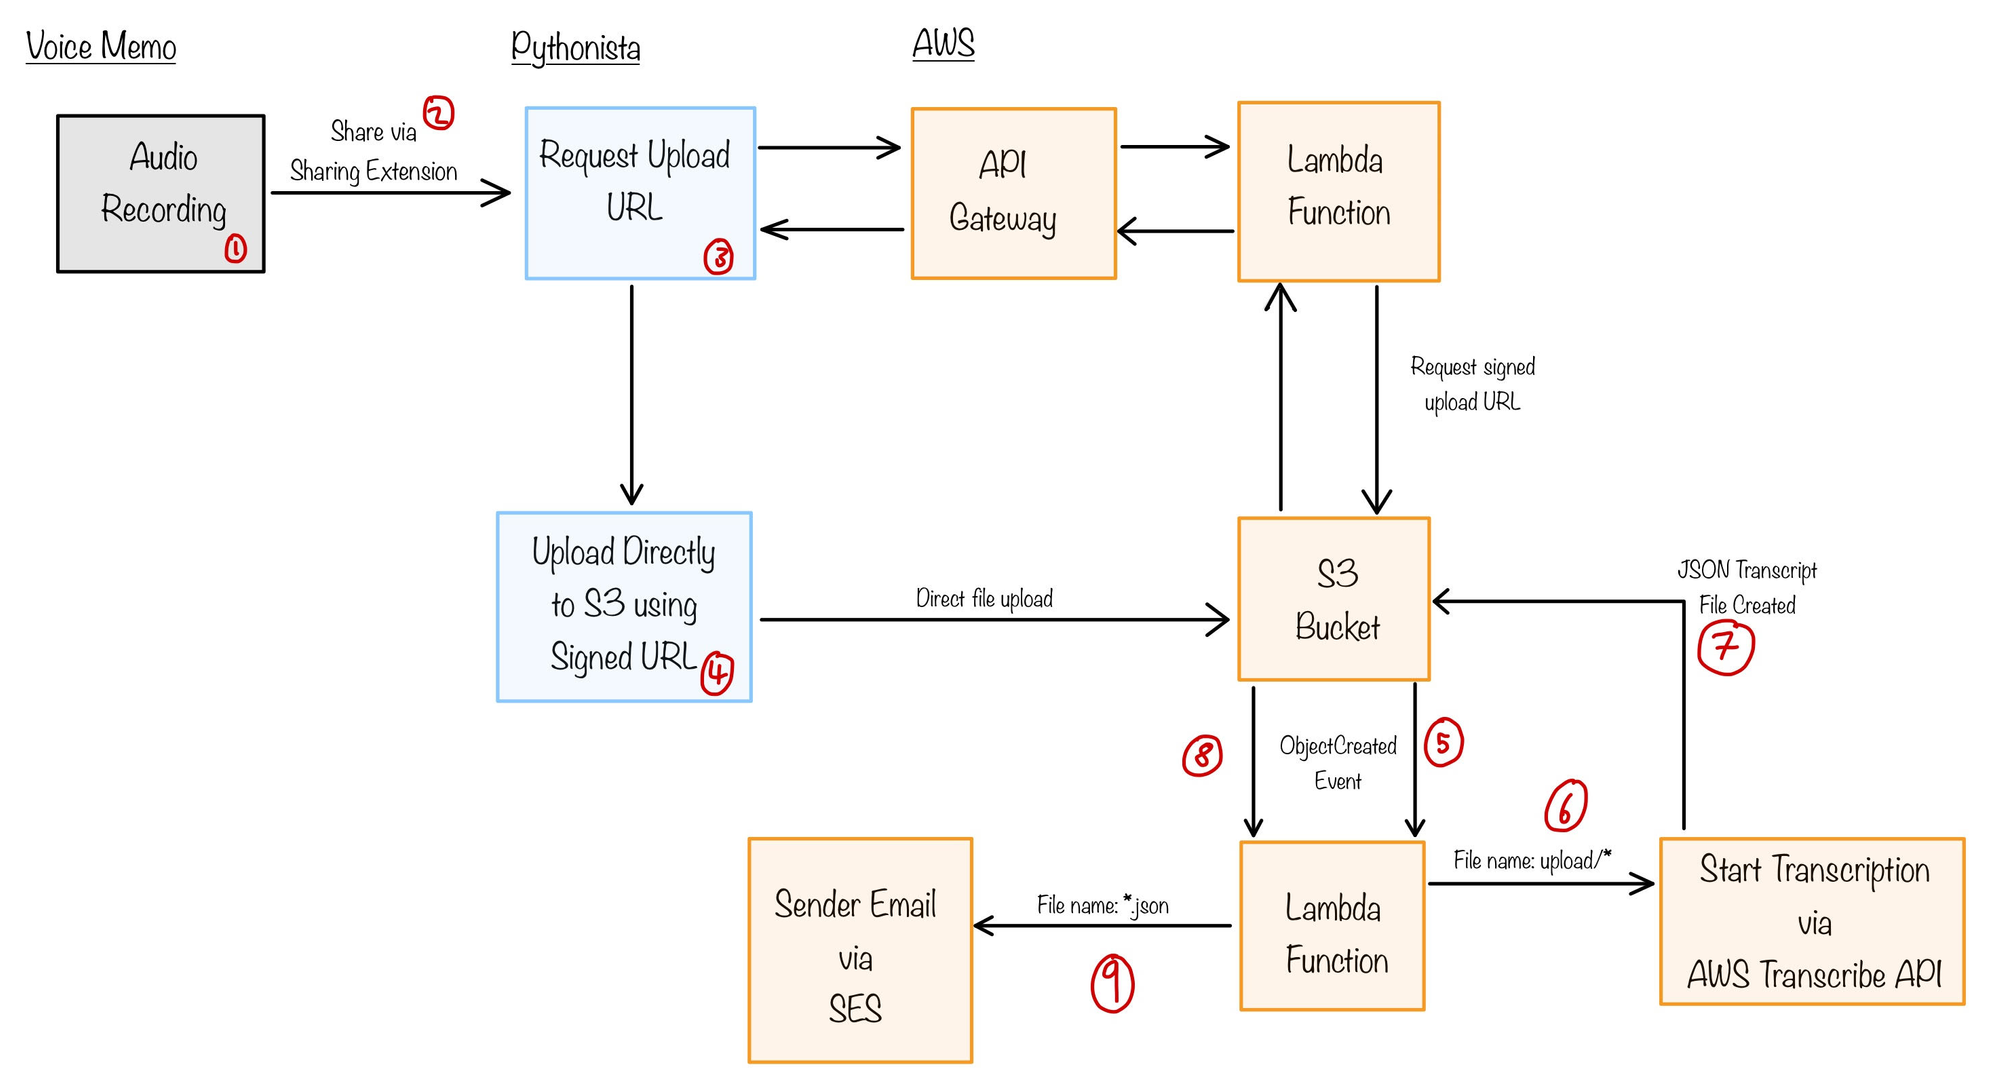
I will build a basic API using API Gateway and a Lambda Function. API Gateway limits the size of a payload to 10MB, which will be a challenge as an audio file could easily be larger than 10MB, which will prevent API Gateway from handling large file uploads directly. Because of this limitation, the API will be responsible for generating a signed S3 URL that can be used to upload the file directly to S3. All audio file uploads will have a S3 key prefix of uploads/
A Lambda Function will monitor the S3 bucket for any file changes. Whenever it detects an audio file being uploaded to uploads/ the function will use the AWS SDKs to trigger a transcription of the file using AWS Transcribe.
AWS Transcribe is designed to output the transcription results as a JSON file to a S3 bucket. In our scenario AWS Transcribe will output the results to the same S3 bucket which collects the audio file uploads, and we will use the same Lambda Function to watch for *.json transcript files. Whenever a new one is detected an email will be generated from the contents and will be delivered using SES.
Building the API and Transcribing Mechanism
Building the API and the transcribing process relies on pulling together several AWS resources that will work together as a single application. One approach, could be to implement this in Terraform, which I've used for many of my other projects.
However, over the last year I've found that the Servless Framework can work well for developing small, Serverless applications. Serverless Framework is written in Node.js and uses a serverless.yml file to describe the AWS resources that will comprise your application stack.
Prerequisites:
- Node.js
- npm
As the Serverless Framework uses Node.js and npm, for simplicity sake, the Lambda Functions will also be implemented using Node.js
Before getting to stuck into the Serverless Framework it would be good to have an API to deploy.
File Upload API endpoint
The API endpoint will trigger the Lambda Function that will generate a signed S3 URL for the file upload.
We can start by building out the API logic as a very basic Express application. Using Express will allow us to build, test and debug the API locally on our machine. Once the API is ready, we can then introduce aws-serverless-express that will allow us to run the same Express application code inside a Lambda Function.
Create a package.json file with aws-servless-express and other libraries that we will need as dependencies:
{
  "name": "voice-transcriber",
  "version": "1.0.0",
  "description": "Voice note transcribing service built using serverless AWS services.",
  "main": "index.js",
  "scripts": {
    "start": "npm run server",
    "server": "nodemon local.js",
    "deploy": "serverless deploy"
  },
  "author": "James Ridgway",
  "license": "MIT",
  "dependencies": {
    "aws-serverless-express": "^3.0.0",
    "body-parser": "^1.19.0",
    "express": "^4.17.1",
    "serverless-apigw-binary": "^0.4.0"
  },
  "devDependencies": {
    "nodemon": "^1.11.0",
    "serverless": "~1.70.0",
    "serverless-domain-manager": "^4.0.0"
  }
}Install the dependencies:
npm installWe can now start to write the logic behind our API, we'll put this in app/app.js:
const express = require('express');
const awsServerlessExpressMiddleware = require('aws-serverless-express/middleware');
const bodyParser = require('body-parser')

const app = new express();


app.use(bodyParser.json());
app.use(bodyParser.urlencoded({
  extended: true
}));
app.use(awsServerlessExpressMiddleware.eventContext());


app.get('/status', (req,res) => {
    res.send({healthy: true})
});


const AWS = require('aws-sdk');
const s3 = new AWS.S3();
const moment = require('moment');

app.post('/recordings', (req,res) => {
    let name = req.body.name.replace(/\s/g, '-').replace(/[&\/\\#,+()$~%'":*?<>{}]/g, '_');

    let fileName = 'uploads/' + moment().format('YYYY-MM-DDTHH-mm-ss') + '/' + req.body.name;
    let params = {
        Bucket: process.env.BUCKET_NAME,
        Key: fileName,
        Expires: 3600
    }
    console.log('About to generate signed URL');
    s3.getSignedUrlPromise('putObject', params)
        .then(function (url) {
            console.log("Generated signed URL");
            res.send({upload_url: url});
        })
        .catch(function (err) {
            console.log("Error generating signed URL: ", err);
            res.send({error: err});
        });
});

module.exports = app;
app/app.js - API implementationThe above implementation provides two endpoints:
GET /status
A basic healthy-check/status endpointPOST /recordings
The main endpoint that will generate the upload URL
In the root of the repository we should create two entry points for our API. One entry point for running the code locally, and another entry point for AWS Lambda.
Create local.js and handler.js in the root of the repository.
let app = require('./app/app');
let port = process.env.PORT || 8080;

app.listen(port, () => {
  console.log(`Listening on: http://localhost:${port}`);
});
local.js - entry point for running the API locally'use strict';
const awsServerlessExpress = require('aws-serverless-express');
const app = require('./app/app');
const binaryMimeTypes = [
'audio/x-m4a'
];
const server = awsServerlessExpress.createServer(app, null, binaryMimeTypes);
module.exports.express = (event, context) => awsServerlessExpress.proxy(server, event, context);handler.js - entry point for running the API as an AWS Lambda FunctionOur API can now be run locally by executing
npm start
This will start the API using nodemon which will automatically restart our application as we save changes to any files.
Serverless
The next step is to get the API and all the resources it needs stood up on Amazon using the Serverless Framework.
Install the Serverless Framework by running:
npm install -g serverlessThe Serverless Framework manages resources that are created in a serverless.yml file. We can start to put together a file that looks like this:
service: voice-transcriber
plugins:
  - serverless-domain-manager
  - serverless-dotenv-plugin
  - serverless-plugin-include-dependencies
provider:
  name: aws
  runtime: nodejs12.x
  region: eu-west-2
  stage: prod
  apiKeys:
    - voice-transcriber
  iamRoleStatements:
    - Effect: 'Allow'
      Action:
        - 'transcribe:StartTranscriptionJob'
      Resource: '*'
    - Effect: 'Allow'
      Action:
        - 's3:*'
      Resource: 'arn:aws:s3:::${env:BUCKET_NAME}/*'
    - Effect: 'Allow'
      Action:
        - 'ses:*'
      Resource: '*'
custom:
  customDomain:
    certificateName: ${env:DOMAIN_NAME}
    domainName: ${env:DOMAIN_NAME}
    basePath: ''
    stage: ${self:provider.stage}
    createRoute53Record: true

functions:
  upload:
    handler: handler.express
    integration: LAMBDA
    memorySize: 128
    timeout: 60
    events:
      - http:
          path: '{path+}'
          method: any
          private: true
    environment:
BUCKET_NAME: ${env:BUCKET_NAME}serverless.ymlThis serverless.yml file:
- Declares the use of a few plugins
- Sets the region and runtime that will be used
- Creates an API key called
voice-transcriberthat will be used with AWS API Gateway - Ensures that the IAM role used by the AWS Lambda Function has access to the:
StartTranscriptionJobAWS Transcribe API call, the S3 Bucket, and SES - Creates a custom domain for API Gateway
- Creates the AWS Lambda Function for the API Gateway, and mounts this to the root of the API Gateway using
path: '{path+}'
The Serverless file also takes a number of environment variables. This is so that anything specific to a deployment of the voice transcriber can be kept in a git-ignored .env file. The serverless-dotenv-plugin adds support for the Serverless Framework reading from .env files.
For example:
BUCKET_NAME=voice-transcriber.jamesridgway.co.uk
DOMAIN_NAME=vt.jmsr.io
RECIPIENT=your@example.com
SENDER=no-reply@jmsr.io
.env fileThis can now be deployed using the command:
sls deployBehind the scenes the Servless Framework, will generate a CloudFromation stack from the various details that we have described within the serverless.yml
A simple test of the API should return a URL that can then be used for direct upload:
$ curl -H "x-api-key: yourapikeygoeshere" -s -X POST -d "name=example.m4a" https://vt.jmsr.io/recordings

{"upload_url":"https://s3.eu-west-2.amazonaws.com/voice-transcriber.jamesridgway.co.uk/uploads/2020-05-31T11-03-10/example.m4a?X-Amz-Algorithm=AWS4-HMAC-SHA256&&X-Amz-Signature=..."}
The audio file can now be uploaded to the URL provided by upload_url:
curl --upload-file example.m4a https://s3.eu-west-2.amazonaws.com/voice-transcriber.jamesridgway.co.uk/uploads/2020-05-31T11-03-10/example.m4a?...Uploading the file will just place the file on S3. We need to implement another lambda function to watch the S3 buckets for:
- new audio file uploads that get placed in
uploads/ - new
*.jsonfiles that will be the transcribed results from AWS Transcribe
Create a s3handler.js file in the root of the directory:
'use strict';

const AWS = require('aws-sdk');
const transcribeservice = new AWS.TranscribeService();
const s3 = new AWS.S3();
const ses = new AWS.SES();

module.exports.filePut = (event, context, callback) => {
    console.log('Received event:', JSON.stringify(event, null, 2));
    for (var i = 0; i < event.Records.length; i++) {
        let fileName = decodeURIComponent(event.Records[i].s3.object.key);
        if (fileName.startsWith('uploads/')) {
            console.log("Processing uploads: ", fileName);
            let location = 's3://' + process.env.BUCKET_NAME + '/' + fileName;
            console.log(location);
            let transcribeParams = {
                LanguageCode: 'en-GB',
                Media: {
                    MediaFileUri: location
                },
                TranscriptionJobName: fileName.replace('uploads/','').replace(/[&\/\\#,+()$~%'":*?<>{}]/g, '_'),
                OutputBucketName: process.env.BUCKET_NAME
            }
            transcribeservice.startTranscriptionJob(transcribeParams, function (err, data) {
                if (err) {
                    console.log("Error: ", err);
                    return
                }
                console.log(data);
            });
        }
        if (fileName.endsWith('.json')) {
            console.log("Processing transcript: ", fileName);
            var transcript = "";
            var getParams = {
                Bucket: process.env.BUCKET_NAME,
                Key: fileName
            }
            s3.getObject(getParams, function (err, data) {
                if (err) {
                    console.log("Error retrieving S3 object:" , err);
                    return
                }
                var transcriptData = JSON.parse(data.Body.toString());
                for (var transcriptIdx = 0; transcriptIdx < transcriptData.results.transcripts.length; transcriptIdx++) {
                    transcript += transcriptData.results.transcripts[transcriptIdx].transcript;
                }
                transcript += "\n\n---\n"
                transcript += "Transcript file s3://" + process.env.BUCKET_NAME + "/" + fileName
                const params = {
                    Destination: {
                        ToAddresses: [process.env.RECIPIENT]
                    },
                    Message: {
                        Body: {
                            Text: {
                                Charset: "UTF-8",
                                Data: transcript
                            }
                        },
                        Subject: {
                            Charset: 'UTF-8',
                            Data: fileName
                        }
                    },
                    Source: 'Voice Transcriber <' + process.env.SENDER + '>',
                };

                ses.sendEmail(params, (err, data) => {
                    if (err) {
                        return console.log(err, err.stack);
                    } else {
                        console.log("Email sent.", data);
                    }
                });
            })
        }
    }
};
This Lambda Function will expect to receive an ObjectCreated event from S3 whenever an object is created. An ObjectCreated event could contain multiple records relating to multiple files.
The Lambda Function will iterate over each record present in the event, and either:
- Request AWS Transcribe transcribes the file if it has been created in
uploads/ - Or, if the file is a JSON file, read the JSON transcript and send off an email with the transcribed text.
With the Lambda Function written, the serverless.yaml will need to be updated to create the Lambda Function:
Add the following to the functions section of the file:
  filePut:
    handler: s3handler.filePut
    events:
      - s3:
          bucket: ${env:BUCKET_NAME}
          event: s3:ObjectCreated:*
    environment:
      BUCKET_NAME: ${env:BUCKET_NAME}
      RECIPIENT: ${env:RECIPIENT}
SENDER: ${env:SENDER}filePut to the functions section of serverless.yamlThe file should now read:
service: voice-transcriber
plugins:
  - serverless-domain-manager
  - serverless-dotenv-plugin
  - serverless-plugin-include-dependencies
provider:
  name: aws
  runtime: nodejs12.x
  region: eu-west-2
  stage: prod
  apiKeys:
    - voice-transcriber
  iamRoleStatements:
    - Effect: 'Allow'
      Action:
        - 'transcribe:StartTranscriptionJob'
      Resource: '*'
    - Effect: 'Allow'
      Action:
        - 's3:*'
      Resource: 'arn:aws:s3:::${env:BUCKET_NAME}/*'
    - Effect: 'Allow'
      Action:
        - 'ses:*'
      Resource: '*'
custom:
  customDomain:
    certificateName: ${env:DOMAIN_NAME}
    domainName: ${env:DOMAIN_NAME}
    basePath: ''
    stage: ${self:provider.stage}
    createRoute53Record: true

functions:
  upload:
    handler: handler.express
    integration: LAMBDA
    memorySize: 128
    timeout: 60
    events:
      - http:
          path: '{path+}'
          method: any
          private: true
    environment:
      BUCKET_NAME: ${env:BUCKET_NAME}
  filePut:
    handler: s3handler.filePut
    events:
      - s3:
          bucket: ${env:BUCKET_NAME}
          event: s3:ObjectCreated:*
    environment:
      BUCKET_NAME: ${env:BUCKET_NAME}
      RECIPIENT: ${env:RECIPIENT}
SENDER: ${env:SENDER}serverless.yamlAnother round of sls deploy will deploy the new AWS Lambda Function that will watch the S3 bucket for ObjectCreated events.
Our backend service for transcribing audio files is now complete. You should be able to repeat the curl commands described previous to upload and audio file, and a few minutes later you should receive an email with your transcript:

Python Client Library
Part of the goals of this project is to create a custom Share Extension that will allow me to use Pythonista to upload the file. As Pythonista is all about Python, I'll need to put together a Python client library for the API.
The API client doesn't need to be anything too complicated at all, it just needs to replicate the commands we were able to do in curl.
This client library will follow a similar pattern and structure as a Short URLs Client that I build for the Short URLs project.
I won't dig into the details here as this is a fairly straightforward API client library that uses requests and a few other libraries for testing, such as vcrpy.
The voice transcriber client is available on:
- GitHub: jamesridgway/voice-transcriber-client
- PyPI: https://pypi.org/project/voice-transcriber-client/
Building the Share Extension with Pythonista
Building the share extension will be implemented entirely from within Pythonista on the iPad. Our share extension, for the most part, will just call through to the voice-transcriber-client library. We will use the keychain and ui APIs provided by Pythonista to allow us to collect the API credentials and store these securely the first time the extension is used.
The first step in building the extension is to install the voice-trainscriber-client library within the Pythonista environment by executing the following via StaSh:
pip install voice-transcriber-clientIf you haven't used StaSh before, in my Getting Started with Programming on the iPad blog post, I demonstrate how StaSh can be installed and used to provide a bash-like shell within Pythonista for executing commands such as pip.
Our share extension should implement the following logic:
- Check if API credentials are know, if not, prompt for them
- Prompt for a name for the voice note
- Upload the voice note
- Confirm to the user that the upload succeeded or failed.
Which will result in the following implementation:
import appex
import console
import keychain
import ui
from voice_transcriber.voice_transcriber import VoiceTranscriber

def main():
	api_key = keychain.get_password("voice_notes", "api_key")
	domain = keychain.get_password("voice_notes", "domain")
	if domain is None:
		domain = console.input_alert("Enter Domain:")
		keychain.set_password("voice_notes", "domain", domain)
	if api_key is None:
		api_key = console.input_alert("Enter API Key:")
		keychain.set_password("voice_notes", "api_key", api_key)
	voice_transcriber = VoiceTranscriber(domain, api_key)
	if not appex.is_running_extension():
		print('This script is intended to be run from the sharing extension.')
		return

	name = console.input_alert("Please provide a name for your voice note:")

	result = voice_transcriber.transcribe(name, appex.get_file_path())
	if result:
		console.alert('Upload', 'Voice note uploaded successfully.', 'Ok', hide_cancel_button=True)
	else:
		console.alert('Upload', 'Voice note upload failed.', 'Ok', hide_cancel_button=True)
	appex.finish()

if __name__ == '__main__':
	main()
voice_notes.pyWe now have a script that we can configure Pythonista to use as a Share Extension.
Click on the Settings cog in the left hand panel:
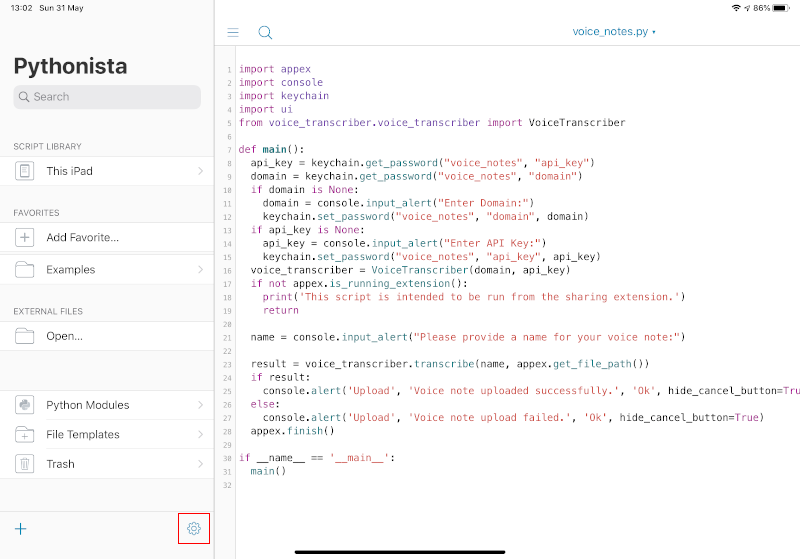
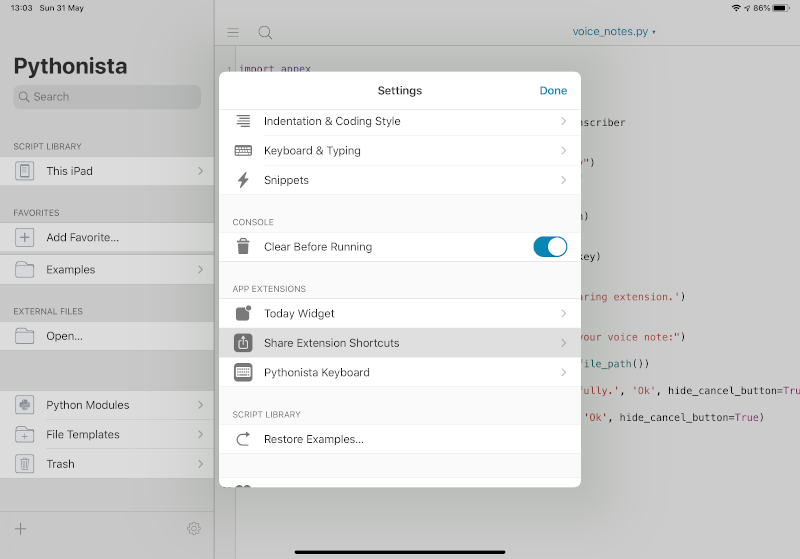
Select Share Extension Shortcuts
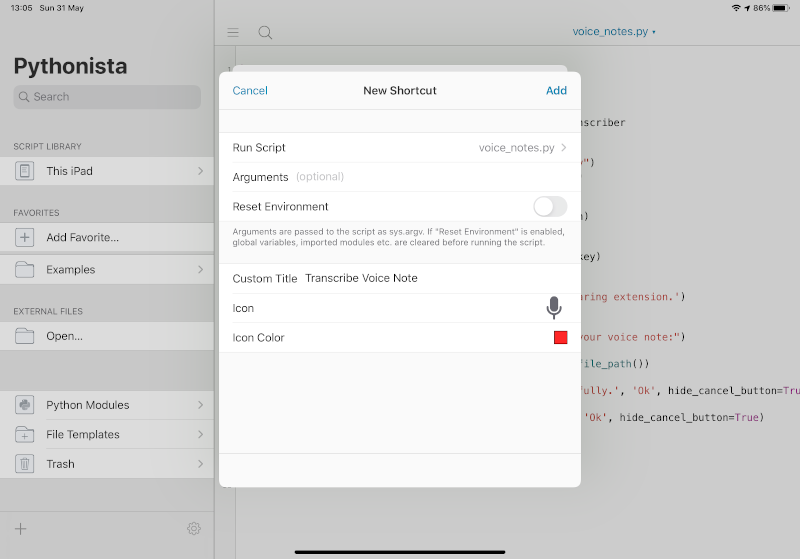
Click on the Add (+) button and select the voice_notes.py script. You can also specify a title, icon and icon colour.
Conclusion
Using a number of Serverless technologies and Pythonista, it has been possible to build a voice note transcribing solution for the iPad that doesn't require any technical input or heavy lifting by the end user.
Once a voice note has been recorded, the Share process native to the iPad operation system can then be used to upload the voice note for transcribing, and minutes later you will receive an email with the transcribed text.
In all honesty I can't see myself using this all the time. But as this has been implemented using AWS Lambda Functions, S3, API Gateway and Transcribe, it has the benefit of being a service that is available 24x7, but only costs on a pay-as-you-go basis.
Resources:
- voice-transcriber
Serverless voice transcriber using AWS Lambda/API Gateway/AWS Transcribe - voice-transcriber-client
A python client CLI and client library for voice-transcriber


