

I got a SwitchBot Bot and a SwitchBot Hub Mini for Christmas! And it's finally time to put these new toys to use!
The SwitchBot Hub Mini is the hub for the SwitchBot ecosystem. It's designed to allow you to control your SwitchBot devices remotely when you're not within range of your devices.
I have one or two other hubs in my home automation setup; they're often straightforward to set up and usually integrate well with things like Home Assistant and Alexa.
However, the SwitchBot Hub Mini hasn't proven to be particularly reliable, so here in lies my cautionary tail.
What I outline in this post does work if we ignore the unreliability of the SwitchBot API, and I have covered my approach in detail in case it is useful in the future, or in the event someone else is using a similar product that has a similar problem that could benefit from an approach like this.
The ultimate downfall of this approach is that SwitchBot devices aren't super responsive to instructions received via the SwitchBot API. If that was fixed, this approach would probably be flawless.
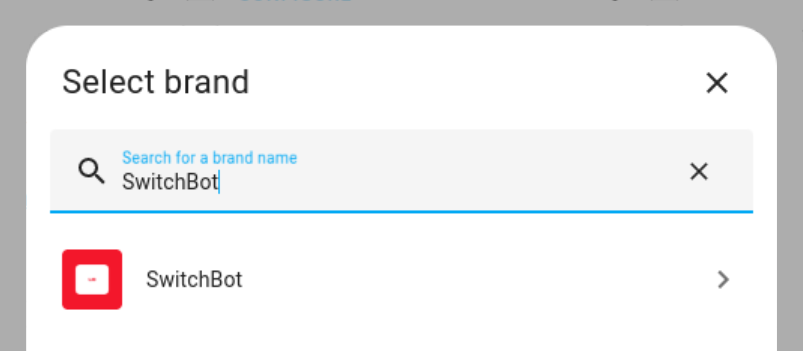
SwitchBot Integration
Home Assistant has a SwitchBot integration:
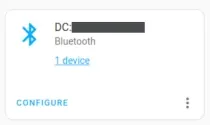
The automation works by connecting to the SwitchBot devices directly over Bluetooth.
When I first looked at the integration, I struggled to get it to work. It didn't matter what I tried, I'd always get the following error:
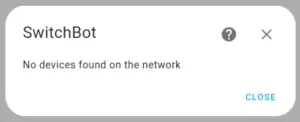
What I learnred much later in all of this is that you'll get this error if:
- There are genuinely no devices on your network, or
- If you haven't enabled bluetooth integration
So, make sure you have a bluetooth integration added to Home Assistant if you want to use the SwitchBot integration.
I didn't realise I needed to add the Bluetooth integration until much later, so at the time, it appeared I wouldn't be able to use the built-in integration, so I started to explore if I'd be able to use the SwitchBot APIs to build my own integration.
SwitchBot APIs
SwitchBot has an API which is well documented in their SwitchBotAPI GitHub repository.
There are plenty of other examples online for using templates in Home Assistant to control SwitchBot devices.
At first, I thought I'd just be able to copy and paste one of these examples into my setup.
However, the authentication mechanism between version 1.0 and 1.1 of the API has changed significantly, and all of the examples I could find were for 1.0. Because version 1.1 of the API requires a unique signature to be generated as part of the authentication process, this complexity is beyond what can be achieved with templates and REST commands out-of-the-box in Home Assistant.
Intergration Home Assistant with the SwitchBot 1.1 APIs
The idea that I had for solving this was fairly simple. SwitchBot provides Python code examples in their GitHub repository README for authenticating, and these is also a python-switchbot library.
I've also used AppDaemon before to create apps using Python code from within Home Assistant.
My simple idea was to build a basic HTTP API within AppDaemon, that would abstract away the complications of the SwitchBot API authentication and provide me with a simpler API to do what I needed.
For the sake of brevity, I'll assume you have some familiarity with AppDaemon. If not, you may find my previous post on AppDaemon helpful as this provides more of a walkthrough of how to set up and use AppDaemon:
To use the SwitchBot APIs you will need a Hub Mini and will need to have already paired your SwitchBot devices with the hub – I'll assume that you've already done this.
First, let's set up the API token, API secret and the device ID we want to control in our Home Assistant secrets config.
We will first need to get the API token and secret from the SwitchBot app:
- Open the SwitchBot app on your phone
- Goto Profile > Preferences
- Tap on the App Version 10 times
- Select Developer Options which should now be visible
- You will now be able to copy your API token and API secret from your Developer Options screen.
The easiest way I found to determine the ID of the device I wanted to control was to use a basic python script to enumerate the device IDs over the API. You will need the python-switchbot library installed for this to work:
from switchbot import SwitchBot

your_switch_bot_token = 'd1c254479...'
your_switch_bot_secret = 'b6d96369...'
switchbot = SwitchBot(token=your_switch_bot_token, secret=your_switch_bot_secret)

devices = switchbot.devices()
for device in devices:
	print(device)
In home assistant, populate your secrets.yaml with your API credentials and the ID of the device that you want to control:
...
switch_bot_token:  "d1c2544794d3362f1491c90a4e7ef3e299d8596f28b37090968e9434b29e8d114fd50e8425723ea9a5a50ba87fd7e0df"
switch_bot_secret: "b6d96369fbd89572c24795818e758574"
switch_bot_office_curtain_id: AB12345CDE60
...secrets.yamlThe next step is to assemble the simplified API in AppDaemon that we'll want Home Assistant to use. The reason for doing this is that the API provided by SwitchBot uses an authentication mechanism that Home Assistant REST commands cannot handle out-of-the-box.
Create a new app within AppDaemon (e.g. appdaemon/apps/switch_bot_curtains.py):
import appdaemon.plugins.hass.hassapi as hass
from switchbot import SwitchBot

class SwitchBotCurtains(hass.Hass):
    def initialize(self):
        self.register_endpoint(self.switch_bot_curtain, 'switch_bot_curtain')

    async def switch_bot_curtain(self, request, kwargs):
        allowed_commands = ['turn_off', 'turn_on', 'position']
        switchbot = SwitchBot(token=self.args['switch_bot_token'].strip(), secret=self.args['switch_bot_secret'].strip())

        device = None
        data = await request.json()
        self.log(data)
        device_id = data['device_id']
        command = data['command'] if 'command' in data else None
        position = data['position'] if 'position' in data else None

        try:
            device = switchbot.device(id=device_id)
        except ValueError:
            return {'error': 'Invalid device_id'}, 422

        self.log('Command: %s', command)

        if command in allowed_commands:
            self.log('Issuing command %s to device %s with position %s', command, device_id, position)
            if command == 'position':
                device.command('set_position', parameter='0,ff,' + str(position))
            else:
                device.command(command)
            return device.status(), 200
        elif command is None or command == '':
            self.log('Device status for device %s', device_id)
            return device.status(), 200
        else:
            return {'error': 'Invalid command'}, 422
appdaemon/apps/switch_bot_curtains.pyThis specific code sample above is designed for controlling a SwitchBot Curtain Rod 2. However, you should be able to adapt this concept for controlling any SwitchBot device. The following documentation can be useful reference material for making your own modifications to the above sample:
For AppDaemon we need to add the new app to our appdaemon/apps/apps.yaml file:
switch_bot_curtains:
  module: switch_bot_curtains
  class: SwitchBotCurtains
  switch_bot_token: !secret switch_bot_token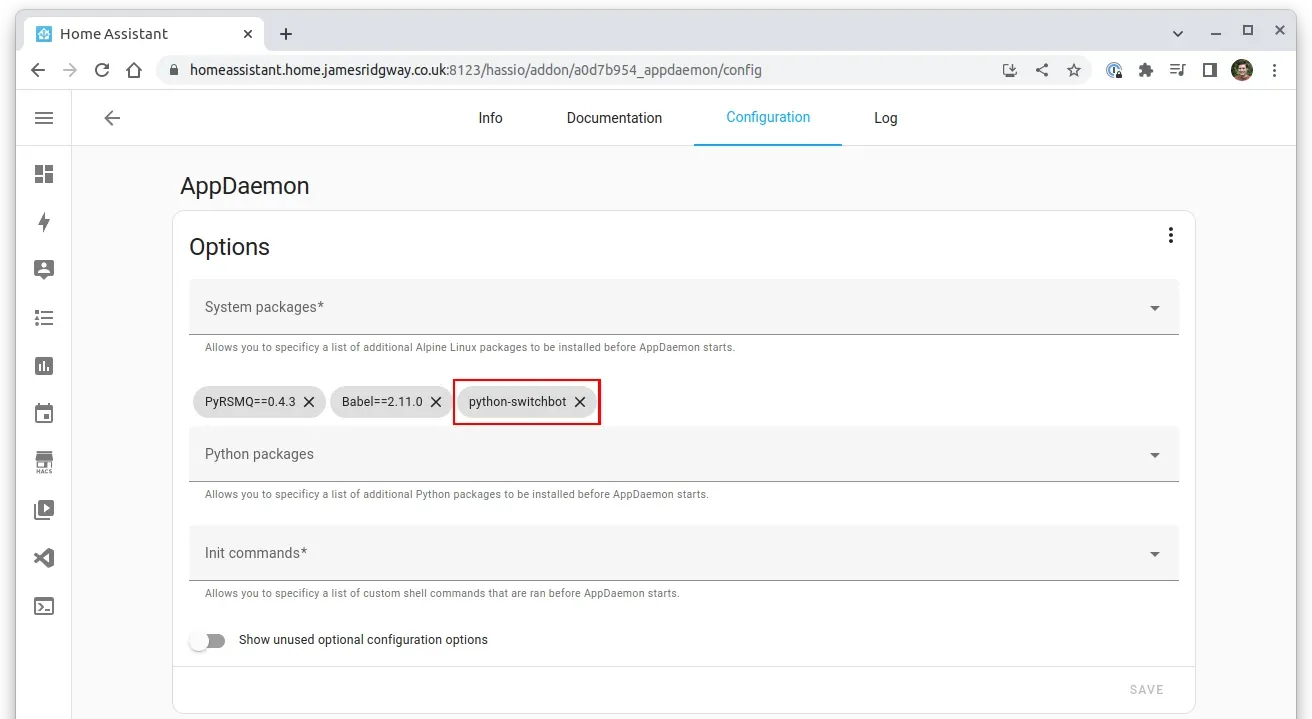
switch_bot_secret: !secret switch_bot_secretappdaemon/apps/apps.yamlGo to the Configuration tab for AppDaemon to ensure that the python-switchbot dependency is installed. After adding the dependency you may need to restart AppDaemon.
Now that AppDaemon is setup, Home Assistant needs to be configured to use our API that we have written in AppDaemon. We can do this using a REST command and a cover template.
My configuration.yaml has a rest_command: !include rest_command.yaml entry which means I have populated by rest_command.yaml as follows:
switchbot_curtain_command:
  url: 'http://192.168.1.5:5050/api/appdaemon/switch_bot_curtain'
  method: post
  content_type: 'application/json'
payload: '{"command": "{{ command }}","device_id": "{{ device_id }}", "position": "{{ position }}" }'rest_command.yamlThis will create a switchbot_curtain_command REST command within Home Assistant, that will allow us to pass command, device_id and position parameters to the REST command.
Similarly, I also have a cover: !include cover.yaml entry in my configuration.yaml that will allow me to put all of my cover configuration into a separate cover.yaml file.
This template entry will allow for the curtains in my office to be controlled via our AppDaemon API endpoint that we've written. The template uses the REST command for open_cover, close_cover, stop_cover and set_cover_position instructions. Each instruction provides a data payload specific to that instruction.
- platform: template
  covers:
    office_curtains:
      device_class: curtain
      friendly_name: "Office Curtains"
      position_template: "{{ states('sensor.office_curtain_position') }}"
      open_cover:
        service: rest_command.switchbot_curtain_command
        data:
          device_id: !secret switch_bot_office_curtain_id
          command: "turn_on"
          position: 0
      close_cover:
        service: rest_command.switchbot_curtain_command
        data:
          device_id: !secret switch_bot_office_curtain_id
          command: "turn_off"
          position: 100
      stop_cover:
        service: rest_command.switchbot_curtain_command
        data:
          device_id: !secret switch_bot_office_curtain_id
          command: "turn_off"
          position: 100
      set_cover_position:
        service: rest_command.switchbot_curtain_command
        data:
          device_id: !secret switch_bot_office_curtain_id
          command: "position"
position: "{{position}}"cover.yamlOur cover.yaml references a sensor for the position_template value. This sensor is defined in our sensor.yaml:
- platform: rest
  name: 'Office Curtain Position'
  resource: 'http://192.168.1.5:5050/api/appdaemon/switch_bot_curtain'
  method: 'POST'
  payload: '{"device_id": "AB12345CDE60"}'
  headers:
    Content-Type: 'application/json'
  value_template: '{{ value_json.slide_position }}'
  scan_interval: 600
  json_attributes:
    - device_id
    - device_type
    - hub_device_id
    - calibrate
    - group
    - moving
- slide_positionsensor.yamlAnd there we go! We have a office_curtains cover device that will allow us to control our SwitchBot curtain device, and the position of the curtains are accessible via the Office Curtain Position sensor!
In this approach we have used AppDaemon to deal with the complexity of the API authentication via the use of the python-switchbot library. This allows us to expose a simpler API that we can consume directly within Home Assistant with the use of a template cover, REST command and a sensor definition.
Conclusion
I originally started following this approach for two reasons:
- I didn't realise for the SwitchBot integration built in to Home Assistant to work I first needed to add the Bluetooth integration
- The authentication mechanism on the SwitchBot API is more complex that what a REST command in Home Assistant can deal with out of the box.
As a result, I conceded that I would have to use AppDaemon to provide a wrapper or facade over the SwitchBot API that I could interact with more simply from within Home Assistant.
This approach would have worked absolutely fine, however, the biggest downfall to this is that the SwitchBot devices don't always seem to respond to API commands, even though the API call is executed successfully.
This resulted in very temperamental and unreliable automations that used my SwitchBot devices.
I ultimately wrote up this experience because this technique of using AppDaemon to provide a simplified wrapper/facade to an existing API could have other applications with devices or APIs for other products/vendors.
However, if you're using SwitchBot devices, avoid their REST API, enable the Bluetooth integration, and just use the SwitchBot integration for Home Assistant – but make sure to use a high-performance Bluetooth adapter.
